Search This Blog

05 June 2023

Marie's Garden Printable Junk Journal Kit Assembly

Make a pretty junk journal / mini album using the Marie's Garden printable kit. In the video below I show you how I put the kit together - no sewing required! Thanks for watching and please like and subscribe!


DOWNLOAD THE KIT: https://www.creativefabrica.com/product/maries-garden-junk-journal-printable/ref/98543/ PRINTER PAPER: https://tinyurl.com/u695h2ec CIRCLE PUNCH: https://tinyurl.com/jjhcrp2r

31 March 2023

Friday Favourites

 Every Friday (more or less 😉) I bring you a graphic, a font and a cut file that I like.  Some will be free and some will be paid for, but all are items that I have downloaded or purchased myself.  

This week's graphic offering is a little bit different.  I came across this Photoshop Stamp Brush Bundle at Creative Fabrica and couldn't believe how much it contained 😲!  There are 136 stamp brush sets, totalling more than 5000 individual brushes!  For those without Photoshop, they also work with Affinity Designer and Affinity Photo.


 A stamp brush is basically a stamp.  Although it is called a brush, you don't paint or draw with it. Rather you stamp individual images on to your canvas wherever the brush passes.  So this could be great for creating textured backgrounds and patterned papers for journals, scrapbooking, cardmaking, sublimation... Basically any crafty project.  At $12 (or included as part of the All Access Subscription) it's an absolute bargain.

I created this gorgeous, textured background using some of the brush sets in this bundle - namely the splash, foil and cracks sets. You can download this background for free here.   I may film a tutorial for creating a digital background like this soon, so consider subscribing to my YouTube channel to keep updated.  

Download this free textured background here

------------------------------------------------------------------------------------------------

This week's font is Rainbow from Creative Fabrica. It is a decorative typeface with 5 different styles - plain, stars, stripes, hearts and circles.  It's super cute and would be a good candidate for use with digital cutting machines.  

If you know your way around a graphics program like Affinity Designer, you could also isolate the outline of the letters to get a solid base for layered effects like I did with the last two examples.


------------------------------------------------------------------------------------------------

With Easter fast approaching, these Easter Egg Lanterns from Design Bundles would be a cute addition to your Easter decorating.  Do you decorate for Easter?  I don't specifically decorate for Easter, but I do like to have a lot of floral decorations around go celebrate Spring.  


And again, if you know how to modify SVGs, you could squish the tabs and replace with Christmas imagery to get decorative ball lanterns for the festive season.

Until next time...

27 January 2023

Friday Favourites

  Every Friday I'll be presenting some graphics, a font and a cut file that have caught my eye.  This week I bring you a gorgeous set of watercolour images featuring floral cameras with birds, an elegant serif font and a set of kitchen-themed monogram frames.


  So first of all, the Watercolor Spring Floral Camera Bundle.  These watercolour images are just gorgeous 😍.  There are 10 PNG images in the set featuring old-style cameras adorned with flowers, birds and butterflies.  


  I used one of the bird images to create my own decoupage sheet, which I then assembled and put in a box frame.  I love the end result.  It was given as a gift but I plan to make another one to put on my own wall.  All of these images would look lovely on a variety of projects, like greetings cards, notebook covers or wall art.


It's difficult to see the 3D in this photo, but it looks great in person!


This week's font is Rise of Kingdom.  This elegant, serif, all caps typeface is available as a free download from Creative Fabrica.  There are over 100 pages of free fonts available on the Creative Fabrica website so it's well worth a look.


  I recently used the font to create this kitchen sign, which also happens to be the cut file of the week:


  The split monogram frame comes from the Laser Kitchen Split Monogram Svg Bundle, although I got it as part of the Cute Paper Craft SVG Mega Bundle both from Creative Fabrica.  (The latter is an absolute bargain by the way, with over 300 sets of SVG cut files for only $11! I might have to do a separate post or two just for that.)  


Happy creating!

22 January 2023

Butterfly Name Sign

  A few weeks ago my friend asked me to make a personalised gift for the daughter of a friend. I used one of the split monogram butterflies from this set.  I welded the name to the butterfly and then turned it into a multi-layered design in Affinity Designer.

  I exported the resulting files as SVGs, which I then imported into my ScanNCut to cut the various layers.  After gluing them all together I decided to use a spray varnish on both sides to protect the card and increase its longevity.


It's so pretty!  To display it tie some string to the antenna or glue it to the back of the butterfly to make a hanger, or put it in a box frame.


SUPPLIES and RESOURCES

Spray and Shine High Gloss Varnish - https://tidd.ly/3D17HPP


19 January 2023

Romantic Parisian Tag

  I recently completed a class on Creative Fabrica about creating a digital tag - From Paris With Love - Create a Romantic French-Inspired Digital Tag.  I really enjoyed it and ended up with a very pretty tag that I really like.

The end result.  I went a bit off-piste, but I like it.

  All the materials that Traci uses in the class are provided and she explains everything really clearly.  Despite the class being demo'd with Photoshop I was still able to follow along using Affinity Designer. However if you are using a program other than Photoshop it would help if you were somewhat familiar with it so that you can replicate what Traci does. 

  The techniques that I learned were actually super helpful in helping me to create the tag that I designed for this post.  I will definitely be putting my newfound knowledge to good use and creating more tags and background papers.  In the meantime you can download a sheet of the tag I created here.

  To view the class you will need an All Access Subscription.  The subscription allows you to download absolutely everything on the site with no limits!  There's a great deal on at the moment where you can get yearly all access for just £4.59 / $4.99 a month (usually £26.99 / $29 per month).  I'm not sure how long that offer is going to be around so get it while you can.  Just head to the Creative Fabrica homepage and click on the "Upgrade Now" button on the blue banner at the top of the screen.

13 January 2023

Friday Favourites

  First off I have to mention this incredible, huge bundle from Digital Attic Studio on Creative Fabrica.  The Ultimate Vintage Bundle consists of 60 individual sets including digital papers, backgrounds, junk journal kits, ephemera and clip art. Even if vintage isn't your thing there are so many elements to choose from that you're bound to find something that you like.


BUT, it's only free for a limited time.  The bundle expires at 23:00 (GMT) on 18th January.

  I created this tag using a handful of elements from the Vintage Celestial Bundle - just one of the kits available in the full bundle. 
-----------------------------------------------------

For the font I have chosen Underwood Champion from Creative Fabrica.  It's a retro, typewriter font with a slightly grungy texture.  I used it to create these sentiment strips mentioned in this blog post.
-----------------------------------------------------

And finally for the cut file I've chosen this cute Welcome Sign from Design Bundles.  The design is listed as a laser cut file, but could definitely work with paper too.  It comes in a layered version or a flat version.  If you're familiar with any graphics program you could modify the files to create your own layered version as well.

Happy creating!

07 December 2022

Easy Christmas Cards feat. Golden Mandala Digital Textures Set

Thumbnail images of the Christmas Mandala Golden Paper Texture Set

I found this lovely set of golden mandala textures on Creative Fabrica and I thought that they would make pretty Christmas cards.  I could have used the images for the whole card front, but I decided to just print them off directly from Windows Explorer.  The resulting images were 9x13cm and would fit nicely on to the front of an A6 card.

Windows Explorer Print Dialogue

I felt that the resulting cards needed a little bit of jazzing up, so I tried out various embellishing techniques like using glitter glue, glitter washi tape, paint markers and Nuvo Drops to enhance the images.  I also tried out different die cut and peel-off sentiments to see which worked best.

Gold acrylic paint marker around the edge of the image, some red glitter glue to highlight the red areas on the image (not very visible in this photo) and a Merry Christmas die-cut sentiment all on a black card blank.


Red glitter around the edge of the image, a few dots of red glitter glue on the image and a Merry Christmas die-cut sentiment. 

Gold glitter washi tape around the edge of the image, a few dots of glitter glue on the image and a Merry Christmas die-cut sentiment.

Gold glitter around the perimeter of the topper and a few spots on the image.  Merry Christmas peel-off sentiment.

They're simple, but pretty cards that can be put together easily; perfect for batch making.  Go check out this designer's shop.  There are lots of gorgeous backgrounds and textures - from Christmas imagery to cotton candy clouds and fairy gardens.  I've downloaded at least 15 of the bundles and plan to add to my collection!

By the way, if you want to buy from the Creative Fabrica website and you're only being given the option to take out a subscription, change the currency to US$ via the drop-down menu in the top right corner of the screen.  You should then be able to see individual prices.

Watch the process video:


01 November 2022

Spooky Faces Wood Slice Ornaments

A quick and easy project today - spooky faces wood slice ornaments.  I used the Halloween Spooky Door SVG Bundle from Creative Fabrica.  I started by importing the images into Canvas Workspace, grouping the faces together and resizing each face so that they were about 45-50mm each before cutting them out.  I used white card, but you could use something a little more robust.


  • Simply paint the wood slice with acrylic paint and leave to dry.
  • Choose a stencil and then apply the glitter paint through it.
  • Carefully lift off the stencil and allow the glitter paint to dry.
  • Done!

SUPPLIES

25 October 2022

Spiderweb Hanging Decoration

 If you've read my blog before you'll know that I am the QUEEN of last minute 👑!  My youngest has been begging me to decorate for Halloween and I've been putting it off.  But with only a handful of days to go I'm going to have to go into Halloween crafting overdrive in order to keep my promise.

So for the first decoration I went back to The Enchanted Forest Bundle from craftbundles.com (I wrote about it here).  It has a few different mini bundles consisting of different forest animals, including spiders!   I chose the design that looks like a hanging cobweb with spider attached.

Black papercut spiderweb with spider hanging decoration


I cut 6 of that design from black card using my ScanNCut, then glued them together back to back.  Don't make the same mistake I did!  Layer them one of top of another without flipping the stack over.  I did not do that and ended up in a bit of a pickle!  But the end result was still very effective.

I used a Spectrum Noir clear sparkle pen to roughly coat the web portions and give them a subtle glittery shimmer.  There were also some round nodule types of things in the design, to which I added 6mm acrylic gems in purple, lime green and orange.  I could probably have used larger gems (up tp 10mm), but I only had the 6mm size in those colours.  The final touch was to add some metallic thread to the hanging loop and then hang it up.

Watch the process video:


20 July 2022

Patchwork Cards 1 - Half-Rectangle Triangles

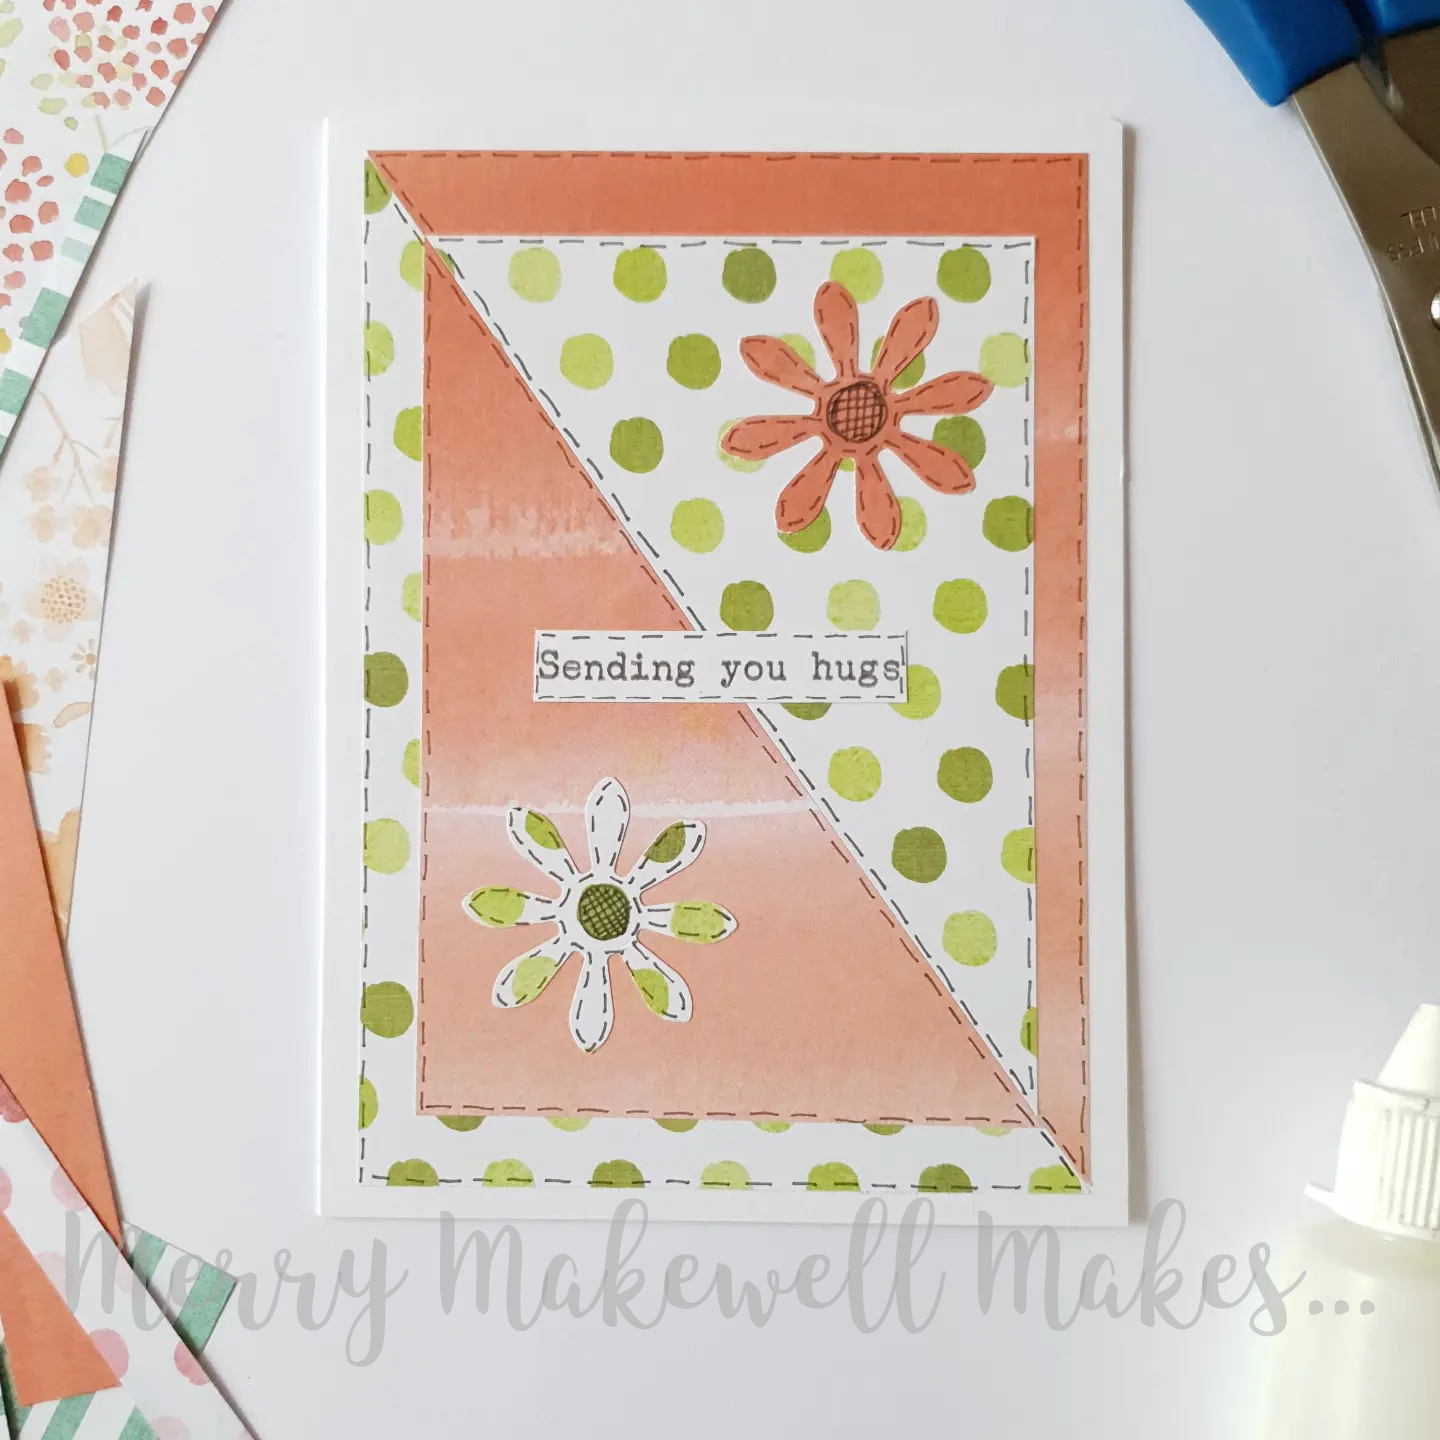
I was looking through some of my (extensive!) paper scraps and came across a card layout that I designed, but never tried.  I thought it would be fun to try it out and share it with you:


To make the card:
  • Trim an A6 card base to 14.5cm (i.e. 10.5 x 14.5cm).  (This step is optional.  I like to do it because it makes the borders around the patterned papers equal.)
  • Cut two rectangles each measuring 9.5 x 13.5 cm and 7.5 x 11.5cm from two contrasting patterned papers. You should have four rectangles in total.
  • Cut each of the rectangles in half across the diagonal. (If you have half-rectangle triangle dies you can just cut the triangles directly.)  Make sure to cut in the same direction on all four of the rectangles.  You should now have four large triangles and four smaller triangles (two each in two patterned papers).
  • Position one of the large triangles in one corner of the card base, leaving an even border around the top and side.  Take one of the large triangles with a different pattern and position it in the opposite corner of the card base.
  • Place a smaller triangle in the middle of a larger triangle so that you have two different patterned papers on top of each other.
  • Use a (black) fineliner to add faux stitching around all the edges. 
  • Cut two flowers (or other shape) - one from each patterned paper and add faux stitching all around the edges. 
  • Glue the flowers (or other shape) towards the right-angled corner of the smaller triangles. You can shape the flowers and only stick down the centres or you can glue them down flat.  It's up to you!
  • Add a sentiment at the centre.
I made some additional cards with slight variations of the same layout by changing the position of the smaller triangle and the shape of the card base.

Variation 1 - Smaller triangles meeting at the centre diagonal. Also flowers are stuck down flat (more like applique).

Variation 2 - Card in landscape orientation and the corners of the smaller triangles are aligned with the corners of the larger triangles.  Also no faux stitching.

Variation 3 - Square card base, smaller triangles meeting along the diagonal (as in variation 1) and alternative faux stitch pattern on the flowers.

Variation 4 - Square card base, smaller triangles meeting along the diagonal and alternative shape used for the embellishment.

Watch the process video:


SUPPLIES
  • A6 card blank
  • Two types of patterned paper in contrasting colours.
  • Scissors / Trimmer / Guillotine
  • Glue
  • (Black) Fineliner pen  <0.3mm

22 June 2022

Metamorphosis - Junk Mail to Art Journal

You know those little booklets that you sometimes get in the post?  The mini supermarket catalogues, or the insurance policy booklet that you'll never look at again?  Well, I've been keeping a few aside with the intention of turning them into art journals.  

I started with the cover and I love how it turned out!


  • To start I put down a layer of Pearl Diamond White acrylic paint.
  • It was quite transparent so I went over it roughly with Titanium White acrylic paint, leaving some areas of the pearl white exposed.
  • When it was dry I added patches of Mermaid Lagoon and Ripe Persimmon Distress Stain, and Turquoise iridescent acrylic paint, which I blended out with a brush.
  • I stamped small circles of various sizes and with various line patterns in teal ink in a cluster toward the bottom left and top right of the page.
  • Then I used a paisley and script stamp with black ink to add some additional texture to the background.  To avoid a really bold stamp I used second and third generation stamping.
  • I added gold glitter paste through a stencil with small circles randomly across the page.
  • For the focal point I chose a printout of a turquoise butterfly that I thought matched the background a bit.  The image had gold areas, which I went over with gold glitter glue for added interest.
  • I placed the butterfly at the centre and traced around it with a black gel pen.  I then used a damp brush to soften the outline - making it more of a shadow.
  • I stamped the word "metamorphosis" onto plain white card, cut it out and then positioned it in the bottom right corner of the page.
  • And that was the page done!
These booklets tend to have decent quality paper and it took the paints well.  I think that starting with acrylic paint as the base layer also helped.  

The underlying print adds some extra interest to the page.  The paint layers are not completely opaque so although you can't see it clearly, the light and dark areas of the original print do show through in places.

I thought that the phrase "metamorphosis" was very apt as it not only described the process by which a caterpillar turns into a butterfly, but also the transformation of the booklet into an art journal.

So next time you get a junk booklet in the mail, don't throw it out. Turn it into an art journal instead!


SUPPLIES

31 May 2022

Stay Wild Hanging Heart

Earlier this year I downloaded the Copper Tiger digital paper set by Digital Curio (via Creative Fabrica).  


I plan to do a series of tiger-themed crafts throughout the year to celebrate the Year of the Tiger.  I finally sat down a couple of weeks ago to make this hanging heart idea that I had.


I have used the paper set exclusively.  The only extras I used were the gem for the flower centres and the letter dies that I used to make the words.  You could also use a digital cutting machine to cut the letters.  Apart from the slightly wonky lady, I really like how it turned out ☺.

PROCESS

  • Prepare the heart base.  I used 4 layers cut from old cereal boxes and glued together.
  • Choose one of the papers for the background.  Print it out and trace around the heart base, then cut it out and glue onto the heart.
  • Go around the edge of the heart with a sanding block (optional).
  • Print out a couple of the leafy papers and fussy cut a variety of leaves.  I cut nine leaves. 
  • Print out the art deco style black and gold paper and cut 5 of the fan shapes.
  • Print the lady and the sitting tiger clip art making sure to resize them to match the size of the heart base and cut them out.
  • Use the uppercase die set to cut the letters S, T, A, Y from the copper textured paper.
  • Use the lowercase die set to cut the letters w, i, l, d, from one of the tiger skin paper.
  • Position the lady and the tiger towards the centre of the heart.  It doesn't matter if the tiger overhangs the edge a little bit.
  • Position the lettering in the top right of the heart.
  • Add one of the smaller leaves underneath the words as a flourish.
  • In the top left corner use the art deco style elements to create a flower.  Glue them down around a central point leaving the edges free.
  • Add a gem in a coordinating colour to the centre of the flower you created.
  • Arrange a few of the leaves around the flower, slotting them in behind the petals.
  • Add some string or other fixing method to the back of the heart.

SUPPLIES

18 March 2022

Friday Favourites - House Plant Laser Cut Files

I like to keep a regular check on new products added to the Design Bundles Plus products pages.  Under the "Crafters" - "Laser Cutting Designs" filter there are literally thousands of cut files designed for laser cutting with new files being added daily.  I don't have a laser cutter (yet!) but I still like to stalk the pages for items that would work with card or greyboard on my ScanNCut.

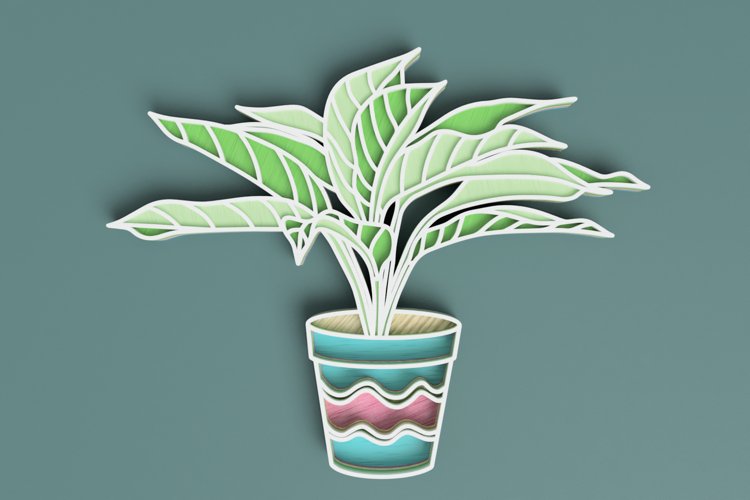
There are a load of layered house plant cut files that I really love.  They would look wonderful in their own right as wall art, but would also make great toppers for cards, scrapbook embellishments, fridge magnets and so on.


Head over to Design Bundles to take a look.  The files are part of the Design Bundles Plus membership, so you would have to become a member to download them.  However the first month is just $1 and you get 10 free Plus credits as soon as you sign up.  And you get to keep any Plus purchases even if you cancel the membership.  Each of the files above are just one plus credit each, so you could buy them all and have credits to spare!

23 February 2022

Heart Flower Collage

14 days of hearts - no. 6

I had some background papers leftover from this project so I decided to make something similar, but on a heart base.  I used a 100mm canvas board heart that I had lying around, but you could use any other type of heart substrate or glue several die cut hearts together to make a strong base.


PROCESS

  • Cover the heart in glue and then add strips of old book pages or newsprint background paper making sure to glue down any overlapping edges.
  • When dry paint lightly over the surface with white acrylic paint using a dry brush.  The aim is to soften the appearance of the text, but not to completely obscure it.
  • Using a dry brush again, paint around the edge of the heart with black paint.
  • Cut about 16 pointed ovals (petals), each about 1-inch long, from coloured patterned paper.
  • Use a hole punch or cut a small circle from scrap card.
  • Glue the (petals) around the circle to create a flower shape.  
  • Cut several smaller petals from the same coloured patterned paper and glue those around the centre of the flower. 
  • Add additional petals in the gaps between petals (optional) to fill out the flower.
  • For the stamens cut thin strips about 1/2 inch long from yellow patterned paper.
  • Glue them around the centre of the flower (tweezers would be very useful here!).
  • Use a hole punch or cut a small circle from the yellow patterned paper and glue that to the very centre of the flower.
  • Glue the completed flower to the canvas base.
  • Cut 3 leaf shapes about 1 1/2 inches long from green patterned paper and slot them in behind the flower.


SUPPLIES:


22 February 2022

Geometric Watercolour Heart - Metallics on Black

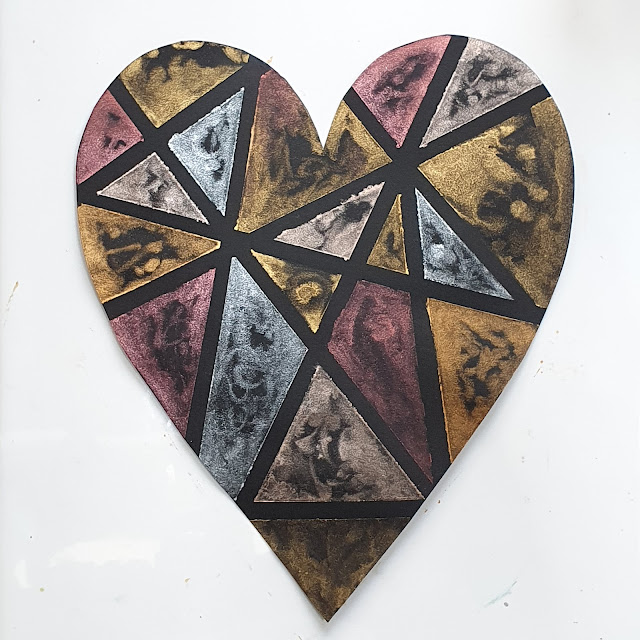
In my last post I painted a geometric watercolour heart with metallic watercolours.  I wanted to see what the finished result would look like if I used black card instead of white.  

I used exactly the same method, but as I didn't have black watercolour card I used plain crafting card.  I also decided to stick with purely metallic shades - gold, silver, aztec gold and copper.


As the card was not watercolour card the paint didn't flow in the same way as it would have with watercolour card.  I'm not sure if I like it 😄.  Perhaps I'd like it more with solid, even coverage 🤷🏾‍♀️.

As the method is exactly the same, take a look at this post for step-by-step instructions.

SUPPLIES

  • Black card (black watercolour card if you can get it)
  • Metallic watercolour paint (I used Arteza metallic watercolours.  At the time of writing they were not available in the UK, but were available in the USA.  For the UK check Craftstash and Cass Art for alternatives).

17 February 2022

Geometric Watercolour Heart

14 days of hearts - no. 4

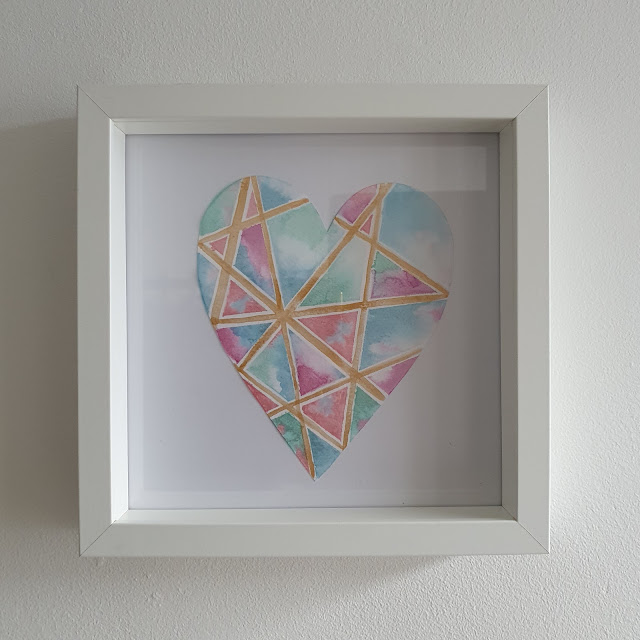
My ScanNCut is being tempremental so I've forgone any cutting for today's heart.  I've pulled out my Arteza metallic watercolour paints to create this pretty geometric heart.  The colours I used were Cactus Green, Sky Blue, Plum Purple and Watermelon Pink.


  • Cut a heart from watercolour card.
  • Cut lengths of masking tape into thin strips.
  • Arrange the strips onto the watercolour card to create a geometric pattern
  • Wet the entire surface of the heart.
  • Drop colour into the sections allowing the colour to flow.  You might need to re-wet the surface if sections have dried.
  • For more of a watercolour effect don't completely cover the sections with paint.  You can also add more than one colour to a section and let them blend together.
  • Let the paint dry (use a heat tool to speed up the process).
  • Carefully remove the tape.
  • You could leave the heart at this point, but if you like, paint over the newly revealed white channels with gold paint.
  • Let the paint dry.
  • Place in a frame and hang as wall art.  It would also make a nice gift.


Watch the process video:


SUPPLIES

  • Watercolour card - I used Crafter's Companion 300gsm watercolour card.
  • Metallic watercolour paint - I used Arteza metallic watercolours but these are currently not available in the UK.  At time of writing this they are available in the USA.  Alternatively Altenew also do a metallic watercolour set. Also check Craftstash and Cass Art for alternatives.
  • Masking tape

16 February 2022

Filigree Heart

14 Days of Hearts - No.3

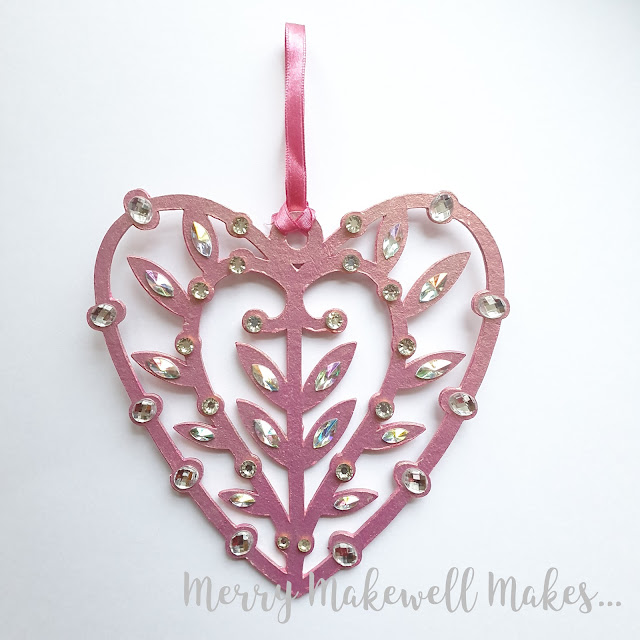
I saw this pair of hearts, designed by Nic Squirrell and thought that they would work really well with gems or pearls on the round elements of the design.

Two Filigree Hearts SVG Cut Files


I used the heart on the left and made a slight modification in Canvas Workspace to add a little hanging loop to the top.

  • Add the file to your cutting machine software and set the desired height.  I chose 150mm.
  • Cut four layers from cardstock and glue them together.  This will give a sturdy structure.
  • Paint the stack.  I used "Glowing Peach" iridescent acrylic paint by Arteza.  (It has a pinkish base with gold shimmer.  The colour changes depending on the angle from which you view it.)  I painted both sides, but that is optional.
  • Once the paint is dry glue a selection of gems to the various corresponding elements in the paper cut.  I used horse eye, round and oval gems.
  • Add a ribbon or string to the hanging loop.


Process video (short):


Supplies


15 February 2022

Rolled Paper Flower Heart

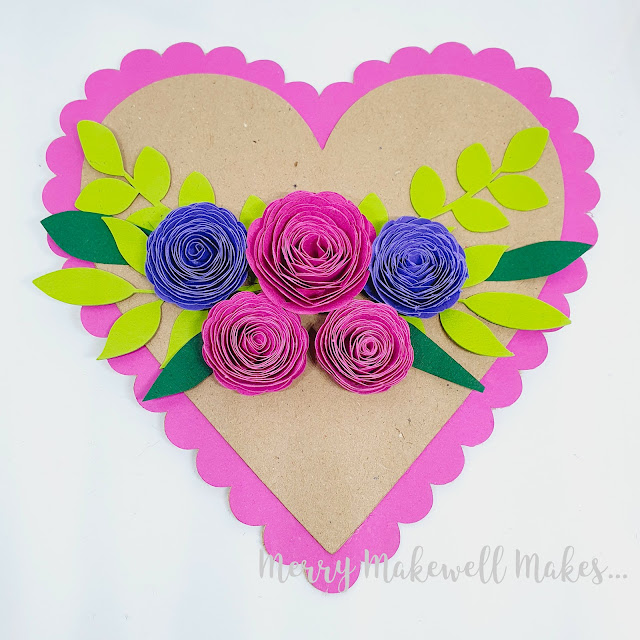
For the second heart in the 14 Hearts series, I decided to keep it simple with just a few rolled paper flowers and some foliage.  I really like the combination of bright colours with Kraft, so that was the colour scheme I chose.


  • Cut 2 scalloped hearts (145mm) from Kraft card and one from pink card.
  • Glue together.
  • Cut 2 hearts (125mm) from Kraft card and glue together.
  • Glue the smaller heart to the scalloped heart.
  • Cut 3 rolled paper flowers with the heart-shaped petals from pink paper.  (I used 135gsm. The large flower was set to130mm width and the smaller flowers were set to 100mm width.)
  • Cut 2 rolled paper flowers from purple paper (I set the size to 100mm width).
  • Cut various types of foliage from green card. Use different shades for added interest.
  • Make the flowers 
    • start from the outside and roll towards the centre
    • Keeping a loose hold of the top and bottom of the rolled flower allow it to unfurl a little.
    • Add glue to the end of the flower and hold it firmly against the bottom of the flower (use hot flue for quicker adhesion).
  • Glue the foliage down.
  • Glue the flowers down starting with the large pink flower at the centre and arranging the smaller flowers around it.

Process video (short):


Supplies

Heart/Scalloped heart cut files - pre-installed on Brother ScanNCut
Kraft Card
Coloured Card

14 February 2022

Mer-made for Each Other

Happy Valentine's Day 💝.  

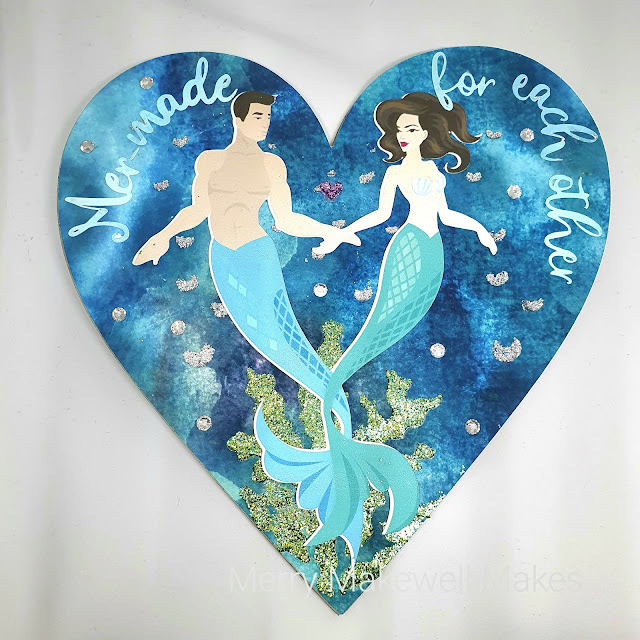
I thought it would be fun to do 14 days of love by making 14 hearts, starting today with this punny heart.


PREPARATION
  • Download items from the supplies list below.
  • Import the mercouple clip art (the artwork comes both coloured and black and white) into graphics program and resize to fit a 150mm x 150mm heart (my couple were 125mm tall).  Then printed that out.
  • The download includes jpg, png and svg formats.  Import the svg into Canvas Workspace and isolate the outer line only and export that to cut out the clip art. 

  • Scan the print layout of the mercouple into the ScanNCut (I really love that feature!), then line up the outline and cut out the couple.
  • Using the pre-installed shapes on the ScanNCut cut four (4) 150mm hearts from 0.6mm greyboard, and one (1) heart from patterned paper printed from the Serene Digital Waters collection.
  • I created the text (Mer-made for each other) in Canvas Workspace and used the "Fit to Path" function to get the text to curve around the top of the heart.
  • Cut the text from patterned card printed from the Serene Waters Digital Textures pack.
  • Cut out the Seaweed Stencil, resized to 200mm x 200mm from thick (Kraft) card.
ASSEMBLY
  • Glue the 4 greyboard hearts together.  This will give a nice, rigid base.
  • Glue the patterned paper heart to the top of the greyboard stack.  (Leave to dry under something heavy so it doesn't warp.)
  • Mix three green shades of Aladine Izink Diamond Paint (turquoise, dark green and light green) and then pass that through the stencil at the bottom of the heart. (I chose to mix the colours but that is optional.)
  • Use silver Diamond Paint through the stencil to create bubbles.
  • Leave to dry, then glue the mercouple to the centre of the heart.
  •  Glue the text around the curve top of the heart.
  • Add some clear acrylic gems randomly across the heart.
  • Add a small heart between the couple. (I used Diamond Paint in pink.  If making this again I would make the heart bigger). 
  • Go over the mercouple's tails with a clear glitter pen so that they are glistening. (I didn't do that until after I'd taken the photo, but I like how it looks.)

Check out the process video:


Supplies:
Alafyou Swirly Font (download free as part of the Huge Font Bundle until 25/02/2022)
Acrylic gems

17 January 2022

Sundial Twisted Easel Card

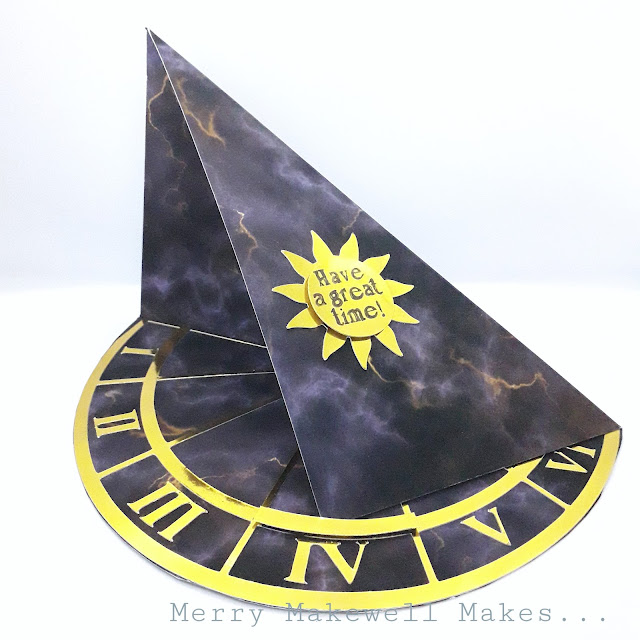
I recently updated my Skillshare class - "Create Dimensional Greetings Cards that Wow! - 1. Easel Card" with a couple of additional lessons.  In the lessons I show how to make a twisted easel card and I create a sundial card as an example of how to use the shape for maximum effect.


I am so happy with how it turned out!  I can't say that I've seen a card like this before so I'm claiming it as my invention!

Head over to Skillshare to watch the class.  If you're not already a member clicking the link will give you a 14-day free trial, and 1 free month if you then sign-up.