Search This Blog

Showing posts with label papercraft. Show all posts

31 May 2022

Stay Wild Hanging Heart

Earlier this year I downloaded the Copper Tiger digital paper set by Digital Curio (via Creative Fabrica).  


I plan to do a series of tiger-themed crafts throughout the year to celebrate the Year of the Tiger.  I finally sat down a couple of weeks ago to make this hanging heart idea that I had.


I have used the paper set exclusively.  The only extras I used were the gem for the flower centres and the letter dies that I used to make the words.  You could also use a digital cutting machine to cut the letters.  Apart from the slightly wonky lady, I really like how it turned out ☺.

PROCESS

  • Prepare the heart base.  I used 4 layers cut from old cereal boxes and glued together.
  • Choose one of the papers for the background.  Print it out and trace around the heart base, then cut it out and glue onto the heart.
  • Go around the edge of the heart with a sanding block (optional).
  • Print out a couple of the leafy papers and fussy cut a variety of leaves.  I cut nine leaves. 
  • Print out the art deco style black and gold paper and cut 5 of the fan shapes.
  • Print the lady and the sitting tiger clip art making sure to resize them to match the size of the heart base and cut them out.
  • Use the uppercase die set to cut the letters S, T, A, Y from the copper textured paper.
  • Use the lowercase die set to cut the letters w, i, l, d, from one of the tiger skin paper.
  • Position the lady and the tiger towards the centre of the heart.  It doesn't matter if the tiger overhangs the edge a little bit.
  • Position the lettering in the top right of the heart.
  • Add one of the smaller leaves underneath the words as a flourish.
  • In the top left corner use the art deco style elements to create a flower.  Glue them down around a central point leaving the edges free.
  • Add a gem in a coordinating colour to the centre of the flower you created.
  • Arrange a few of the leaves around the flower, slotting them in behind the petals.
  • Add some string or other fixing method to the back of the heart.

SUPPLIES

23 February 2022

Heart Flower Collage

14 days of hearts - no. 6

I had some background papers leftover from this project so I decided to make something similar, but on a heart base.  I used a 100mm canvas board heart that I had lying around, but you could use any other type of heart substrate or glue several die cut hearts together to make a strong base.


PROCESS

  • Cover the heart in glue and then add strips of old book pages or newsprint background paper making sure to glue down any overlapping edges.
  • When dry paint lightly over the surface with white acrylic paint using a dry brush.  The aim is to soften the appearance of the text, but not to completely obscure it.
  • Using a dry brush again, paint around the edge of the heart with black paint.
  • Cut about 16 pointed ovals (petals), each about 1-inch long, from coloured patterned paper.
  • Use a hole punch or cut a small circle from scrap card.
  • Glue the (petals) around the circle to create a flower shape.  
  • Cut several smaller petals from the same coloured patterned paper and glue those around the centre of the flower. 
  • Add additional petals in the gaps between petals (optional) to fill out the flower.
  • For the stamens cut thin strips about 1/2 inch long from yellow patterned paper.
  • Glue them around the centre of the flower (tweezers would be very useful here!).
  • Use a hole punch or cut a small circle from the yellow patterned paper and glue that to the very centre of the flower.
  • Glue the completed flower to the canvas base.
  • Cut 3 leaf shapes about 1 1/2 inches long from green patterned paper and slot them in behind the flower.


SUPPLIES:


15 February 2022

Rolled Paper Flower Heart

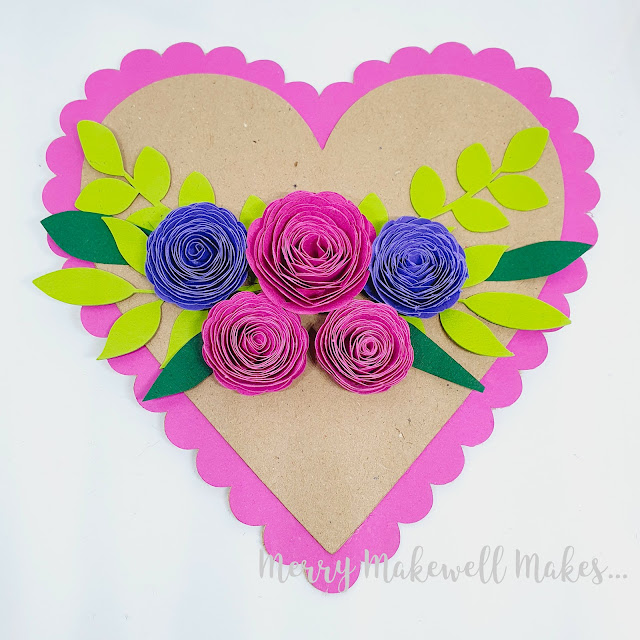
For the second heart in the 14 Hearts series, I decided to keep it simple with just a few rolled paper flowers and some foliage.  I really like the combination of bright colours with Kraft, so that was the colour scheme I chose.


  • Cut 2 scalloped hearts (145mm) from Kraft card and one from pink card.
  • Glue together.
  • Cut 2 hearts (125mm) from Kraft card and glue together.
  • Glue the smaller heart to the scalloped heart.
  • Cut 3 rolled paper flowers with the heart-shaped petals from pink paper.  (I used 135gsm. The large flower was set to130mm width and the smaller flowers were set to 100mm width.)
  • Cut 2 rolled paper flowers from purple paper (I set the size to 100mm width).
  • Cut various types of foliage from green card. Use different shades for added interest.
  • Make the flowers 
    • start from the outside and roll towards the centre
    • Keeping a loose hold of the top and bottom of the rolled flower allow it to unfurl a little.
    • Add glue to the end of the flower and hold it firmly against the bottom of the flower (use hot flue for quicker adhesion).
  • Glue the foliage down.
  • Glue the flowers down starting with the large pink flower at the centre and arranging the smaller flowers around it.

Process video (short):


Supplies

Heart/Scalloped heart cut files - pre-installed on Brother ScanNCut
Kraft Card
Coloured Card

21 July 2021

Floral Collage Canvas

So, you've accumulated a load of patterned papers (either physical or digital), but you have no idea what to do with them.  At least, that's a problem that I have. I'm not a prolific card maker, nor do I scrapbook, but I can't resist a pretty patterned paper or an interesting background texture.  So what to do?  Collage, that's what!

I tend to overthink things and spent ages trying to decide what to collage.  In my mind I felt like it needed to be some grand, artistic piece.  But it really didn't have to be so complicated.   In the end I went with a simple floral layout inspired by an embroidery design.

I used papers from my digital stash, but any papers would work.  This would actually be a great project for using up paper scraps.  I chose a newsprint, a pink paper with a a slight texture for the flowers, two different green papers for the stems and leaves, yellow paper for the flower centres and a lovely bluey-purple paper for some berries.  I've listed links to all the papers used at the end of the post.


Step-by-step

1.  I printed out three sheets using one of the designs in the Old Newspaper Textures set.  The original file is a 12 x 12 sheet and the text was quite large.  So I resized it a couple of times to make the print smaller.  I tore pieces from all three sheets and stuck them down on the canvas board trying to get a nice mix between the different text sizes.


2.  Using the pink sheet I cut a strip about one inch wide and then cut about 30 petals shapes.


3.  I arranged the petals on to the canvas board to create 3 flower heads.


4.  I cut thin stems from one of the green papers and various sized leaves from the other green paper, then arranged them onto the board.


5.  I cut a few small circles for berries from the blue-purple paper and three yellow circles for the flower centres and added them to the piece as well.


At this point the collage was finished, but I felt like it didn't stand out from the background enough. So I went around the edges of the petals, leaves and berries with my Derwent Inktense pencils to help lift the composition off the page.  I think that I might have overworked it a bit, but it does seem to have done the job and I still like the end result.  (Original on the left, "enhanced" on the right.)


Tutorial

Watch the process video on my YouTube channel.


SUPPLIES

5 x 7" Canvas Boards  (you could also use scrap cardboard)
Derwent Inktense Pencils

Backgrounds and digital papers:
Glop Wallpaper 08 (sample freebie available with fewer backgrounds) [apple green paper]
Glop Wallpaper 16 (sample freebie available with fewer backgrounds) [pink paper]
Pattys Desert Strips 3 Bundle (sample freebie available with fewer backgrounds) [blue-purple paper]


06 July 2021

Converting Fonts to Cut Files for Electronic Cutting Machines


I really like the papercut effect of the font Monogram Daishy In order to create an actual papercut monogram with my ScanNCut I would need to convert the font from OTF/TTF formats to a compatible format. The FCM format is specifically for the ScanNCut. The SVG format will work with most electronic cutting machines including the ScanNCut.  


Converting fonts for the ScanNCut

Simply using the text tool in Canvas Workspace doesn't always work.  With more complicated or intricate designs the cut lines can end up crooked and jumbled and would absolutely not work as a cut file.


Monogram Daishy Font in Canvas Workspace using text tool


The easiest solution is to use the ScanNCut Type Converter - a free program that you can download from the Brother website for converting OpenType and TrueType fonts to FCM cut files.  

Brother ScanNCut Type Converter overview


You can only type a single line of text into the converter and it all has to fit within the 30cm (12") width of the mat, so you may have to either save the letters individually or in small groups depending on the size of the font.  My preference is to save as many letters as possible in one go and then resize them in Canvas Workspace afterwards. 

You can clearly see the difference between using the text tool directly in Canvas and using the Type Converter before importing the file into Canvas.


Monogram Daishy Font in Canvas Workspace using Type Converter


Bear in mind that some font designs are best suited for larger scales due to the intricacy of the design or areas with narrow lines and small apertures.  Also some font designs might not translate well to a cut file, for example if the style is sketchy.

I am not familiar with Cricut Design Space or Silhouette Studio, but you can also create cut files from fonts by using a graphics program to convert the font to SVG format.  


How to convert a font to an SVG in Affinity Designer 


- open a new document.  
- select the Type Tool (1) and type out your letter(s).  
- select "Layers - Convert to Curves" (2 and 3).  


- select a colour for the stroke and set the stroke width to >0pt. 


- with the letter(s) selected, go to "File - Export..."
- select "SVG" for the file format and "selection only" for the Area (to export only the areas of interest and not the whole page)


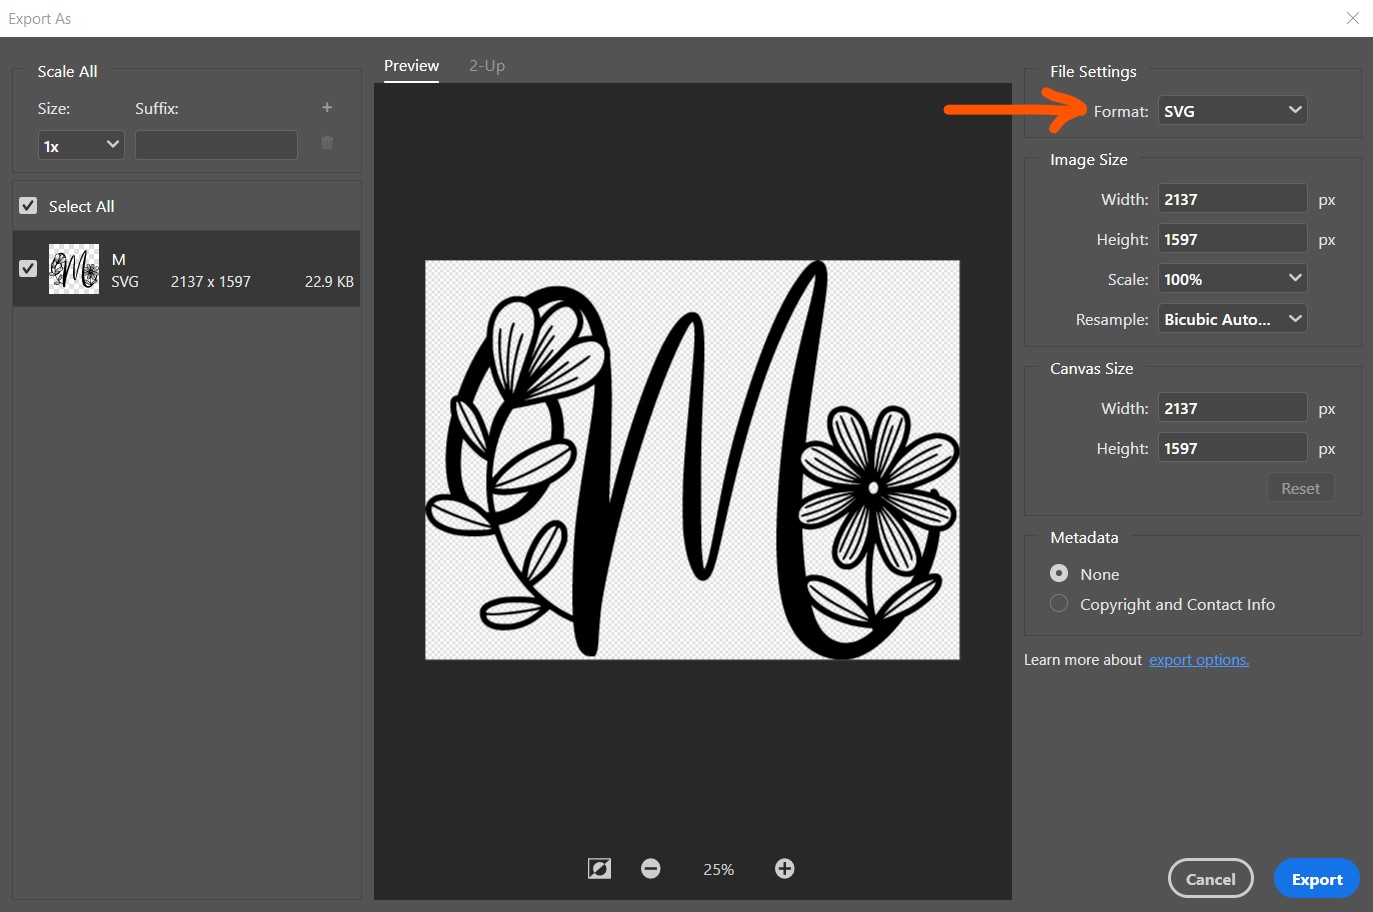
How to convert a font to an SVG in Photoshop


- open a new document.  
- select the Type Tool (1) and type out your letter(s).  
- select "Type - Convert to Shape" (2 and 3).  


- select "Layer - Export As..."

- then select SVG for the format and click export.


The font is now ready to use with your cutting machine! 

Get the Monogram Daishy Font:

Explore more great monogram fonts here, here and here.

12 October 2020

More Decoupage Flowers

So, I might be a little obsessed.  After my first marathon flower making session I was inspired to dig out some of my old die sets to create even more.  I was shocked to discover that some of said die sets had not been used since they were bought in 2018! I'm not even sure that they're still available to buy.  I did buy the Tattered Lace Floral Decoupage Delights Vol. 1 and Vol. 2 USBs though, because as I said I might be a little obsessed!  Vol. 1 sold out in record time, but at the date of writing this Vol. 2 is still available from Create and Craft TV.


The flowers shown here are a mixture of old dies and a handful from Floral Decoupage Delights Vol. 1.  I haven't even made it to Vol. 2 yet, so I see a lot more flowers in my future 🔮.


EDIT 13/02/2022

The Floral Decoupage Delights USBs are no longer available, but individual SVG cut files and corresponding Charisma artwork can be downloaded from the Create and Craft website.

01 October 2020

Tattered Lace Decoupage Flowers - Favourite Florist Collection

*This post contains affiliate links.  Read the Disclaimer for more information. 

 I am weak for any Tattered Lace 3D decoupage floral dies.  I love them, but unfortunately my wallet doesn't always allow me to indulge myself.  But a few weeks ago there was a 50% off sale at Create and Craft so I took the opportunity to bag a few from the Favourite Florist collection ðŸ™Œ.  

The collection consists of 6 "In the Garden" flowers, which as the name suggests are flowers that you would find in your garden, and 6 "In the Field" wildflowers, and they come with free downloadable coloured images (a.k.a. Charisma).  I purchased the Peony, Hyacinth, Lily and Pelargonium dies from the "In the Garden" collection and the Lavatera and Wild Rose from the "In the Field" collection.  


I spent a good while playing around with the colours in a graphics program (because the Charisma images only came in one colour) and then printing, cutting and putting them together.  My favourites are the Hyacinth and Lavatera dies.  Lily and Peony are also very pretty with lots of decoupage elements.  The wild rose is very pretty as well, but it would have been nice to have a few more decoupage elements.  The Pelargonium is OK but I have another geranium/pelargonium die set from a different collection that I much prefer.  

You can use foam tape to put these together, but I used Pinflair glue gel.  It's crystal clear and odourless and gives great dimension.  Now I just have to figure out what to do with all these flowers...

09 July 2020

Tattered Lace Sensational Flower and 3D Flower Pot Dies

*This post contains affiliate links.  If you click on the link and subsequently make a purchase you will not be charged extra, but I will receive a commission.

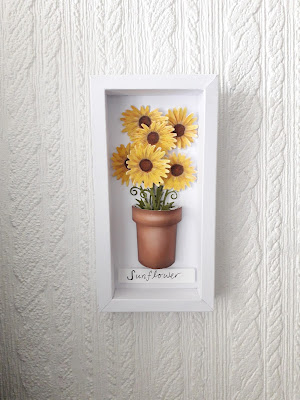
A few weeks ago I managed to snag a great deal from Create and Craft.  The offer was to get the Sensational Flower and Flower Pot die sets at effectively half price (BOGOF).  It looked so cute and I like the 3D element and I like miniature stuff so.....

Tattered Lace Sensational Flower and Flower Pot in Yellow and displayed in a shadow boxTattered Lace Sensational Flower and Flower Pot in Purple and displayed in a shadow box


The flowers and pot come with Charisma (which for the uninitiated is a pre-coloured image that fits the die perfectly that can be downloaded from the Create and Craft website).  The flowers come in yellow and purple, with a couple of additional stems and flower heads so that you can decoupage or fill out the bouquet.  If you have access to a graphics program the colour could be changed to anything you like!  So you could have sunflowers, gerberas, daisies or other similar flowers. I actually recoloured both colour options using alcohol markers because they came out a little more pastel on my printer and I wanted a bold colour. 

The pot comes in terracotta only but again could be recoloured and the die set comes with some additional lacy details that could change the look completely.  I'm going to see if I can get a glazed ceramic look by using Glossy Accents.  You could even stick two halves together to get a free-standing pot and flower display.

The BOGOF deal is no longer available but at the time of publishing you can still get the Sensational Flower die set and the Flower Pot die set for £14.99 each from createandcraft.com.

30 March 2020

Tattered Lace 3D Miniatures - Hot Air Balloon

This post contains some affiliate links (denoted by *).  If you click on a link and make a purchase there will be no extra cost to you, but I will receive a commission.  

Tattered Lace recently released a new collection - the Butterfly Garden Collection.  Part of the collection consists of seven die sets that create miniature items.  There's a hot air balloon, a violin, a jukebox, a teacup, a perfume bottle, a dresser and an alarm clock. 

Now, I love die cutting and I love all things miniature so there was really never going to be any other outcome than making the set mine, plus all seven sets were available at a ridiculously good price (just over half price) from Create and Craft*.  At the time of writing said multi-buy deal is still available at Crafting.co.uk, but only a couple of the individual die sets are available on either site.


I decided to try out the Hot Air Balloon first.  The set creates half of a hot air balloon.  Charisma (Tattered Lace's pre-coloured graphics that work with the die set) artwork is available to download for each of the die sets for free.  If you wanted you could cut the pieces out twice to make a fully 3D miniature, but I love how it looks in a box frame.


I made an A6 box frame and painted the inside blue using watercolour paint.  I die cut three clouds and then used a fineliner to draw in some bird silhouettes.  The end result is really cute.  I'd also like to try cutting the balloon from plain card and making up my own designs and also having multiple designs in a larger box frame.  It would look really sweet in a nursery or kid's bedroom.

Note - this is not the die set for you if you have poor eyesight or any sort of issues with manual dexterity. 

23 December 2019

Space Themed Name Plaque

This post contains affiliate links. If you click the link and then make a purchase it won't cost you any more, but I will receive a commission.

Last weekend my youngest had a birthday party to go to. I decided to make a name plaque for the birthday boy.  I know he likes football, but I wanted to go with something different. I had the Star Studded font in mind and so a space theme seemed like a good fit.

For all the components I glued 4 layers of 280gsm Kraft card together using PVA glue.  When the glue dries the resulting stack is nice and stiff and has the feel of chipboard or MDF.  I left them under something heavy while drying to prevent warping.

I started by creating the plaque base with my Brother Scan N Cut by welding rectangles and semi-circles together on the mat.  Rough dimensions were 20 x 10 cm rectangle + 25 x 7.5 cm rectangle + 2 x semi-circles with 50mm diameter.  Added 2 x 0.5cm holes at either end for hanging.  I also printed out the space background from a digital download collection from Creative Fabrica and cut one plaque shape from that.

I then cut the letters and saved the starry waste to use as small embellishments.   The actual font was a little more squat than I wanted so this is a slightly elongated version to fit the plaque better.  I used silver acrylic paint to cover the letters and stars.
The moon and planet were from the library of files that come pre-loaded with the Scan N Cut machine. Again I used acrylic paint on those.  Then it was simply a case of assembling the components.

Resources:
Star Studded Font
Space Watercolor Backgrounds

05 December 2018

Snowflake Christmas Card

Every year Christmas manages to sneak up on me! You'd think by now I'd have cottoned on, but come the beginning of December I'm always astounded by how close the big day is.  I have managed to make a few Christmas cards though.

This card is based on an old design that I made with white and Kraft card.  The snowflake is actually a doily (Couture Creations Cecily Doily), but I thought that it looked very much like a snowflake and would look great against a snowy background.

I cut the doily in half and placed each half at the top and bottom of the card.  I added a few pearls to some of the circles within the doily for a bit of extra prettiness.  The "Merry Christmas" sentiment is from another Couture Creations set - Merry Layered Stars.

This design, although simple does take a bit of time to complete because of adding small dots of glue to the doily die cut and sticking on the pearls, but could easily be modified to make it quickly reproducible.

  • At first I created the background using paint splatters on blue card, but to save time I used a graphics program to create my snowy background. Download it here
  • Use a double sided adhesive sheet with the doily die cut or a brayer to apply the glue to save time
  • Use self-adhesive pearls or pearl enamel drops (much less fiddly than loose pearls).

I have an extra Cecily Doily and Merry Layered Stars set on eBay if you'd like to recreate this card:

Get the Cecily Doily Die
Get the Merry Layered Stars Die Set

21 July 2018

Quick and Easy Hanging Heart

This post contains affiliate links.

My friend came to me a few days ago to ask for my help to make a last minute teacher gift.  She requested a hanging heart that said "Athrawes gorau" (Best Teacher in Welsh) and personalised with the teacher's name and her son's name and featuring the colour purple.  


To make the heart I cut five hearts from white 300gsm cardstock, and one from Kraft card.  I punched holes in each of the curves at the top of the heart then stuck all the layers together using PVA glue 
with the Kraft heart at the back.  (I used my ScanNCut to cut the hearts but a die would also work.  If you don't have a die cutter or cutting machine I recommend using a square or a rectangle.)  To prevent the stack from warping I put it under a heavy stack of books as it dried.  When dry it feels very sturdy - like chipboard.

Meanwhile I found some pretty digital background paper and in a graphics program I used the heart template as a guide to place the text before cutting it out with the ScanNCut and sticking it to the top of the heart stack.  Incidentally the fonts that I used for the teacher's name and the sentiment are Old Emma Decorative and King Basil (which I love).

To finish I printed out some flower and leaf graphics, cut them out and added them to the heart.  It's not very clear from the photograph, but I printed three of each flower, cut each one gradually smaller than the last and then layered them up to add some dimension and make them more interesting.  I threaded some thick string through the holes to create the hanger.

Download free floral graphics here and here.

09 February 2018

Patchwork Butterfly Birthday Card

My friend asked me to make her mum a 60th birthday card. I make a lot of cards.  I even send some of them to friends and family for various occasions, but I have never made a card for someone to give to someone else.  It was different, trying to make for someone whose tastes I didn't know that much about.  It didn't help that the only direction that I received from my friend was to "make it nice"! 😒
I ended up making a variation on a card that I'd made before that I thought was really pretty,


I made a patchwork base using 4 blocks consisting of 4 strips of patterned paper.  Each block was rotated through 90°.  I cut the Tattered Lace Red Admiral Butterfly from gold mirror card and then cut another from which I separated the butterfly and flowers.  I placed those elements on top of the first die cut, lifting the wings of the butterfly and using foam tape behind the flowers to add dimension.  I also used the mirror card to cut the sentiment.  The card was finished with gold flatback gems in each corner and a couple of pearls for the flower centres. 

I really love how it turned out, and it went down very well with my friend's mum too 😊

29 November 2017

Christmas Decorations - Indoor Wreath

I love Christmas decorations and in an ideal world every room in the house would be festooned to bursting point. In reality though, every year the living room looks beautifully festive but the decoration of the rest of the house is sporadic at best. So I vow to craft up a storm for next Christmas, but it always seems to creep up on me! You know, it's ages away, it's ages away. it's ages away, oh shit it's here! It's like that scene out of Monty Python's The Holy Grail (but without the carnage 😂!) You'd think by now I'd be better prepared...

So in my attempt to boost the decorations stash I have made a few things, including this indoor wreath. I will be attaching one to every internal door in the house.

I cut a ring from Kraft card with a 15cm outer diameter. I then lined it with pine sprigs that I die cut (I don't know the brand) from green paper. I then die cut holly leaves from two shades of green mirror card using the holly dies in the Tattered Lace Holly & Robin set. Finally I cut several poinsettias using two sizes from the Tattered Lace Poinsettia 2016 set to place over the leaves around the frame. The wreath is finished off with a red bow at the top and a loop of red ribbon for hanging glued to the back. As I cut the holly from green mirror card, I went back over all of the berries with red glitter glue.

In our house the decorations go up on the 1st December. That's only a couple of days away so I won't have a full complement of decorations in time for that, BUT technically I've got until Christmas Day so I'll keep making them and adding them up until then.

25 February 2017

Bold Florals - Just For You Card

I had some flowers left over from my paper flower pot project, which didn't really suit that display, but a single one as a statement embellishment on the front of a card looks pretty good.

Bold Floral Just For You Card

The background was made with a scoreboard that came free with a copy of Crafts Beautiful magazine.  It is quite similar to the Xcut Quilting embossing folder which is a favourite of mine.  I used Sizzix Embosslits heart and leaf dies for the flower petals and leaves.  The flower centre was created by colouring a thin rectangular strip of card on both sides, then snipping into it at regular intervals along its length and rolling it up and fanning out the cut fringes. I found a sentiment that matched the colour of the flower and also used a similar colour for the card base.  A few gold gems helped to add some interest and also complemented the gold foiling on the sentiment.

11 February 2017

Paper Flower Pot

Inspired by the pop-up box card, I thought it would be fun to use the same principle to create a different shape.  A plant pot came to mind and I do like to make paper flowers, so I put the two together and voila!


Unlike the pop-up box, the plant pot is only connected along the top edge.  The sides have been cut away to create the pot shape.  I used two strips of card on each side to connect the front and back of the pot to give it some stability.

The flowers have all been made with either punched hearts, or using hand-drawn heart templates.  I stuck 5 heart petals together at their tips to create each flower.  I also scored along the petals before colouring them to give some texture, then shaped the petals by curling gently.  Most of the petals were cut from plain white card, which I then coloured with Spectrum Noir alcohol markers.  A couple were cut from pink paper and then coloured blue.

Some of the stamens were made by snipping at regular intervals into a thin rectangular strip of card and then rolling that up and fanning out the cut fringes.  The rest were made using Flower Soft by Katy Sue.  I actually much prefer those.  I added a few die cut and freeform leaves, and some decorative flourishes by Tattered Lace to finish off the display.  Because the pot is made using the same principle as the pop-up box, it does flatten, so in theory you could make one of these and send it in the post.


09 February 2017

Text Accents

I've been watching a lot of YouTube for inspiration for mixed media and also making my own embellishments.  I see a lot of people use Tim Holtz's Idea-ology word stickers for text accents.  I don't have any of those, but I do have a few mini alphabet stamps, so I thought it would be fun to make my own (and less expensive too).

For these I used a Dovecraft set, which I got on sale for £1 at Hobbycraft.  Stamp any words that you like then cut out the strip.  It's a quick, easy and cheap way to add text accents to projects, with the added benefits that you only get the words that you want as many times as you want.  The stamp sets come in various styles, so could work for lots of different types of projects.

This is not a sponsored post and does NOT contain affiliate links.  These are my own opions based on products that I have bought.

15 January 2017

Hello!

It's been a while since I entered a cardmaking challenge or posted on the blog.  It seems appropriate to start off my comeback with a "Hello".


I got this gorgeous "hello" stamp as a freebie with a Docrafts Creativity magazine and it's been languishing in the bottom of my stamp stash for months.  I can't believe that I waited this long to use it, but now that it's made its debut I can see it being used a lot.

The background was made by flicking gold paint onto the card base.  The sentiment was stamped onto a card panel and heat embossed with gold.  I then made a rough outline of the sentiment panel with a gold pen and popped it up on the card base with foam tape.  Three gold gems, placed randomly finished off the card.

Today I'm entering the following challenges:


Daring Cardmakers (New), and
CAS-Ual Fridays (Gold)

02 November 2016

6x6 Holly Wreath Card

Wow, was it really May when I last posted on this blog?!  Time is racing past at an alarming rate, which means that Christmas will be here in the blink of an eye!  So, it seems like a good time to start sharing some Christmas projects.


This is a card that I made last Christmas, but I think that I will make some more this year too.  It's pretty straightforward to make.

You will need:

  • 6x6 card blank
  • Gold Mirror card in different shades
  • Kraft card
  • Flat back pearls or Liquid Pearls
  • Embossing folder
  • Bow or ribbon
  • Foam Pads
  • Glue

I used my Silhouette Portrait to cut out the holly leaves, but you could use a die, or a punch, or if you have the patience, do it by hand!  I also used the Portrait to cut out a ring about 3 inches (7.5cm) in diameter to act as a base for the holly wreath.

  • Start with a 6x6 (15x15cm) card blank.  
  • Cut a piece of mirror card to leave about a 1/2 cm (1/4 inch) border around the outside (so 5.5x5.5 inches or 14x14cm) and affix to the centre of the card blank.
  • Cut a piece of Kraft card about 5x5 inches (13x13cm) and emboss using an embossing folder of your choice.  I used Sheena Douglass' 7x5 swirls folder (one of my favourites).
  • Affix the embossed Kraft card square to the centre of the mirror card mat.
  • Cut about 20 holly leaves out of different shades of gold mirror card.  If necessary emboss the veins onto each leaf using a ball tool or blunt pencil.
  • Cut out a ring about 3 inches (7.5cm) diameter and 5/8 inch (1.5cm) wide from card for the wreath base.
  • Attach the holly leaves to the ring, alternating shades and layering some to add dimension.
  • Attach a bow at the bottom of the ring.
  • Place flat-back pearls in groups of three around the wreath for berries.
  • Attach the wreath to the card with foam pads. 
  • Place a pearl in each corner of the embossed Kraft panel.
You could also add a sentiment to the front if you wanted.  This would also look great with traditional green holly leaves with red berries, but you could also try pink leaves with turquoise berries, or purple leaves with gold berries or any colour combination that you like for an alternative look.  Just be sure to match the colour of the mirror mat with the holly leaves.


27 April 2016

Perching Bird - Free Book Folding Pattern

I first came across book folding a few months ago and although some of the designs looked good, I wasn't really inspired by it.  Then recently I found a website where you could create your own patterns and as I love to do my own thing, I decided to have a go.

Using one of the punches in CraftArtist 2 Professional, I generated the following image, which I then converted into a book folding pattern with the help of the online software.


And here's the finished item:


I'm really pleased with how it turned out, especially as a first attempt. Needless to say I've generated quite a few more patterns, which I hope to be able to share soon.  In the meantime download the Perching Bird book fold pattern here.