Search This Blog

21 July 2021

Floral Collage Canvas

So, you've accumulated a load of patterned papers (either physical or digital), but you have no idea what to do with them.  At least, that's a problem that I have. I'm not a prolific card maker, nor do I scrapbook, but I can't resist a pretty patterned paper or an interesting background texture.  So what to do?  Collage, that's what!

I tend to overthink things and spent ages trying to decide what to collage.  In my mind I felt like it needed to be some grand, artistic piece.  But it really didn't have to be so complicated.   In the end I went with a simple floral layout inspired by an embroidery design.

I used papers from my digital stash, but any papers would work.  This would actually be a great project for using up paper scraps.  I chose a newsprint, a pink paper with a a slight texture for the flowers, two different green papers for the stems and leaves, yellow paper for the flower centres and a lovely bluey-purple paper for some berries.  I've listed links to all the papers used at the end of the post.


Step-by-step

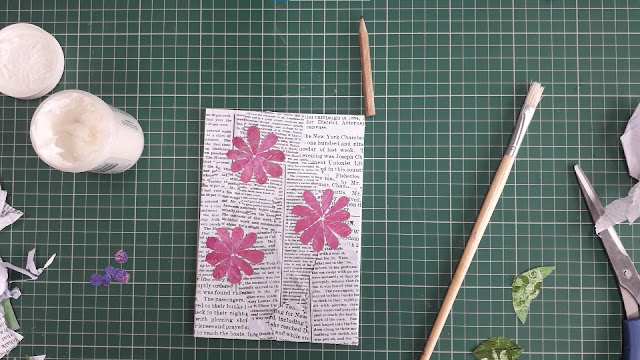
1.  I printed out three sheets using one of the designs in the Old Newspaper Textures set.  The original file is a 12 x 12 sheet and the text was quite large.  So I resized it a couple of times to make the print smaller.  I tore pieces from all three sheets and stuck them down on the canvas board trying to get a nice mix between the different text sizes.


2.  Using the pink sheet I cut a strip about one inch wide and then cut about 30 petals shapes.


3.  I arranged the petals on to the canvas board to create 3 flower heads.


4.  I cut thin stems from one of the green papers and various sized leaves from the other green paper, then arranged them onto the board.


5.  I cut a few small circles for berries from the blue-purple paper and three yellow circles for the flower centres and added them to the piece as well.


At this point the collage was finished, but I felt like it didn't stand out from the background enough. So I went around the edges of the petals, leaves and berries with my Derwent Inktense pencils to help lift the composition off the page.  I think that I might have overworked it a bit, but it does seem to have done the job and I still like the end result.  (Original on the left, "enhanced" on the right.)


Tutorial

Watch the process video on my YouTube channel.


SUPPLIES

5 x 7" Canvas Boards  (you could also use scrap cardboard)
Derwent Inktense Pencils

Backgrounds and digital papers:
Glop Wallpaper 08 (sample freebie available with fewer backgrounds) [apple green paper]
Glop Wallpaper 16 (sample freebie available with fewer backgrounds) [pink paper]
Pattys Desert Strips 3 Bundle (sample freebie available with fewer backgrounds) [blue-purple paper]


09 July 2021

DIY Sentiment Strips

Sentiment strips can be a really elegant addition to your card fronts, home décor projects, mixed media artwork or scrapbook pages.  They generally come pre-printed or as a stamp (and die) set.  Both of those options are just fine, but they can be costly and you are limited to the words and phrases that are offered, the font used, the size of the strip etc.  Making your own sentiment strips is both cost-effective and non-limiting because you choose the words and phrases, the font, the size, the colour scheme and so on.

Pile of sentiment strips with white text on a black background

In the following example I used Photoshop to create my sentiment strips, but you could also do this in a word processing program if you don't have a graphics program.


1. Create a new project.  I used A5 size because I couldn't think of enough sentiments to fill an A4 page!  But in hindsight I could have just doubled-up on some of them 🙃.  

2.  Draw a rectangle to cover the sheet and fill it in black (or whatever colour scheme you fancy).

3.  Using the text tool, select the desired font and create a page full of short sentiments to cover a variety of occasions and lay them out onto the (black) background.  If using a dark background colour remember to select white or a light colour for the text and vice versa.


4.  When the page has been filled and you are happy with your sentiment sheet print it out, then cut out the strips as you need them or cut them all out and keep them in a container so that they're ready to go.


Remember to set your print settings to best quality and consider using photo paper rather than copy paper to get a good depth of colour in the background.

06 July 2021

Converting Fonts to Cut Files for Electronic Cutting Machines


I really like the papercut effect of the font Monogram Daishy In order to create an actual papercut monogram with my ScanNCut I would need to convert the font from OTF/TTF formats to a compatible format. The FCM format is specifically for the ScanNCut. The SVG format will work with most electronic cutting machines including the ScanNCut.  


Converting fonts for the ScanNCut

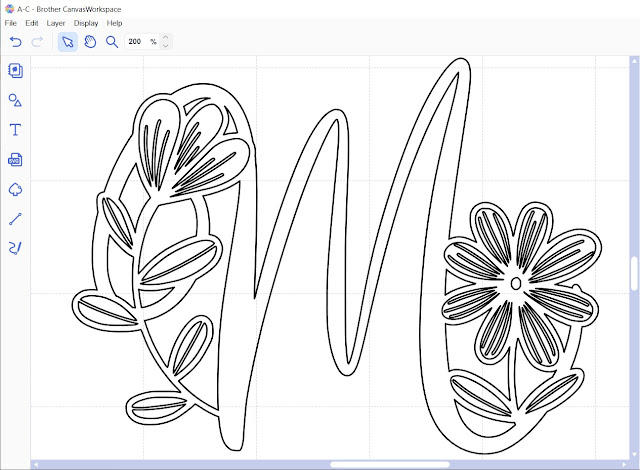
Simply using the text tool in Canvas Workspace doesn't always work.  With more complicated or intricate designs the cut lines can end up crooked and jumbled and would absolutely not work as a cut file.


Monogram Daishy Font in Canvas Workspace using text tool


The easiest solution is to use the ScanNCut Type Converter - a free program that you can download from the Brother website for converting OpenType and TrueType fonts to FCM cut files.  

Brother ScanNCut Type Converter overview


You can only type a single line of text into the converter and it all has to fit within the 30cm (12") width of the mat, so you may have to either save the letters individually or in small groups depending on the size of the font.  My preference is to save as many letters as possible in one go and then resize them in Canvas Workspace afterwards. 

You can clearly see the difference between using the text tool directly in Canvas and using the Type Converter before importing the file into Canvas.


Monogram Daishy Font in Canvas Workspace using Type Converter


Bear in mind that some font designs are best suited for larger scales due to the intricacy of the design or areas with narrow lines and small apertures.  Also some font designs might not translate well to a cut file, for example if the style is sketchy.

I am not familiar with Cricut Design Space or Silhouette Studio, but you can also create cut files from fonts by using a graphics program to convert the font to SVG format.  


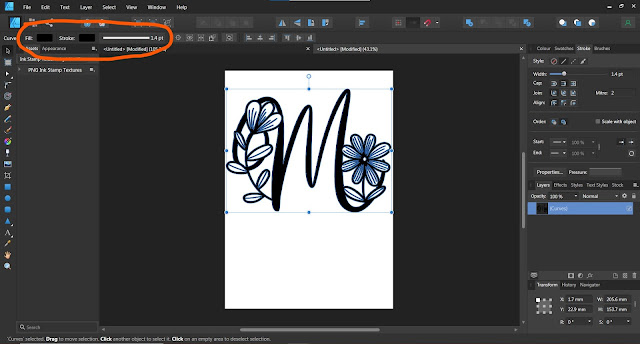
How to convert a font to an SVG in Affinity Designer 


- open a new document.  
- select the Type Tool (1) and type out your letter(s).  
- select "Layers - Convert to Curves" (2 and 3).  


- select a colour for the stroke and set the stroke width to >0pt. 


- with the letter(s) selected, go to "File - Export..."
- select "SVG" for the file format and "selection only" for the Area (to export only the areas of interest and not the whole page)


How to convert a font to an SVG in Photoshop


- open a new document.  
- select the Type Tool (1) and type out your letter(s).  
- select "Type - Convert to Shape" (2 and 3).  


- select "Layer - Export As..."

- then select SVG for the format and click export.


The font is now ready to use with your cutting machine! 

Get the Monogram Daishy Font:

Explore more great monogram fonts here, here and here.