Search This Blog

Showing posts with label typography. Show all posts

06 July 2021

Converting Fonts to Cut Files for Electronic Cutting Machines


I really like the papercut effect of the font Monogram Daishy In order to create an actual papercut monogram with my ScanNCut I would need to convert the font from OTF/TTF formats to a compatible format. The FCM format is specifically for the ScanNCut. The SVG format will work with most electronic cutting machines including the ScanNCut.  


Converting fonts for the ScanNCut

Simply using the text tool in Canvas Workspace doesn't always work.  With more complicated or intricate designs the cut lines can end up crooked and jumbled and would absolutely not work as a cut file.


Monogram Daishy Font in Canvas Workspace using text tool


The easiest solution is to use the ScanNCut Type Converter - a free program that you can download from the Brother website for converting OpenType and TrueType fonts to FCM cut files.  

Brother ScanNCut Type Converter overview


You can only type a single line of text into the converter and it all has to fit within the 30cm (12") width of the mat, so you may have to either save the letters individually or in small groups depending on the size of the font.  My preference is to save as many letters as possible in one go and then resize them in Canvas Workspace afterwards. 

You can clearly see the difference between using the text tool directly in Canvas and using the Type Converter before importing the file into Canvas.


Monogram Daishy Font in Canvas Workspace using Type Converter


Bear in mind that some font designs are best suited for larger scales due to the intricacy of the design or areas with narrow lines and small apertures.  Also some font designs might not translate well to a cut file, for example if the style is sketchy.

I am not familiar with Cricut Design Space or Silhouette Studio, but you can also create cut files from fonts by using a graphics program to convert the font to SVG format.  


How to convert a font to an SVG in Affinity Designer 


- open a new document.  
- select the Type Tool (1) and type out your letter(s).  
- select "Layers - Convert to Curves" (2 and 3).  


- select a colour for the stroke and set the stroke width to >0pt. 


- with the letter(s) selected, go to "File - Export..."
- select "SVG" for the file format and "selection only" for the Area (to export only the areas of interest and not the whole page)


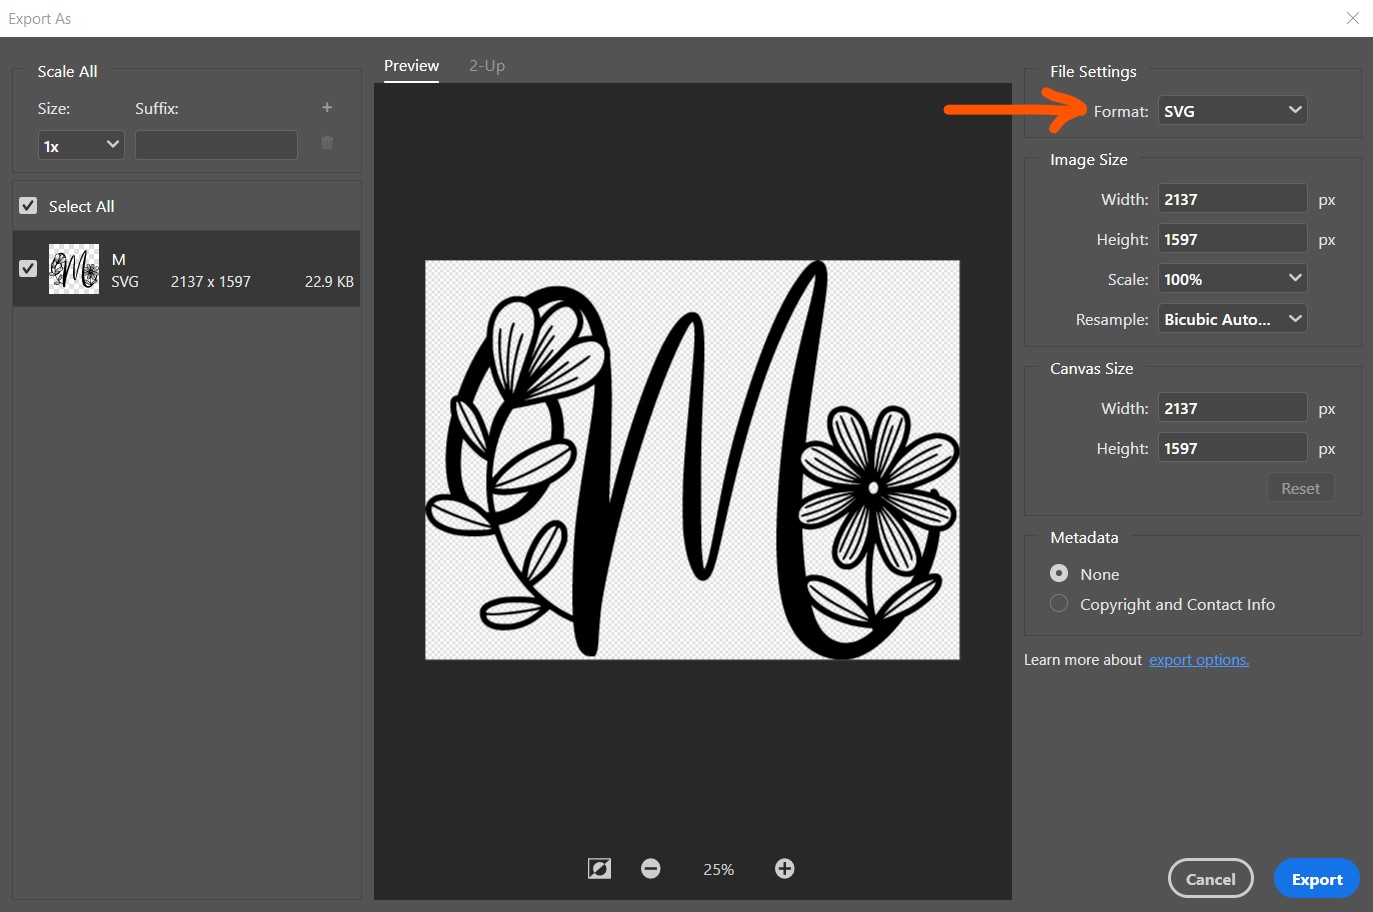
How to convert a font to an SVG in Photoshop


- open a new document.  
- select the Type Tool (1) and type out your letter(s).  
- select "Type - Convert to Shape" (2 and 3).  


- select "Layer - Export As..."

- then select SVG for the format and click export.


The font is now ready to use with your cutting machine! 

Get the Monogram Daishy Font:

Explore more great monogram fonts here, here and here.

18 July 2018

L'amour est la cle

When it comes to craft supplies I'm a hoarder.  I can't bear to part with the smallest scraps of paper or a bit of ribbon that came with a gift or some old cardboard that could be used for some project or other.  So in an attempt to destash I decided to make a heart wall hanging out of old cereal boxes that I've been putting aside for a while.  


I made a large heart template on a piece of A5 card and then traced around that on the large panels of the cereal box.   After cutting them out (4 of them) and punching holes so that the finished piece could be hung, I stuck the 4 hearts together to get a thick, chipboard type of effect.  I also used the heart template to cut a heart from a piece of woodgrain effect paper.  NOTE - I suggest placing the heart stack underneath something heavy to prevent it from warping as the glue dries.

I cut the flowers with my ScanNCut using a pattern that I designed myself and coloured them using Spectrum Noir alcohol markers, before layering them together.  The leaves came from another die set.  I also used some Katy Sue Flower Soft for the flower centres. 

I gave the padlock die cut the same treatment as the hanging heart in that I layered up several die cuts - 5 from plain white card and one from gold mirror card - to get some dimension.  I then went over the front and sides with copper gilding wax to take away the white edges. 

The lettering was die cut using Sizzix Brush Alphabet dies and then I added a few freehand hearts to finish it all off.  I decided to go with French as it was a present for my (French) friend's mother.  To finish it off I used some thick string, which gave it a bit of a rustic feel.

In case you're interested in any of the supplies that I used:

*affiliate link

14 February 2018

Choose Love - Free Printable

Happy Valentine's Day!  In honour of all things love and romance I created this poster as a reminder to always choose love.  Download the A4 poster here.


If you'd like to create your own projects you can get free downloads of the floral digital elements from here and this and 99 other wood backgrounds from here.

04 March 2017

Easy Watercolour Backgrounds

Watercolouring in card making is everywhere at the moment, so I dug out my set of Reeves Water Soluble Wax Pastels to have a go at creating some simple watercolour style backgrounds.  I simply scribbled pastels in similar shades onto a white card blank in vertical, horizontal and diagonal stripes, then used a wet paintbrush to go over the colours and blend them a little.

Hello Greetings Card - ombre watercolour background

Have a Beautiful Day greetings card - watercolour background with glitter blutterfly
I used ordinary cardstock for these so the colours did not move as much as if I had used watercolour card, but I quite like that effect.  The first butterfly was cut using Sizzix Thinlits die set Butterfly #3.  The second used an ArtC stencil with BoBunny glitter pastes.  It's much more lovely in real life.

I like the simplicity of these.  The watercolour effect is a great backdrop that doesn't really need much else to make an attractive card.  This would be a great technique for making men's cards; a bold sentiment and a well-chosen stamped image or die cut would be all you'd need.

09 February 2017

Text Accents

I've been watching a lot of YouTube for inspiration for mixed media and also making my own embellishments.  I see a lot of people use Tim Holtz's Idea-ology word stickers for text accents.  I don't have any of those, but I do have a few mini alphabet stamps, so I thought it would be fun to make my own (and less expensive too).

For these I used a Dovecraft set, which I got on sale for £1 at Hobbycraft.  Stamp any words that you like then cut out the strip.  It's a quick, easy and cheap way to add text accents to projects, with the added benefits that you only get the words that you want as many times as you want.  The stamp sets come in various styles, so could work for lots of different types of projects.

This is not a sponsored post and does NOT contain affiliate links.  These are my own opions based on products that I have bought.