Search This Blog

Showing posts with label cards for men. Show all posts

17 January 2022

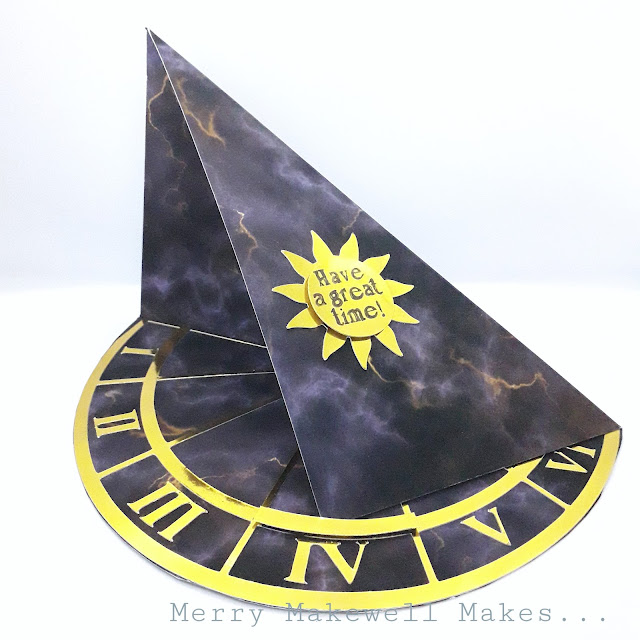
Sundial Twisted Easel Card

I recently updated my Skillshare class - "Create Dimensional Greetings Cards that Wow! - 1. Easel Card" with a couple of additional lessons.  In the lessons I show how to make a twisted easel card and I create a sundial card as an example of how to use the shape for maximum effect.


I am so happy with how it turned out!  I can't say that I've seen a card like this before so I'm claiming it as my invention!

Head over to Skillshare to watch the class.  If you're not already a member clicking the link will give you a 14-day free trial, and 1 free month if you then sign-up.

20 October 2017

Stars 🌟

Over on the Less is More blog the latest challenge is a one layer challenge featuring stars.  Here's my attempt:

The stars come from various stamp sets.  I stamped the sentiment into the centre of the card with copper dye ink and added the little star trio at opposite corners.  Then I stamped the spotted stars into the corners with first with gold dye ink and then overstamped with copper, and finally the stripy star into the gaps with the gold ink.


The pictures don't pick up the metallic sheen of the inks very well, but IRL there is a nice shimmer.

I'm also going to enter the latest AAA Cards challenge - inspired by a film. The movie I've chosen is Stardust (love that movie btw). I think that the sentiment could apply to Evain, who shines brightly when she's happy, but also to Tristan who learns the value of being himself.

04 March 2017

Easy Watercolour Backgrounds

Watercolouring in card making is everywhere at the moment, so I dug out my set of Reeves Water Soluble Wax Pastels to have a go at creating some simple watercolour style backgrounds.  I simply scribbled pastels in similar shades onto a white card blank in vertical, horizontal and diagonal stripes, then used a wet paintbrush to go over the colours and blend them a little.

Hello Greetings Card - ombre watercolour background

Have a Beautiful Day greetings card - watercolour background with glitter blutterfly
I used ordinary cardstock for these so the colours did not move as much as if I had used watercolour card, but I quite like that effect.  The first butterfly was cut using Sizzix Thinlits die set Butterfly #3.  The second used an ArtC stencil with BoBunny glitter pastes.  It's much more lovely in real life.

I like the simplicity of these.  The watercolour effect is a great backdrop that doesn't really need much else to make an attractive card.  This would be a great technique for making men's cards; a bold sentiment and a well-chosen stamped image or die cut would be all you'd need.

18 February 2017

Geometric Shards

A little while ago I was helping my mum to clean out her garage and I came across a load of my old school books and folders.  One of the things that I used to love to do was to decorate the insides of the folders by sectioning the space into squares or triangles and then colouring them in.  I made this card shortly afterwards, inspired by that memory.


How are You? geometric pattern card


I used Spectrum Noir alcohol markers; BT5 using the chisel tip to create the outline and PL2, PL4, PL5, LV1 and LV3 to colour in the triangles.  I happened to have some card that matched the turquoise marker colour almost perfectly, which I used for the card base.  The sentiment is from an old sticker collection by American Crafts which has been in my stash for years!  I added the faux stitching around the perimeter to help it stand out more.  It just goes to show that you don't always need stamps, patterned papers and fancy dies to create a striking card.

02 June 2015

My First Shaker Card

This is a straight-up CASE of a card by Vicky Papaioannu..  I've never really felt compelled to make a shaker card, but I loved the softness and the diffused effect that using vellum gives, so I decided to give my own a go.


To start with I cut three rectangles 12.85cm x 8.5 cm from patterned paper, plain white card and vellum.  To make a frame I measured 1.5cm in from all sides on the back of the white rectangle and then cut the middle section out using a craft knife.  (I may use my Silhouette to make up a load of these rectangles and frames for future use, as I'm pretty rubbish with a craft knife and even this simple task was a bit of a pain!)


I stamped the image and sentiment onto the vellum using silver pigment ink and then covered that with silver embossing powder. Heat embossing happens quickly on vellum so keep the heat tool moving to avoid bubbling.  Then placing the embossed vellum face down, I attached double-sided foam tape around the four edges of the vellum, sprinkled in some sequins then placed the patterned paper rectangle on top (also face down).  And that's the shaker compartment done.

I had intended to use the same patterned paper as a mat for the shaker compartment, but forgot!  Instead I used a lovely bright blue paper, which matched the colour tones of the sequins.  So there you go - my first shaker card!  I don't think it'll be the last...

I'm entering this card into the Simon Says Stamp Wednesday Challenge and The Paper Players Tic Tac Toe challenge (any shade of blue / Embossing / Patterned paper).

11 May 2015

Best. Dad. Ever!

I think I have just got time to join in with last week's Freshly Made Sketches challenge.  This is the sketch:


And this is my interpretation:


I used my new Stripes embossing folder (from the Stripes and Pinwheel set by Sizzix), going around the edge with a Spectrum Noir marker to lift it a little from the background card.  I used Washi tape for the banners.  Then I cut a rectangle out of patterned wood boards paper and matted it onto silver mirror card, then stamped the sentiment.  Using my Garden Tools Sizzlits I cut handles from wood grain patterned paper and cut the heads from silver mirror card.  


The mirror card was pressed against the scratched surface of my Big Shot cutting pads so it's been inadvertently embossed with the scratches, but that gives a nice weathered look.  I hadn't done it when I took these photos, but I think I'll glaze the handles of the tools.  If I had glossy accents that's what I'd use, but as I don't I'll have to make do with Decopatch's glossy glue.