Search This Blog

Showing posts with label floral. Show all posts

09 August 2021

Glitter Background Floral Greetings Cards

Affiliate links used. If you follow a link and then make a purchase I will receive a commission at no additional cost to you. 
All of the products mentioned in this post are products that I have bought and paid for myself.

Hello!  Today I'm sharing a few cards that I have made by creating simple backgrounds with Aladine's Izink Gold Diamond Paint and some graphics from the Vanilla Blossom Watercolor Set from The Hungry Jpeg. 

In case you've never heard of it, Izink Diamond Paint is a glitter paste and paint in one.  Although you can apply it with a paintbrush it wouldn't really work for painting fine details.  It would work really well with stencils though.  I love that it is super sparkly and that the paint is not too wet like a lot of other glitter paints/glues.  I've purposely left the stripes and spots a little bit rough but it's up to you how neat and tidy they are.

The Vanilla Blossom Watercolor set has a number of elements including florals, foliage, butterflies and birds.  One of the florals had three complementary images that would work as decoupage.  


I filled an A4 sheet with the various images that I wanted to use and printed that out.  If you're going to try to decoupage remember to group all of the relevant images and resize them together.

I'm using sentiment strips that I created myself.  Check out this blog post to see how I made them.

Card 1

- Paint horizontal stripes across the card front and allow to dry.
- Cut out the three different floral images (flower with stem, flower with no stem and flower on its own).
- Layer the floral images using foam pads to create a 3D decoupage effect.
- Glue the decoupaged flower to the front of the card and add a sentiment.
Floral card with horizontal gold glitter stripe background


Card 2

- Paint horizontal stripes across the card front and allow to dry.
- Cut out one each of the flower with stem, and the flower on its own and stick them together with foam pads.
- Rotate the card to landscape orientation so that the fold is at the top.
- Glue the floral to the left-hand side of the card front and add a sentiment.


Card 3

- Use a saucer, bowl or similar to paint curved stripes across the card front and allow to dry.
- Cut one each of the flower with stem, flower and leaves with no stem, flower on its own and a butterfly.
- Layer the flowers with foam pads and glue it in the bottom right corner of the card front.
- Glue the butterfly in the top left corner (ish) and add a sentiment.
Floral card with gold glitter curved stripe background


Card 4

- Paint rough circles about 1.5cm / ⅝ inch onto the card front and leave to dry.
- Cut out two of the flower with leaves, one flower on its own and a butterfly.
- Decoupage one of the flowers with leaves and the flower on its own with foam pads.
- Arrange the flowers toward the centre of the card and glue them down.
- Add a butterfly (I chose the top left corner) and add a sentiment.


Use a black card blank for an alternative look.

I really like the gold, but the diamond paint comes in a few different colours so it could be fun to try out different card and paint combinations as well as different florals, or even multicoloured glitter paint backgrounds.

Watch the process video:


SUPPLIES


23 June 2021

Quick and Easy Floral Greetings Cards

I may have mentioned before that I absolutely love buying craft supplies!  It's bordering on an addiction.  The problem with that is that it is costly and the supplies take up a lot of space (that I don't have).  So I've been trying my hardest not to succumb to all the juicy deals that seem to keep popping up in my inbox lately 😩.  To help keep my cravings at bay, I've been scouring the "Freebies" section at Creative Fabrica.  It's the perfect foil to my buying habit - the products don't cost anything, they only take up space on my hard drive and I get to feel the same joy and satisfaction that I get from buying and receiving physical items 🙌.

Anyway, on to the project!  These floral greetings cards are really pretty and quick and easy to make.


 Aside from your computer and printer, you will need:
Step 1:
Download the clipart and import the images into a graphics program, e.g. Photoshop.  Adjust the size so that they are about 10 x 13cm (to fit an A6 card) or whatever dimensions you need for the card that you want to make.

Step 2:
Position the graphics so that they are one side of the page (rotate if required and use guides to help you position them), then print out.


Step 3:
Cut the A4 sheet in half, then score and fold to create two greetings cards and put them aside.


Step 4:
Create another page in your graphics program using the graphics from step 2, but this time fill the page, then print.


Step 5:
Cut out one central flower from each design on the printed sheet.


Step 6:
Use foam pads or dimensional glue to stick the cut flower onto the greetings card base to add dimension.

Step 7:
Download the font and install on your computer.

Step 8: 
In your graphics program create a new project with an A5 sheet.  Draw a rectangle to cover the sheet and fill it in black.

Step 9:
Using the text tool, select the Underwood Champion font and create a page full of short sentiments to cover a variety of occasions and lay them out onto the black background.  Select white for the font fill colour.  When you are happy with your sentiment sheet print it out.


Step 10:
Cut out one of the sentiment strips and attach it to the front of the greetings card.  


Your card is complete!  I chose to do some decoupage on the front because I think it adds something extra, but that is optional (steps 4-6). 

The sentiment sheet does take a little time to put together, but once you have done it choosing a sentiment is very quick.

You could easily make a stack of these to have on hand for any occasion or to sell or gift as a set.  

Head over to Creative Fabrica to grab these assets and make your own cards, or check out the vast selection of fonts and graphics (both free and paid for) and be inspired to bring your own creations to life.


01 October 2020

Tattered Lace Decoupage Flowers - Favourite Florist Collection

*This post contains affiliate links.  Read the Disclaimer for more information. 

 I am weak for any Tattered Lace 3D decoupage floral dies.  I love them, but unfortunately my wallet doesn't always allow me to indulge myself.  But a few weeks ago there was a 50% off sale at Create and Craft so I took the opportunity to bag a few from the Favourite Florist collection ðŸ™Œ.  

The collection consists of 6 "In the Garden" flowers, which as the name suggests are flowers that you would find in your garden, and 6 "In the Field" wildflowers, and they come with free downloadable coloured images (a.k.a. Charisma).  I purchased the Peony, Hyacinth, Lily and Pelargonium dies from the "In the Garden" collection and the Lavatera and Wild Rose from the "In the Field" collection.  


I spent a good while playing around with the colours in a graphics program (because the Charisma images only came in one colour) and then printing, cutting and putting them together.  My favourites are the Hyacinth and Lavatera dies.  Lily and Peony are also very pretty with lots of decoupage elements.  The wild rose is very pretty as well, but it would have been nice to have a few more decoupage elements.  The Pelargonium is OK but I have another geranium/pelargonium die set from a different collection that I much prefer.  

You can use foam tape to put these together, but I used Pinflair glue gel.  It's crystal clear and odourless and gives great dimension.  Now I just have to figure out what to do with all these flowers...

09 July 2020

Tattered Lace Sensational Flower and 3D Flower Pot Dies

*This post contains affiliate links.  If you click on the link and subsequently make a purchase you will not be charged extra, but I will receive a commission.

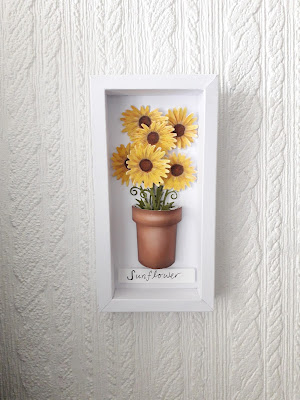
A few weeks ago I managed to snag a great deal from Create and Craft.  The offer was to get the Sensational Flower and Flower Pot die sets at effectively half price (BOGOF).  It looked so cute and I like the 3D element and I like miniature stuff so.....

Tattered Lace Sensational Flower and Flower Pot in Yellow and displayed in a shadow boxTattered Lace Sensational Flower and Flower Pot in Purple and displayed in a shadow box


The flowers and pot come with Charisma (which for the uninitiated is a pre-coloured image that fits the die perfectly that can be downloaded from the Create and Craft website).  The flowers come in yellow and purple, with a couple of additional stems and flower heads so that you can decoupage or fill out the bouquet.  If you have access to a graphics program the colour could be changed to anything you like!  So you could have sunflowers, gerberas, daisies or other similar flowers. I actually recoloured both colour options using alcohol markers because they came out a little more pastel on my printer and I wanted a bold colour. 

The pot comes in terracotta only but again could be recoloured and the die set comes with some additional lacy details that could change the look completely.  I'm going to see if I can get a glazed ceramic look by using Glossy Accents.  You could even stick two halves together to get a free-standing pot and flower display.

The BOGOF deal is no longer available but at the time of publishing you can still get the Sensational Flower die set and the Flower Pot die set for £14.99 each from createandcraft.com.

28 February 2020

Purple Flower Embroidery

I so enjoyed doing embroidery again that I went out and bought some 4" and 6" hoops.  I liked the way it looked on denim and as I still have a massive pile of denim scraps I've used that as my base fabric.


I love the flower! I used buttonhole wheel stitch for it, with black French knots at the centre.  I'm still working out how best to do leaves so there are quite a few different versions here.  But from where I started (bottom right leaf) I can definitely see a lot of improvement by the time I got to the last leaf.  I also like my attempts at a palm-like frond and a pine leaves.  I used an open leaf stitch for both.  The leaf clusters are simply lazy daisy stitches on a stem. 

These little projects are so much fun.  I see more embroidery in my future!  The 4" hoops are very portable and stitch up quickly enough to satisfy my impatient nature.  I'd like to try some different subjects like birds and butterflies as well as more florals of course.  I might even try my hand at designing a little project.

29 January 2020

Back to My Roots

The very first needlecraft I tried was knitting.  My mum taught me how to cast on and knit a scarf when I was about 6 or 7.  When I went off to school at 8 I learnt sewing and embroidery and I really loved both.  However they both fell by the wayside.  Then around 2013 I took embroidery back up and practised on and off for about three years.  When I started I only knew how to chain stitch, but thanks to sites like Mary Corbet's Needle N Thread and PinTangle I learnt a whole range of different stitches.  But then I discovered papercrafting and my needlecrafts were all but forgotten. Until now!


I've been seeing a lot of really amazing embroidery via Instagram and Tumblr for a while now and thinking how great it would be to be able to create such loveliness.  On a completely different note I was cutting up some old jeans to turn into some sort of patchwork thing and noticed that a) the denim was quite soft and would be relatively easy to embroider, and b) the scrap I had was the perfect size for a 4" hoop.  And, being the craft stash junkie that I am, obviously I have a hoard of embroidery threads and needles just sitting there waiting to be used.  So with the stars thus aligned I started my first piece of embroidery for several years, and it was a real joy.  It took me quite a while for such a small piece, probably a whole day altogether. (Is that long for something like this?  I have no idea.)  Anyway I had fun and I hope it's not such a long time time before I feel moved to stitch again.