I found this lovely set of golden mandala textures on Creative Fabrica and I thought that they would make pretty Christmas cards. I could have used the images for the whole card front, but I decided to just print them off directly from Windows Explorer. The resulting images were 9x13cm and would fit nicely on to the front of an A6 card.
I felt that the resulting cards needed a little bit of jazzing up, so I tried out various embellishing techniques like using glitter glue, glitter washi tape, paint markers and Nuvo Drops to enhance the images. I also tried out different die cut and peel-off sentiments to see which worked best.
Gold acrylic paint marker around the edge of the image, some red glitter glue to highlight the red areas on the image (not very visible in this photo) and a Merry Christmas die-cut sentiment all on a black card blank.
Red glitter around the edge of the image, a few dots of red glitter glue on the image and a Merry Christmas die-cut sentiment.
Gold glitter washi tape around the edge of the image, a few dots of glitter glue on the image and a Merry Christmas die-cut sentiment.
Gold glitter around the perimeter of the topper and a few spots on the image. Merry Christmas peel-off sentiment.
They're simple, but pretty cards that can be put together easily; perfect for batch making. Go check out this designer's shop. There are lots of gorgeous backgrounds and textures - from Christmas imagery to cotton candy clouds and fairy gardens. I've downloaded at least 15 of the bundles and plan to add to my collection!
By the way, if you want to buy from the Creative Fabrica website and you're only being given the option to take out a subscription, change the currency to US$ via the drop-down menu in the top right corner of the screen. You should then be able to see individual prices.
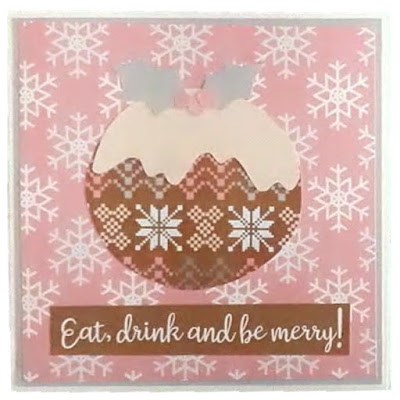
On the back of one of the brown patterned papers draw around a circular-ish shape and then cut it out. This will be the Christmas Pudding.
On a piece of contrasting card (I chose plain beige) use the pudding shape to draw and cut out a half circle.
Cut along the bottom edge of the half circle to create the effect of dripping frosting and then glue that to the pudding shape.
On another piece of coloured cardstock (I used grey picked from one of the patterned papers) draw two holly leaf shapes and cut them out.
Cut or punch three small circles from the plain pink cardstock for berries.
Cut a square from the pink snowflake patterned paper to 13 x 13cm
Glue the pudding, holly leaves and berries to the patterned paper, leaving enough room below for a sentiment.
Glue the sentiment in place.
Cut a square from the grey cardstock to 13.5 x 13.5cm and glue the pudding and pink patterned paper on top of it leaving an even, narrow border all around.
I recently downloaded the Nordic Winter Christmas Backgrounds digital paper set. I wanted to do a 10 cards 1 paper pack for this set, but I don't think that I'll have time to get that all done. So I'm going to post about each card as I go rather than waiting for all the cards to be completed.
Nordic Christmas Digital Paper Set by Green Light Ideas (via CreativeFabrica.com)
To flesh out the paper pack I used the colour picker tool in my graphics program on the patterned paper to create some solid-colour coordinating cardstock in pink, brown, grey, beige and blue. I also made some generic Christmas sentiments using the brown background. Take a look at this post to find out create your own sentiment strips.
To make the card:
Draw (or print) a template for a Christmas jumper (sweater) onto plain white card, trace around it on the reverse of the patterned papers and then cut it out.
Trace around just the neck, cuffs and bottom of the jumper on plain white card, cut them out and glue them into place.
The card blank is 10.5 x 14.5cm.
Cut a piece of 10 x 14cm printed brown cardstock and glue to the card blank.
Cut a piece of 9.5 x 13.5cm blue and grey argyle patterned paper and layer on top of the brown card.
Glue the jumper (sweater) to the front of the card. Use foam tape for added dimension (optional).
Place a sentiment of your choosing below the jumper (sweater).
Some affiliate links used. If you follow a link and then make a purchase I will receive a commission at no additional cost to you.
All of the products mentioned in this post are products that I have bought and paid for myself.
Last year I did a 10 Cards 1 Kit post where I used a paper pack as my "kit". I like the idea of doing something similar and this Christmas-themed paper pack that I found at Creative Fabrica seemed like a good fit. I like the mix of colours and imagery and the potential to make a complete card kit from it.
To make up the card kit you could:
use a graphics program to separate the gingerbread, holly sprigs, candy and poinsettias into individual files to give a set of embellishments.
print the backing papers as is (in 12x12 format) or manipulate them in a graphics program to create a smaller scale repeat as the patterns are (more-or-less) seamless.
use the colour picker tool to create your own coordinating plain card for matting and layering.
create a sheet of generic sentiments (like in this blog post) for your card fronts or interiors.
bring in some other elements from your stash (like glitter, glitter card, mirror card, gems etc.) to add some pizzazz...
…and you've made your own card kit! I'll make a separate post (and maybe a video) with more details and the results, so stay tuned.
A few months ago Design Bundles released a new freebie digital paper pack - the Summer Digital Papers Set: sixteen 12x12" papers with a (loose) summer theme. As soon as I saw the set I thought of Christmas even though it's labelled as "Summer" and one of the papers features watermelons! So I thought it would be fun to try a 10 cards 1 kit with the set, but with a Christmas theme. I also thought that it would make a great debut video for my YouTube channel. Alas, I didn't get around to editing it in time 😞.
OK, so I know that Christmas is long gone, but I'm posting this anyway because I went to all the trouble to make the cards and film the process and it seems like a bit of a waste not to. Besides, if you ignore the Christmas theme this could be great inspiration for how to use patterned papers for cards in general.
I did use some die cuts, stamps and card from my stash, but I tried to keep the "extras" to a minimum so that the cards could be recreated easily with whatever you have in your stash.
Card 1
I was struggling to get started so used Freshly Made Sketches 457 for inspiration. I used a Kraft card blank and four of the patterned papers and cut a stag head silhouette from Kraft card to match the base. The sentiment is stamped and heat embossed with white embossing powder.
The stag head could easily be replaced and the sentiment changed for a card for a different occasion.
Card 2
For this card I cut one of the green papers into a triangle for a tree and used the red paper to create presents. I also used pink glitter card as a mat to match the pink of the patterned backing paper and then cut 'tinsel' from the glitter card to decorate the tree. Acrylic gems for baubles and a simple sentiment stamped in green to match the colour scheme finish off the card. (If I were going to make this again, I'd make the presents slightly smaller.)
Card 3
For this card I embossed a piece of plain white card, slightly smaller than the card front. I cut strips of the triangular patterned paper and used them to create a frame around the embossed card. Then I cut three triangles for trees and a scalloped circle to frame the sentiment from different papers in the set. I added a few gems for an extra festive touch.
Card 4
Here I made rosettes of varying sizes from three of the patterned papers and used silver glitter glue to make them look like hanging ornaments. I stamped and heat embossed a sentiment onto a piece of one of the green papers. This design would also suit a birthday card or any celebration card.
Card 5
The striped patterned paper screamed "candy cane!" to me so I cut out two mirror images of candy cane shapes. (I didn't have a candy cane die so I drew a template and used that as my guide.) I die cut a bow from the the red paper and some pine sprigs from one of the green papers. The elements were arranged on a Kraft tag to match the card blank, and then I used the red gingham style paper as the background. I also added some silver string to the tag.
Card 6
For this card I die cut the pine sprigs from one of the green papers and die cut three circles from three of the patterned papers. I fussy cut various triangles from the patterned paper and arranged all the elements to make it look like baubles hanging from a tree. I cut a sentiment from pink glitter card to finish off the card.
Card 7
I kept things fairly simple for this card, cutting a stitched edge rectangle frame from Kraft card and a rectangle from the red patterned paper. I die cut a bird and a sentiment from plain white card and finished off the card with a few gems.
This could also be adapted for any other occasion by changing the sentiment and using a similar die or florals in place of the bird.
Card 8
This is one of my favourites. Pink isn't readily associated with Christmas, so to make the card more festive I stamped a snowflake-like motif in the centres of all the polka dots and heat embossed them with gold embossing powder. Then I layered rectangles of gold mirror card and the pink patterned paper as shown and die cut a sentiment and the stag head from gold mirror card as well. Again, this could easily be adapted for a different occasion.
Card 9
I had a lot of small paper pieces and offcuts left over so I decided to try some paper weaving. I embossed a piece of white card with the swirly pattern then die cut a bauble aperture from it and placed the woven paper behind the aperture. Then I die cut the bauble hanger from gold mirror card and pieced it back into the aperture. I also stamped two sentiments on circles which I covered with Glossy Accents. I was hoping to get a somewhat domed effect, but they turned out pretty flat. I added a few gems to finish.
Card 10
I left the red and black polka dot paper until last. I really struggled with how to use it because it didn't feel Christmassy to me. In the end I decided to use a layout that I've used a lot in the past and like. I cut a strip of black card to go across the card and a slightly smaller strip of the patterned paper to sit on top of it, then cut a stag silhouette and the sentiment from black card. The stag silhouette didn't pop out enough when directly on the patterned strip so I also cut a decorative oval from white card for it to sit on. I added a few gems on the white spaces for a bit of added interest. I'm still not sold on this colour scheme, but it was interesting to try.
EDIT - I did it! I finished the corresponding video and posted it to YouTube 🙌🙌
--------------------
This was a lot of fun and a great creative exercise! I was really pleased with the variety of different cards that I ended up with despite using limited resources. Why not challenge yourself to create 10 cards from 1 paper pack? Design Bundles have thousands of background papers as well as other graphic resources at very reasonable prices. It's a really cost-effective way of adding to your stash (provided that you have a decent printer), plus you'll never run out of your favourite design again!
If you're new to digital crafting or don't have much of a budget for craft supplies it's definitely worth checking out their freebies page, but remember to read the licence terms to make sure you don't violate any terms of use.
Every year Christmas manages to sneak up on me! You'd think by now I'd have cottoned on, but come the beginning of December I'm always astounded by how close the big day is. I have managed to make a few Christmas cards though.
This card is based on an old design that I made with white and Kraft card. The snowflake is actually a doily (Couture Creations Cecily Doily), but I thought that it looked very much like a snowflake and would look great against a snowy background.
I cut the doily in half and placed each half at the top and bottom of the card. I added a few pearls to some of the circles within the doily for a bit of extra prettiness. The "Merry Christmas" sentiment is from another Couture Creations set - Merry Layered Stars.
This design, although simple does take a bit of time to complete because of adding small dots of glue to the doily die cut and sticking on the pearls, but could easily be modified to make it quickly reproducible.
At first I created the background using paint splatters on blue card, but to save time I used a graphics program to create my snowy background. Download it here.
Use a double sided adhesive sheet with the doily die cut or a brayer to apply the glue to save time
Use self-adhesive pearls or pearl enamel drops (much less fiddly than loose pearls).
I have an extra Cecily Doily and Merry Layered Stars set on eBay if you'd like to recreate this card:
A few weeks ago Redbubble hosted a series of design challenges and I decided to enter. The brief for Week 1 was to create a vintage-inspired card or pattern artwork. This was my submission:
...and I was chosen as a runner-up! You can read the post on the Redbubble blog here. Or better yet, head over to my Redbubble listing and take a closer look. Buy multiple greetings cards (they don't all have to be the same) and get a discount of up to 50%. This post contains affiliate links. If you click on a link and subsequently make a purchase I will receive a commission at no extra cost to you.
I love Christmas decorations and in an ideal world every room in the house would be festooned to bursting point. In reality though, every year the living room looks beautifully festive but the decoration of the rest of the house is sporadic at best. So I vow to craft up a storm for next Christmas, but it always seems to creep up on me! You know, it's ages away, it's ages away. it's ages away, oh shit it's here! It's like that scene out of Monty Python's The Holy Grail (but without the carnage 😂!) You'd think by now I'd be better prepared... So in my attempt to boost the decorations stash I have made a few things, including this indoor wreath. I will be attaching one to every internal door in the house. I cut a ring from Kraft card with a 15cm outer diameter. I then lined it with pine sprigs that I die cut (I don't know the brand) from green paper. I then die cut holly leaves from two shades of green mirror card using the holly dies in the Tattered Lace Holly & Robin set. Finally I cut several poinsettias using two sizes from the Tattered Lace Poinsettia 2016 set to place over the leaves around the frame. The wreath is finished off with a red bow at the top and a loop of red ribbon for hanging glued to the back. As I cut the holly from green mirror card, I went back over all of the berries with red glitter glue.
In our house the decorations go up on the 1st December. That's only a couple of days away so I won't have a full complement of decorations in time for that, BUT technically I've got until Christmas Day so I'll keep making them and adding them up until then.
I've seen a few cards on Pinterest featuring a silver birch style background which I really liked. So I bought myself a birch tree background cutting die and made my own version. I really like how it turned out.
I started with an A6 plain white card blank.
For the background I used Distress Stains in blocks of colour (from top to bottom: Chipped Sapphire, Wilted Violet+Broken China and Broken China). I simply swiped the stain across the card in stripes, overlapping the colours in each block for a smoother transition. Wilted Violet on its own was too purple, so went over the top of it with Broken China to get more of a blue hue. I also dotted Chipped Sapphire across all three colour blocks in several places, which also helps to blend the colours.
I die cut the birch tree trunks from white card and lined the die cut up with the top and sides of the card over the coloured background. The die cut did not reach all the way to the bottom so I cut a couple of snow mounds from white card and placed them at the bottom of the card, then went over them with a Spectrum Noir clear sparkle pen for a glistening snow effect.
The deer are from the Tattered Lace Family Outing die set. I cut them from white card and coloured them using Spectrum Noir markers, going over the spots on their backs with a white gel pen. I stuck the doe straight on to the card and used foam pads for the fawn.
At this point I decided to add some snowfall to the scene by dotting snowflakes onto the background using a white gel pen.
Finally, I stamped the sentiment into the corner. The stamp I used is from a set that came with issue 35 of Creative Stamping magazine.
Wow, was it really May when I last posted on this blog?! Time is racing past at an alarming rate, which means that Christmas will be here in the blink of an eye! So, it seems like a good time to start sharing some Christmas projects.
This is a card that I made last Christmas, but I think that I will make some more this year too. It's pretty straightforward to make.
You will need:
6x6 card blank
Gold Mirror card in different shades
Kraft card
Flat back pearls or Liquid Pearls
Embossing folder
Bow or ribbon
Foam Pads
Glue
I used my Silhouette Portrait to cut out the holly leaves, but you could use a die, or a punch, or if you have the patience, do it by hand! I also used the Portrait to cut out a ring about 3 inches (7.5cm) in diameter to act as a base for the holly wreath.
Start with a 6x6 (15x15cm) card blank.
Cut a piece of mirror card to leave about a 1/2 cm (1/4 inch) border around the outside (so 5.5x5.5 inches or 14x14cm) and affix to the centre of the card blank.
Cut a piece of Kraft card about 5x5 inches (13x13cm) and emboss using an embossing folder of your choice. I used Sheena Douglass' 7x5 swirls folder (one of my favourites).
Affix the embossed Kraft card square to the centre of the mirror card mat.
Cut about 20 holly leaves out of different shades of gold mirror card. If necessary emboss the veins onto each leaf using a ball tool or blunt pencil.
Cut out a ring about 3 inches (7.5cm) diameter and 5/8 inch (1.5cm) wide from card for the wreath base.
Attach the holly leaves to the ring, alternating shades and layering some to add dimension.
Attach a bow at the bottom of the ring.
Place flat-back pearls in groups of three around the wreath for berries.
Attach the wreath to the card with foam pads.
Place a pearl in each corner of the embossed Kraft panel.
You could also add a sentiment to the front if you wanted. This would also look great with traditional green holly leaves with red berries, but you could also try pink leaves with turquoise berries, or purple leaves with gold berries or any colour combination that you like for an alternative look. Just be sure to match the colour of the mirror mat with the holly leaves.
I've been having so much fun making mini holly wreaths. They're so adorable and perfectly sized to sit on the front of an A6 card or to make great hanging ornaments for the Christmas tree.
I made the holly in CraftArtist 2 by using the star shape, selecting the number of points and then using the edit nodes function to manipulate the shape. I then imported the shape (jpeg) into Silhouette software and used the trace function to generate a cut file. Then it was just a matter of filling the page with the holly in a couple of different sizes and cutting them out from lots of different shades of mirror card with my Portrait. It probably would have been much easier to download the shape from the Silhoutte store, but where's the fun in that?!
I also cut out lots of rings with an outer diameter of 9cm and an inner diameter of 7.5cm to act as the wreath bases. Before sticking the holly down I hand-embossed each one (using a blunt pencil or scoring tool) with leaf veins. 4mm rhinestones act as berries and the whole thing is finished off with a small bow.
Various shades of green on the same wreath give the illusion of depth and I also enjoyed playing around with other colours for a more contemporary look. For the hanging ornaments I added a hanging loop and stuck another round of leaves on the backside so that the wreath looks good on both sides. Made a little bigger they can be used on A5 cards, and a little bigger again they look great as inside door decorations. I'll definitely be making more wreaths again next year.

.jpg "Christmas Mandala Golden Paper Texture Set")
.jpg "Print from Windows Explorer")