Search This Blog

Showing posts with label cut files. Show all posts

31 March 2023

Friday Favourites

 Every Friday (more or less 😉) I bring you a graphic, a font and a cut file that I like.  Some will be free and some will be paid for, but all are items that I have downloaded or purchased myself.  

This week's graphic offering is a little bit different.  I came across this Photoshop Stamp Brush Bundle at Creative Fabrica and couldn't believe how much it contained 😲!  There are 136 stamp brush sets, totalling more than 5000 individual brushes!  For those without Photoshop, they also work with Affinity Designer and Affinity Photo.


 A stamp brush is basically a stamp.  Although it is called a brush, you don't paint or draw with it. Rather you stamp individual images on to your canvas wherever the brush passes.  So this could be great for creating textured backgrounds and patterned papers for journals, scrapbooking, cardmaking, sublimation... Basically any crafty project.  At $12 (or included as part of the All Access Subscription) it's an absolute bargain.

I created this gorgeous, textured background using some of the brush sets in this bundle - namely the splash, foil and cracks sets. You can download this background for free here.   I may film a tutorial for creating a digital background like this soon, so consider subscribing to my YouTube channel to keep updated.  

Download this free textured background here

------------------------------------------------------------------------------------------------

This week's font is Rainbow from Creative Fabrica. It is a decorative typeface with 5 different styles - plain, stars, stripes, hearts and circles.  It's super cute and would be a good candidate for use with digital cutting machines.  

If you know your way around a graphics program like Affinity Designer, you could also isolate the outline of the letters to get a solid base for layered effects like I did with the last two examples.


------------------------------------------------------------------------------------------------

With Easter fast approaching, these Easter Egg Lanterns from Design Bundles would be a cute addition to your Easter decorating.  Do you decorate for Easter?  I don't specifically decorate for Easter, but I do like to have a lot of floral decorations around go celebrate Spring.  


And again, if you know how to modify SVGs, you could squish the tabs and replace with Christmas imagery to get decorative ball lanterns for the festive season.

Until next time...

27 January 2023

Friday Favourites

  Every Friday I'll be presenting some graphics, a font and a cut file that have caught my eye.  This week I bring you a gorgeous set of watercolour images featuring floral cameras with birds, an elegant serif font and a set of kitchen-themed monogram frames.


  So first of all, the Watercolor Spring Floral Camera Bundle.  These watercolour images are just gorgeous 😍.  There are 10 PNG images in the set featuring old-style cameras adorned with flowers, birds and butterflies.  


  I used one of the bird images to create my own decoupage sheet, which I then assembled and put in a box frame.  I love the end result.  It was given as a gift but I plan to make another one to put on my own wall.  All of these images would look lovely on a variety of projects, like greetings cards, notebook covers or wall art.


It's difficult to see the 3D in this photo, but it looks great in person!


This week's font is Rise of Kingdom.  This elegant, serif, all caps typeface is available as a free download from Creative Fabrica.  There are over 100 pages of free fonts available on the Creative Fabrica website so it's well worth a look.


  I recently used the font to create this kitchen sign, which also happens to be the cut file of the week:


  The split monogram frame comes from the Laser Kitchen Split Monogram Svg Bundle, although I got it as part of the Cute Paper Craft SVG Mega Bundle both from Creative Fabrica.  (The latter is an absolute bargain by the way, with over 300 sets of SVG cut files for only $11! I might have to do a separate post or two just for that.)  


Happy creating!

22 January 2023

Butterfly Name Sign

  A few weeks ago my friend asked me to make a personalised gift for the daughter of a friend. I used one of the split monogram butterflies from this set.  I welded the name to the butterfly and then turned it into a multi-layered design in Affinity Designer.

  I exported the resulting files as SVGs, which I then imported into my ScanNCut to cut the various layers.  After gluing them all together I decided to use a spray varnish on both sides to protect the card and increase its longevity.


It's so pretty!  To display it tie some string to the antenna or glue it to the back of the butterfly to make a hanger, or put it in a box frame.


SUPPLIES and RESOURCES

Spray and Shine High Gloss Varnishhttps://tidd.ly/3D17HPP


13 January 2023

Friday Favourites

  First off I have to mention this incredible, huge bundle from Digital Attic Studio on Creative Fabrica.  The Ultimate Vintage Bundle consists of 60 individual sets including digital papers, backgrounds, junk journal kits, ephemera and clip art. Even if vintage isn't your thing there are so many elements to choose from that you're bound to find something that you like.


BUT, it's only free for a limited time.  The bundle expires at 23:00 (GMT) on 18th January.

  I created this tag using a handful of elements from the Vintage Celestial Bundle - just one of the kits available in the full bundle. 
-----------------------------------------------------

For the font I have chosen Underwood Champion from Creative Fabrica.  It's a retro, typewriter font with a slightly grungy texture.  I used it to create these sentiment strips mentioned in this blog post.
-----------------------------------------------------

And finally for the cut file I've chosen this cute Welcome Sign from Design Bundles.  The design is listed as a laser cut file, but could definitely work with paper too.  It comes in a layered version or a flat version.  If you're familiar with any graphics program you could modify the files to create your own layered version as well.

Happy creating!

01 November 2022

Spooky Faces Wood Slice Ornaments

A quick and easy project today - spooky faces wood slice ornaments.  I used the Halloween Spooky Door SVG Bundle from Creative Fabrica.  I started by importing the images into Canvas Workspace, grouping the faces together and resizing each face so that they were about 45-50mm each before cutting them out.  I used white card, but you could use something a little more robust.


  • Simply paint the wood slice with acrylic paint and leave to dry.
  • Choose a stencil and then apply the glitter paint through it.
  • Carefully lift off the stencil and allow the glitter paint to dry.
  • Done!

SUPPLIES

18 March 2022

Friday Favourites - House Plant Laser Cut Files

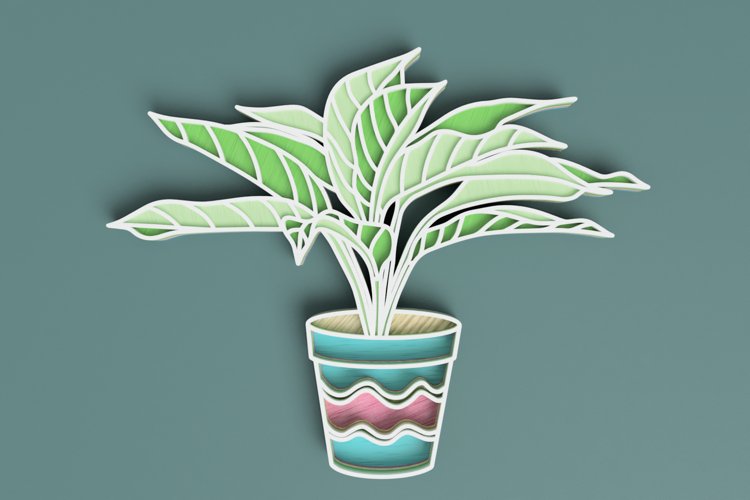
I like to keep a regular check on new products added to the Design Bundles Plus products pages.  Under the "Crafters" - "Laser Cutting Designs" filter there are literally thousands of cut files designed for laser cutting with new files being added daily.  I don't have a laser cutter (yet!) but I still like to stalk the pages for items that would work with card or greyboard on my ScanNCut.

There are a load of layered house plant cut files that I really love.  They would look wonderful in their own right as wall art, but would also make great toppers for cards, scrapbook embellishments, fridge magnets and so on.


Head over to Design Bundles to take a look.  The files are part of the Design Bundles Plus membership, so you would have to become a member to download them.  However the first month is just $1 and you get 10 free Plus credits as soon as you sign up.  And you get to keep any Plus purchases even if you cancel the membership.  Each of the files above are just one plus credit each, so you could buy them all and have credits to spare!

16 February 2022

Filigree Heart

14 Days of Hearts - No.3

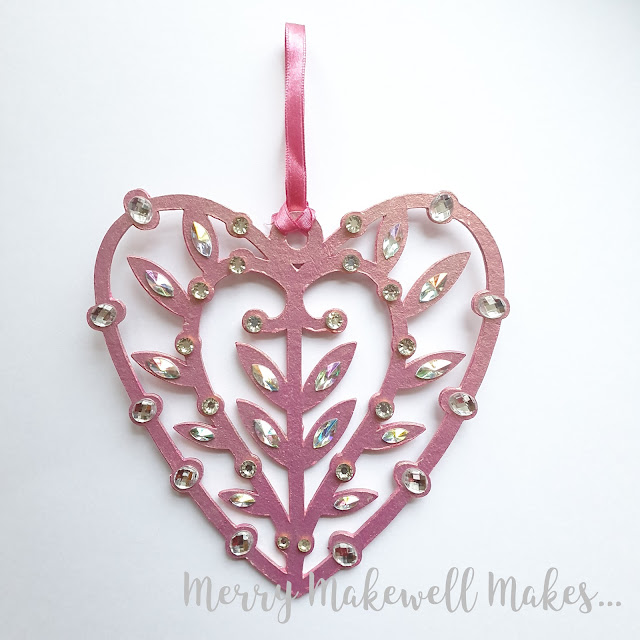
I saw this pair of hearts, designed by Nic Squirrell and thought that they would work really well with gems or pearls on the round elements of the design.

Two Filigree Hearts SVG Cut Files


I used the heart on the left and made a slight modification in Canvas Workspace to add a little hanging loop to the top.

  • Add the file to your cutting machine software and set the desired height.  I chose 150mm.
  • Cut four layers from cardstock and glue them together.  This will give a sturdy structure.
  • Paint the stack.  I used "Glowing Peach" iridescent acrylic paint by Arteza.  (It has a pinkish base with gold shimmer.  The colour changes depending on the angle from which you view it.)  I painted both sides, but that is optional.
  • Once the paint is dry glue a selection of gems to the various corresponding elements in the paper cut.  I used horse eye, round and oval gems.
  • Add a ribbon or string to the hanging loop.


Process video (short):


Supplies


11 December 2021

Stained Glass Papercut Collection - Peacock

Here's another design from the Stained Glass Papercut Collection from CraftWorld.  I love peacocks, so it was a given that this would be one of the first designs that I chose from the collection.


To make this card:

  • I wanted to back the peacock with a colourful patterned paper, so I imported the SVG to Canvas Workspace and created a mat to fit the peacock by drawing around it with the Path Tool.  So now when I resize the peacock design I can resize the mat at the same time!
  • The SVG was 8.5 x 14cm.  So I cut a piece of gold glitter card to 9 x 14.5cm and the card blank was 9.5 x 15cm.  
  • I glued the papercut and mat to the gold (champagne) glitter card, and then onto the card blank.
  • I added some gems to the peacock's tail in a coordinating peacock green.
It's a relatively simple design, but it has a lot of impact.  I can't remember where I got the glitter card from, but it is absolutely gorgeous 😍.

The papercut includes the sentiment "Best Wishes" , but it would be easy enough to make some additional sentiments.  The Breamcatcher font would fit the Art Deco aesthetic very well and is available to download for free.

The patterned paper that I used for the peacock is from this set.

Get the Stained Glass Peacock cut files and others from the collection here.

09 December 2021

Stained Glass Papercut Collection - Rose Buds

I was browsing the CraftWorld website a couple of weeks ago and came across a call for digital cut file testers.  On a whim I applied and imagine my delight when they sent me a bunch of files to try out!

There are 9 files in the Stained Glass Collection consisting of a mix of traditional stained glass imagery as well as some landscapes and florals.  For the first card that I made, I used the Rose Buds set.


  • First of all I imported the SVG into a graphics program and adjusted the line colour so that it was very faint.  
  • Then I printed that out to use as a painting guide.  I used Derwent Inktense pencils and a water brush to colour in most of the elements. 
  • I cut the file (being sure to keep the same dimensions* as the printed version) from black card and then glued that on top of the coloured image and put it onto a card blank.
  • To finish the card I added some gold gems and a sentiment strip, which I popped up with foam tape.

*For this card the SVG had width of 9cm.  The card blank was 10 x 16cm.

Originally a set of metal dies, which are no longer available to buy, the designs have been resurrected as SVG cut files.  Get the full set from CraftWorld.

11 October 2021

Rest In Pieces Coffin Box

Some affiliate links used. If you follow a link and then make a purchase I will receive a commission at no additional cost to you. 
All of the products mentioned in this post are products that I have bought and paid for myself.

So yesterday while I was organising my latest batch of cut files I was hit with a sudden compulsion to make a coffin box 🤷.  I really don't know where that came from, because none of the files that I was organising were even remotely Halloween related! I could have purchased or downloaded one but I felt like I wanted to make my own, so I did.

Coffin treat box with Rest In Pieces written on it and a cross both dripping with blood.
Coffin treat box for halloween

  • For the text and cross I used the Kiss My Lips font.  It's actually not a "spooky" font, but I thought that it would give a great dripping blood effect.  In Canvas Workspace I welded the words "REST IN PIECES" together and the letters T and I to make the cross. 
  • Then I cut all the elements from black card.
  • After assembling the box lid and base I used a synthetic bristle brush to paint a very light coating of silver acrylic paint and bronze gouache on to the coffin lid to distress the black.
  • I also used the synthetic bristle brush to roughly paint over the text with silver acrylic paint. (I didn't want neat, even coverage.)
  • With a very small amount of scarlet red acrylic paint I roughly painted over the silver, being sure to leave some of the silver showing.
  • With a fine detail brush I used the red acrylic paint to saturate the drips.
  • Finally I glued the text and cross onto the front of the coffin lid.
  • Fill with treats (or tricks!).

Supplies

Coffin cut file for ScanNCut (free download): https://www.dropbox.com/s/220ywu7exj30ig9/coffin%20box%202.fcm?dl=0

Rest In Pieces text for ScanNCut (free download): https://www.dropbox.com/s/x2eyxfje0h8rcpc/rest%20in%20pieces%20text.fcm?dl=0

Kiss My Lips Font: https://www.creativefabrica.com/product/kiss-my-lips-3/ref/98543/

Arteza Acrylic Paint: https://arteza.co.uk/collections/acrylic-paint/products/acrylic-paints-set-12-colours

Arteza Metallic Acrylic Paint: https://arteza.co.uk/collections/acrylic-paint/products/metallic-acrylic-paint-set-12

Arteza Metallic Gouache Paint: https://arteza.co.uk/collections/gouache-paint/products/metallic-gouache-artist-paint-12ml-tubes-set-of-36

Arteza Detail paint brush set: https://arteza.co.uk/collections/artist-brushes/products/detail-paint-brush-set-of-15

Black card: https://tidd.ly/3GPZosv


06 July 2021

Converting Fonts to Cut Files for Electronic Cutting Machines


I really like the papercut effect of the font Monogram Daishy In order to create an actual papercut monogram with my ScanNCut I would need to convert the font from OTF/TTF formats to a compatible format. The FCM format is specifically for the ScanNCut. The SVG format will work with most electronic cutting machines including the ScanNCut.  


Converting fonts for the ScanNCut

Simply using the text tool in Canvas Workspace doesn't always work.  With more complicated or intricate designs the cut lines can end up crooked and jumbled and would absolutely not work as a cut file.


Monogram Daishy Font in Canvas Workspace using text tool


The easiest solution is to use the ScanNCut Type Converter - a free program that you can download from the Brother website for converting OpenType and TrueType fonts to FCM cut files.  

Brother ScanNCut Type Converter overview


You can only type a single line of text into the converter and it all has to fit within the 30cm (12") width of the mat, so you may have to either save the letters individually or in small groups depending on the size of the font.  My preference is to save as many letters as possible in one go and then resize them in Canvas Workspace afterwards. 

You can clearly see the difference between using the text tool directly in Canvas and using the Type Converter before importing the file into Canvas.


Monogram Daishy Font in Canvas Workspace using Type Converter


Bear in mind that some font designs are best suited for larger scales due to the intricacy of the design or areas with narrow lines and small apertures.  Also some font designs might not translate well to a cut file, for example if the style is sketchy.

I am not familiar with Cricut Design Space or Silhouette Studio, but you can also create cut files from fonts by using a graphics program to convert the font to SVG format.  


How to convert a font to an SVG in Affinity Designer 


- open a new document.  
- select the Type Tool (1) and type out your letter(s).  
- select "Layers - Convert to Curves" (2 and 3).  


- select a colour for the stroke and set the stroke width to >0pt. 


- with the letter(s) selected, go to "File - Export..."
- select "SVG" for the file format and "selection only" for the Area (to export only the areas of interest and not the whole page)


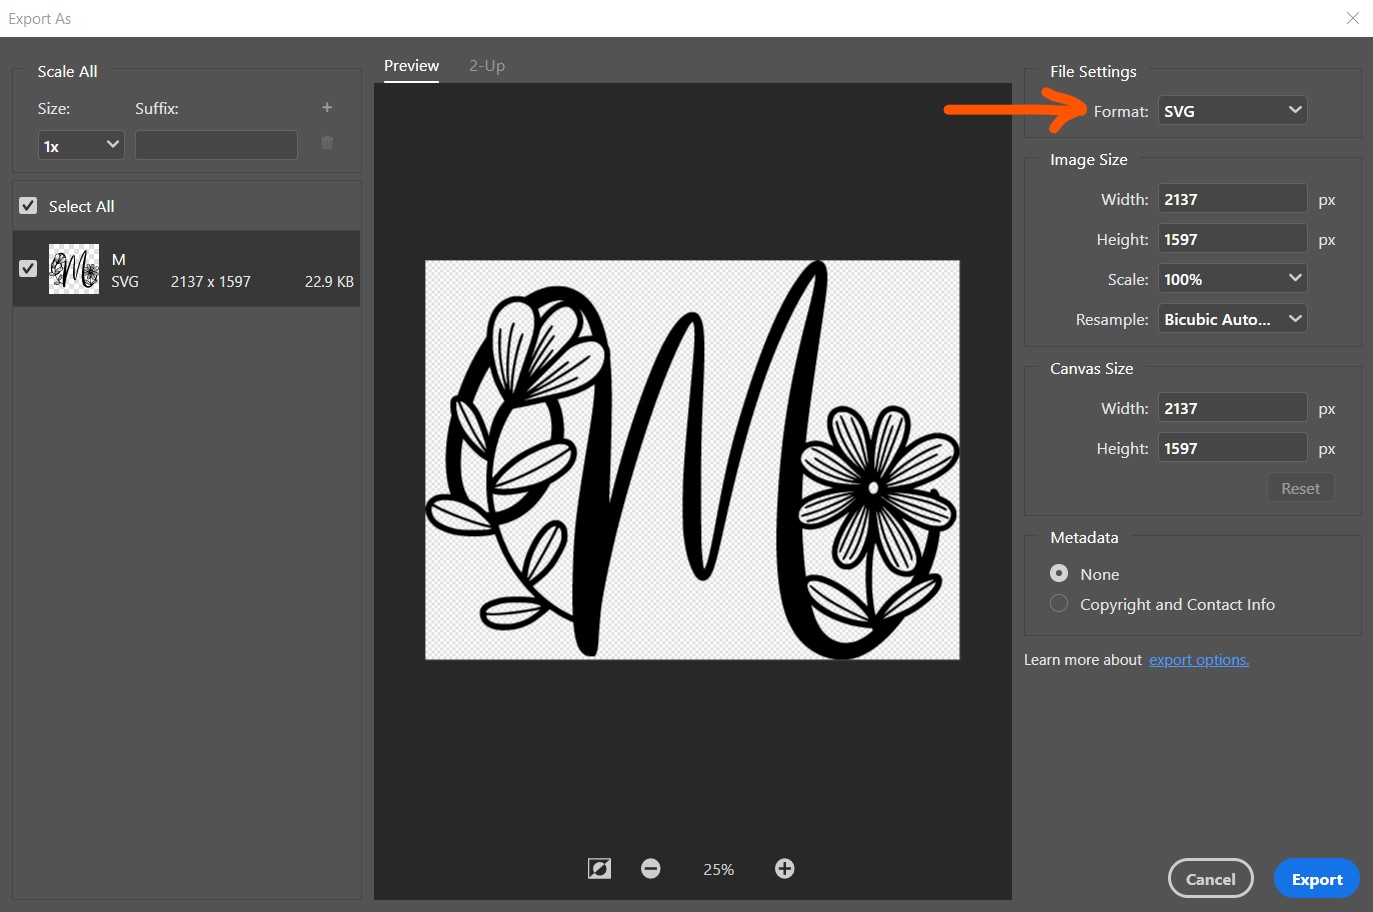
How to convert a font to an SVG in Photoshop


- open a new document.  
- select the Type Tool (1) and type out your letter(s).  
- select "Type - Convert to Shape" (2 and 3).  


- select "Layer - Export As..."

- then select SVG for the format and click export.


The font is now ready to use with your cutting machine! 

Get the Monogram Daishy Font:

Explore more great monogram fonts here, here and here.

09 March 2021

Friends Are The Flowers in The Garden of Life - With Free Download


I made this for a friend a while ago.  It's been a while since I've seen it, but the adhesive failed so she asked me to fix it and now that I've seen it again I really love it!

The base is an MDF shape that I picked up at a craft show.  I covered it with a couple of coats of silver acrylic paint.

The flowers were made using Tattered Lace's Floral Layers Rose die, which makes really lovely layered flowers, but sadly has been discontinued.  However any floral dies would work.  Same for the foliage.

I designed the sentiment in Canvas Workspace, positioning all the letters so that there was some overlap, then welding them together so that the sentiment was a single piece.  I cut 4 layers from 300gsm card and glued them together to get a solid, dimensional appearance.  Download the SVG cut file for the sentiment here (personal use only please).

To arrange the flowers I used hot glue to affix a piece of acetate to the back of the watering can that extended from the top to the handle and then used hot glue to stick down the flowers. Then I cut cut some foliage, doubling up the layers again to give them some rigidity, and just slotted them in around the flowers.

Fonts:

22 October 2019

Halloween Tea Light Covers

I don't really do Halloween, but the kids enjoy it and so I thought that it would be nice for them to have some Halloween decorations this year.  Even though I've had the Enchanted Forest Bundle from CraftBundles.com for a while, I'm still working my way through it.   One of the collections within the big Bundle is Enchanted Spiders, which I had completely forgotten about.  But then my friend asked me to create a poster for her kid's school's Halloween disco and that's when I rediscovered it.

There are a few files that I thought would lend themselves perfectly to being made into tea light covers.  One of the designs worked straight out of the box so to speak, but the others needed some adjustments (which I did in Canvas Workspace) to make it easier for the panels to be stuck together.  I added vellum to the backs of each panel.


I resized this one so that it was about 10cm (4in) wide and then cut four. Then I folded the decorative elements over and glued each panel together at those points to create the tea light cover.


This one is similar, but I had to modify the spider and web so that there were no gaps between the elements and the panel could be lifted off the mat in one piece.  That was fairly easily done in Canvas.


For these I simply welded a rectangular strip to both the left and right sides of the panel in Canvas to act as the adhesion point.  I really like the way the branches stick out in the first set.

Unfortunately I couldn't find my LED tea lights :( so I couldn't photograph them in action, but I'm pretty sure that they'll look great.

As an added bonus, I was able to make use of the waste as well by sticking double-sided tape to card and using that to lift the waste off the cutting mat.  I then sprinkled silver and gold glitter over the surface. The results could be used as toppers on greetings cards or on bunting or garlands or for other decorations.

Lantern "waste".
(I just couldn't capture it here, but they really sparkle in real life.)

These are only a handful of the 46 images in the Enchanted Spiders collection, which means plenty more choice to play around with.  And with 280 images in the whole bundle covering birds, butterflies, bears, deer, foxes, fairies and unicorns there really are a multitude of options and possibilities.  At only $9 including a full commercial licence it's a crazy bargain! Get the bundle here.

*This post contains affiliate links.  If you click on the link and make a purchase later I will receive a commission at no extra cost to you.  However I bought and paid for this bundle myself and I'm recommending it because I really like it.