Search This Blog

Showing posts with label cards. Show all posts

20 July 2022

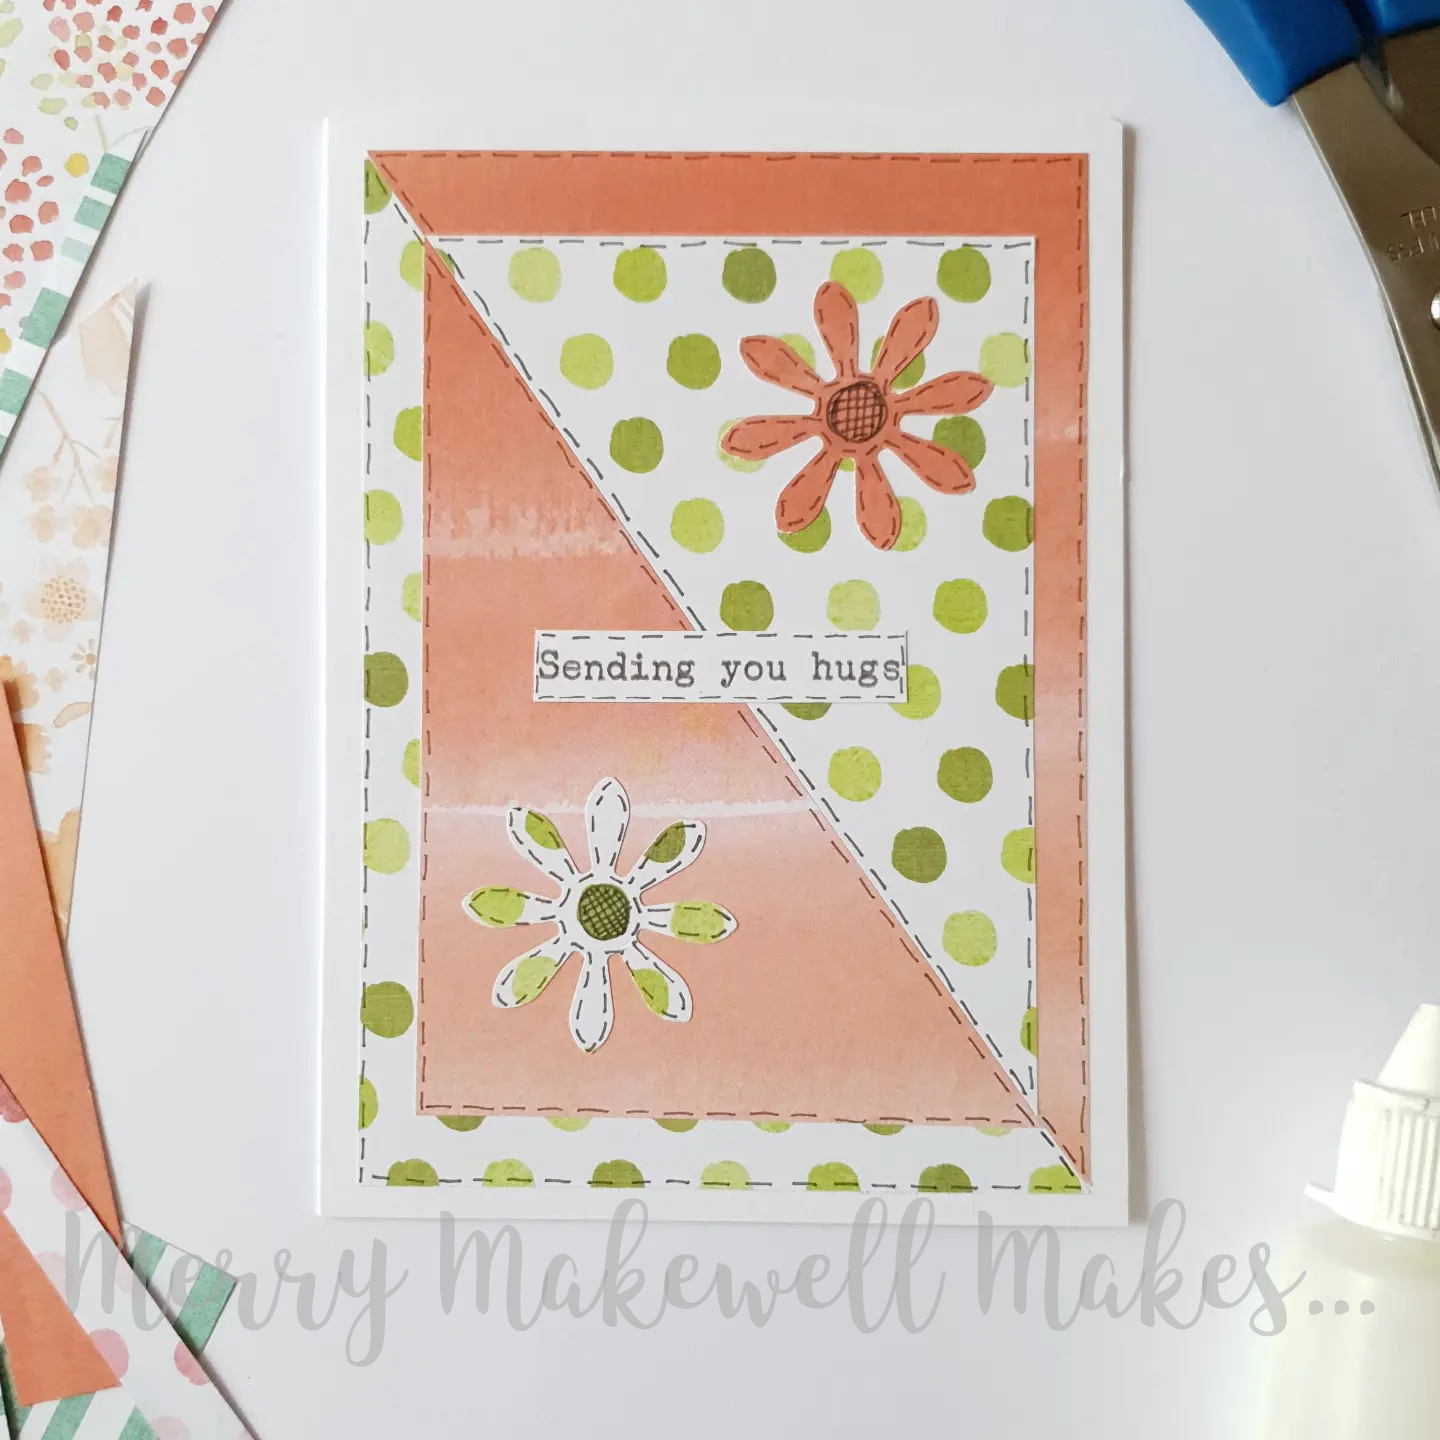
Patchwork Cards 1 - Half-Rectangle Triangles

I was looking through some of my (extensive!) paper scraps and came across a card layout that I designed, but never tried.  I thought it would be fun to try it out and share it with you:


To make the card:
  • Trim an A6 card base to 14.5cm (i.e. 10.5 x 14.5cm).  (This step is optional.  I like to do it because it makes the borders around the patterned papers equal.)
  • Cut two rectangles each measuring 9.5 x 13.5 cm and 7.5 x 11.5cm from two contrasting patterned papers. You should have four rectangles in total.
  • Cut each of the rectangles in half across the diagonal. (If you have half-rectangle triangle dies you can just cut the triangles directly.)  Make sure to cut in the same direction on all four of the rectangles.  You should now have four large triangles and four smaller triangles (two each in two patterned papers).
  • Position one of the large triangles in one corner of the card base, leaving an even border around the top and side.  Take one of the large triangles with a different pattern and position it in the opposite corner of the card base.
  • Place a smaller triangle in the middle of a larger triangle so that you have two different patterned papers on top of each other.
  • Use a (black) fineliner to add faux stitching around all the edges. 
  • Cut two flowers (or other shape) - one from each patterned paper and add faux stitching all around the edges. 
  • Glue the flowers (or other shape) towards the right-angled corner of the smaller triangles. You can shape the flowers and only stick down the centres or you can glue them down flat.  It's up to you!
  • Add a sentiment at the centre.
I made some additional cards with slight variations of the same layout by changing the position of the smaller triangle and the shape of the card base.

Variation 1 - Smaller triangles meeting at the centre diagonal. Also flowers are stuck down flat (more like applique).

Variation 2 - Card in landscape orientation and the corners of the smaller triangles are aligned with the corners of the larger triangles.  Also no faux stitching.

Variation 3 - Square card base, smaller triangles meeting along the diagonal (as in variation 1) and alternative faux stitch pattern on the flowers.

Variation 4 - Square card base, smaller triangles meeting along the diagonal and alternative shape used for the embellishment.

Watch the process video:


SUPPLIES
  • A6 card blank
  • Two types of patterned paper in contrasting colours.
  • Scissors / Trimmer / Guillotine
  • Glue
  • (Black) Fineliner pen  <0.3mm

17 January 2022

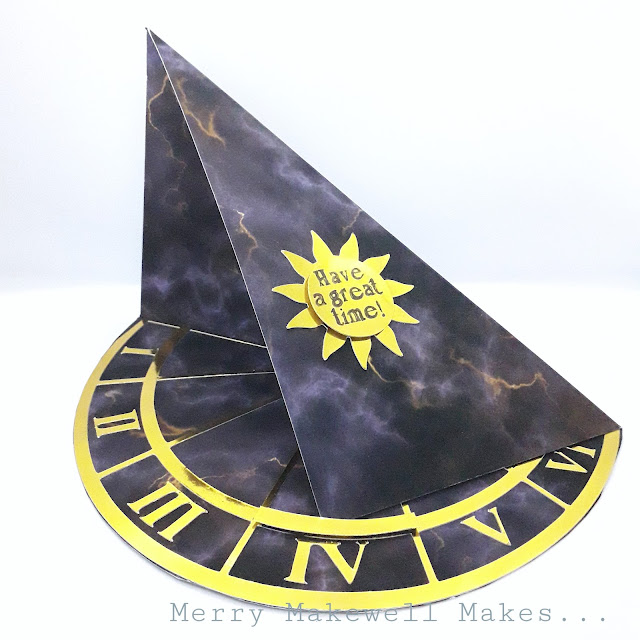
Sundial Twisted Easel Card

I recently updated my Skillshare class - "Create Dimensional Greetings Cards that Wow! - 1. Easel Card" with a couple of additional lessons.  In the lessons I show how to make a twisted easel card and I create a sundial card as an example of how to use the shape for maximum effect.


I am so happy with how it turned out!  I can't say that I've seen a card like this before so I'm claiming it as my invention!

Head over to Skillshare to watch the class.  If you're not already a member clicking the link will give you a 14-day free trial, and 1 free month if you then sign-up.

14 December 2021

Nordic Winter Digital Paper Set - Card 1

I recently downloaded the Nordic Winter Christmas Backgrounds digital paper set.  I wanted to do a 10 cards 1 paper pack for this set, but I don't think that I'll have time to get that all done.  So I'm going to post about each card as I go rather than waiting for all the cards to be completed.

Nordic Christmas Digital Paper Set by Green Light Ideas (via CreativeFabrica.com)

To flesh out the paper pack I used the colour picker tool in my graphics program on the patterned paper to create some solid-colour coordinating cardstock  in pink, brown, grey, beige and blue.  I also made some generic Christmas sentiments using the brown background.  Take a look at this post to find out create your own sentiment strips. 

To make the card:

  • Draw (or print) a template for a Christmas jumper (sweater) onto plain white card, trace around it on the reverse of the patterned papers and then cut it out.
  • Trace around just the neck, cuffs and bottom of the jumper on plain white card, cut them out and glue them into place.
  • The card blank is 10.5 x 14.5cm.
  • Cut a piece of 10 x 14cm printed brown cardstock and glue to the card blank.
  • Cut a piece of 9.5 x 13.5cm blue and grey argyle patterned paper and layer on top of the brown card.
  • Glue the jumper (sweater) to the front of the card.  Use foam tape for added dimension (optional).
  • Place a sentiment of your choosing below the jumper (sweater). 

Here's the finished card:


Watch the process video:


Supplies:

280gsm+ White Card

190gsm matte printer paper* to print:

  1. Nordic Winter Christmas Backgrounds digital paper set 
  2. Brown cardstock (use the colour picker tool in a graphics program to get the same brown as on the patterned paper)
  3. Christmas sentiment strips on brown background (handmade)

*I get my photo paper from StinkyInk.

11 December 2021

Stained Glass Papercut Collection - Peacock

Here's another design from the Stained Glass Papercut Collection from CraftWorld.  I love peacocks, so it was a given that this would be one of the first designs that I chose from the collection.


To make this card:

  • I wanted to back the peacock with a colourful patterned paper, so I imported the SVG to Canvas Workspace and created a mat to fit the peacock by drawing around it with the Path Tool.  So now when I resize the peacock design I can resize the mat at the same time!
  • The SVG was 8.5 x 14cm.  So I cut a piece of gold glitter card to 9 x 14.5cm and the card blank was 9.5 x 15cm.  
  • I glued the papercut and mat to the gold (champagne) glitter card, and then onto the card blank.
  • I added some gems to the peacock's tail in a coordinating peacock green.
It's a relatively simple design, but it has a lot of impact.  I can't remember where I got the glitter card from, but it is absolutely gorgeous 😍.

The papercut includes the sentiment "Best Wishes" , but it would be easy enough to make some additional sentiments.  The Breamcatcher font would fit the Art Deco aesthetic very well and is available to download for free.

The patterned paper that I used for the peacock is from this set.

Get the Stained Glass Peacock cut files and others from the collection here.

29 February 2020

AAA Cards - CAS Game: One Corner With Optional Twist (Old Supplies)

It's been ages since I participated in a blog challenge.  I'm making my comeback with the AAA Cards CAS challenge. The theme for this week is "one corner" with optional twist "love those old supplies". 


I stamped those flowers about 3 years ago then chucked the card into a pile where it's been lying forgotten since then. That counts as an old supply right? I pulled out that stamp set (Hunkydory "Floribunda" - also unused since I stamped those flowers) and stamped the leaves.  The sentiment came from another Hunkudory stamp set "Beautiful Babushkas". I coloured the leaves and flowers with watercolours. 

05 December 2018

Snowflake Christmas Card

Every year Christmas manages to sneak up on me! You'd think by now I'd have cottoned on, but come the beginning of December I'm always astounded by how close the big day is.  I have managed to make a few Christmas cards though.

This card is based on an old design that I made with white and Kraft card.  The snowflake is actually a doily (Couture Creations Cecily Doily), but I thought that it looked very much like a snowflake and would look great against a snowy background.

I cut the doily in half and placed each half at the top and bottom of the card.  I added a few pearls to some of the circles within the doily for a bit of extra prettiness.  The "Merry Christmas" sentiment is from another Couture Creations set - Merry Layered Stars.

This design, although simple does take a bit of time to complete because of adding small dots of glue to the doily die cut and sticking on the pearls, but could easily be modified to make it quickly reproducible.

  • At first I created the background using paint splatters on blue card, but to save time I used a graphics program to create my snowy background. Download it here
  • Use a double sided adhesive sheet with the doily die cut or a brayer to apply the glue to save time
  • Use self-adhesive pearls or pearl enamel drops (much less fiddly than loose pearls).

I have an extra Cecily Doily and Merry Layered Stars set on eBay if you'd like to recreate this card:

Get the Cecily Doily Die
Get the Merry Layered Stars Die Set

13 November 2018

Redbubble Holiday Card Design Challenge

A few weeks ago Redbubble hosted a series of design challenges and I decided to enter.  The brief for Week 1 was to create a vintage-inspired card or pattern artwork.  This was my submission:


"Eat, Drink & Get Hammered" Greetings Card
...and I was chosen as a runner-up!  You can read the post on the Redbubble blog here.  Or better yet, head over to my Redbubble listing and take a closer look.  Buy multiple greetings cards (they don't all have to be the same) and get a discount of up to 50%.

This post contains affiliate links.  If you click on a link and subsequently make a purchase I will receive a commission at no extra cost to you.

12 October 2018

Freebie Friday - So Special Card Front

This post contains affiliate links which means that if you follow the links and then make a purchase I will receive a commission at no extra cost to you.

I'm a bit of a craft supply junkie - whether it's physical or digital products my house and my hard drive are chock full with supplies that I love, but hardly ever use, but shopping for craft supplies is only half the fun.  There's joy to be found in the making too, so I'm making a concerted effort to use what I've got.

A little while ago I downloaded the graphics pack 'Herbaceous Greens'.   It is a set of watercolour greenery - branches, foliage and individual leaves - as well as 9 seamless patterns.  I used it to create this lovely A6 card front, which you can download for free from here (personal use only please):

You Are So Special A6 card front - Free Download
If you like the look of the set you can get the complete pack for just $1 (until the end of October) from The Hungry Jpeg.

12 May 2018

Majestic Unicorn


My creativity has been on hiatus.  There is a reason for this - my attention has been elsewhere.  You see, it all began with Black Panther, which led me to find out who Danai Gurira was, which led me to the Walking Dead where I boarded the Good Ship Richonne and sailed to Binge Watch Island.  I followed a trail that led me to the rabbit hole that is fan fiction which I promptly fell so deep into that I'm surprised I can still see daylight!

Anyway, I'm determined to claw my way back out and regain some sort of balance in my life and get back to making and creating in some capacity.  After catching up with my blog reading list I decided to join in with last week's Simon Says Stamp Wednesday Challenge - Animal Magic.  I cut several star garlands from gold mirror card to create the backdrop and then overlaid nesting stitched edge oval die cuts in white and gold.  Finally I used the Tattered Lace Majestic Unicorn die for the focal point.  

13 March 2018

Black and Gold

Back in September I bought some nesting triangle dies, but I've never used them! I knew I wanted to use the triangles to cover opposite corners of my card and I had recently seen some products from the Crafter's Companion Black and Gold Collection, which inspired the colour scheme.


I decided to use a black card base and cut the triangles from gold mirror card.  To add some interest I embossed the gold mirror card using the Crafter's Companion (CC) 3D Lace embossing folder (which I love but have also never used since I bought it!) and the black card with another CC embossing folder - Blooming Vines from the Country Garden collection.  I added some black flowers to the triangles, but they were a bit lacklustre so I added a few highlights with gold pen.  The sentiment is a Tattered Lace die that came with one of their magazines.

I used the off-cut from the die cut triangles to make a similar card.  This time I cut the flowers from gold card and the sentiment from black card.

Which do you like better?


22 February 2018

Lovely Flowers Card

Remember the free printable that I shared recently?  Well. I just wanted to show an example of a finished card:


Isn't it lovely (see what I did there)?  I also decoupaged the flowers for a little bit of extra interest.


It would make a lovely Mother's Day card, but the universal sentiment would make it suitable for almost any occasion.

16 February 2018

Cocktails by Moonlight

When the Tattered Lace Art Deco Classics range came out I fell in love with the ladies in the Art Deco Cocktail Hour set.  I really like the seated lady and I had recently downloaded a set of space watercolour backgrounds from Creative Market (free download of the week at the time, currently 50% off) which made me think of having her sitting in the moon sipping her cocktail. A few gems and some small fabric stars completed the overall effect.  


This post does not contain affiliate links. 

09 February 2018

Patchwork Butterfly Birthday Card

My friend asked me to make her mum a 60th birthday card. I make a lot of cards.  I even send some of them to friends and family for various occasions, but I have never made a card for someone to give to someone else.  It was different, trying to make for someone whose tastes I didn't know that much about.  It didn't help that the only direction that I received from my friend was to "make it nice"! 😒
I ended up making a variation on a card that I'd made before that I thought was really pretty,


I made a patchwork base using 4 blocks consisting of 4 strips of patterned paper.  Each block was rotated through 90°.  I cut the Tattered Lace Red Admiral Butterfly from gold mirror card and then cut another from which I separated the butterfly and flowers.  I placed those elements on top of the first die cut, lifting the wings of the butterfly and using foam tape behind the flowers to add dimension.  I also used the mirror card to cut the sentiment.  The card was finished with gold flatback gems in each corner and a couple of pearls for the flower centres. 

I really love how it turned out, and it went down very well with my friend's mum too 😊

21 November 2017

Woodland Christmas

I've seen a few cards on Pinterest featuring a silver birch style background which I really liked.  So I bought myself a birch tree background cutting die and made my own version. I really like how it turned out.


I started with an A6 plain white card blank.

For the background I used Distress Stains in blocks of colour (from top to bottom: Chipped Sapphire, Wilted Violet+Broken China and Broken China).  I simply swiped the stain across the card in stripes, overlapping the colours in each block for a smoother transition.  Wilted Violet on its own was too purple, so went over the top of it with Broken China to get more of a blue hue.  I also dotted Chipped Sapphire across all three colour blocks in several places, which also helps to blend the colours.

I die cut the birch tree trunks from white card and lined the die cut up with the top and sides of the card over the coloured background.  The die cut did not reach all the way to the bottom so I cut a couple of snow mounds from white card and placed them at the bottom of the card, then went over them with a Spectrum Noir clear sparkle pen for a glistening snow effect.

The deer are from the Tattered Lace Family Outing die set.  I cut them from white card and coloured them using Spectrum Noir markers, going over the spots on their backs with a white gel pen.  I stuck the doe straight on to the card and used foam pads for the fawn.

At this point I decided to add some snowfall to the scene by dotting snowflakes onto the background using a white gel pen.

Finally, I stamped the sentiment into the corner.  The stamp I used is from a set that came with issue 35 of Creative Stamping magazine.

14 November 2017

Dream A Little Dream

Back in September I bought a lot of dies (A LOT!).  I'm slowly working my way through cutting them all and trying them out in projects.  I loved this tree panel die, but interestingly what I had in mind for it is nothing like what I ended up creating.


I found a pad of watercolour paper in Lidl for a steal (so of course I bought some) and then I set out to make a few interesting backgrounds for a different project.  I dabbed Distress Stains (Peeled Paint, Festive Berries, Broken China and a touch of Mustard Seed) onto an old mirror (in lieu of a craft sheet) then spritzed with water and painted random patches of colour on to the watercolour paper until the paper was covered.

At first I cut the tree panel in white and coloured it in with watercolour pencils, but I didn't really like it, so I cut it in black and mounted it onto the background I had created.  It looked so pretty and whimsical, so I put the whole thing on the front of a card and added a sentiment from an old stamp set.

I used a black mat for this card which really highlights the tree, but if I had used any of the colours from the background for the mat, that colour would be highlighted. For example a blue mat would have highlighted the blue in the background and so on.  (A little tip that I picked up from Mel Heaton on Create & Craft TV.)

20 October 2017

Stars 🌟

Over on the Less is More blog the latest challenge is a one layer challenge featuring stars.  Here's my attempt:

The stars come from various stamp sets.  I stamped the sentiment into the centre of the card with copper dye ink and added the little star trio at opposite corners.  Then I stamped the spotted stars into the corners with first with gold dye ink and then overstamped with copper, and finally the stripy star into the gaps with the gold ink.


The pictures don't pick up the metallic sheen of the inks very well, but IRL there is a nice shimmer.

I'm also going to enter the latest AAA Cards challenge - inspired by a film. The movie I've chosen is Stardust (love that movie btw). I think that the sentiment could apply to Evain, who shines brightly when she's happy, but also to Tristan who learns the value of being himself.

14 October 2017

Sparkle ✨

Over on the AAA Cards blog the challenge this week is a sketch:


Here's what I made:

sparkle_cas_card_01

sparkle_cas_card_detail


I used masking tape to create the band where I wanted the colour to go, then I dabbed Distress Stains (Mermaid Lagoon, Wilted Violet, Festive Berries and Worn Lipstick) randomly over the exposed area [I really love that combination of colours].  The colour was a bit intense so I used a tissue to take off the excess.  After drying with a heat tool, I stamped the sparkles and the sentiment with embossing ink and then covered with gold embossing powder.  

That was where I planned to leave it but some of the masking tape damaged the card as I was taking it off and this flower happened to be lying around and it matched the colour scheme pretty well, so it became part of the design.

03 June 2017

Freshly Made Sketches 290


Here's my interpretation of the latest sketch over on the Freshly Made Sketches blog.  I love the combination of lacy detail on that weathered wood bacground.  I used the Tattered Lace Oval Doily die from the Peach Sorbet collection and generic "hello" die.


22 April 2017

Three Looks, One Die

I love background dies and the Tattered Lace Grandma's Garden panel die is really pretty.  There are loads of techniques that are great with background dies, but here are three simple ways to use it.


1.  Cut it out of Kraft (or other coloured) card and affix to a white card blank.  Stick a die cut sentiment also cut from Kraft (or other coloured) card on to a white oval and then affix both on to the background with foam pads.  It's really simple but it looks great.


2.  Die cut a panel out of plain white cardstock and place it over a coloured background.  In this case I created a vibrant background using alcohol markers, but you can use inks, watercolours, pan pastels or whatever medium you like.  I placed a white die cut sentiment onto a piece of coordinating card stock.  The white against the vibrant background helps to tone it down.  This is a great technique to use with busy background papers too.


3.  Die cut a panel from plain white cardstock and colour in the different elements, then affix to a card blank.  In this case I used pastel shades and a Kraft card base.  The pastels and Kraft work really well together.


GHVHVDN131519882 

21 April 2017

Glamour Puss

I've been coveting the Tattered Lace Glamour Puss die that came with one of their magazines ever since I first saw it.  I finally caved in and picked up a back issue from eBay a couple of months ago.  Inspired by one of the sample cards on the Tattered Lace website I made this:


Isn't she fabulous?! The stairway die is also by Tattered Lace, from the Essentials collection.  I used plain white card and coloured the vertical faces of the steps using a Spectrum Noir light grey marker.

The Glamour Puss die itself cuts out all the detail in the dress, but I wanted to keep it in so I taped across the back of the die cut before removing it from the die.  I used a black Spectrum Noir marker to colour the dress then went over it with Dovecraft Crystal glitter glue.  The black highlighted all the green elements in the glitter glue, giving the dress a beautiful emerald shimmer.

I used a gold pen to highlight her jewellery and gave her some hot red lipstick, black hair and a matching clutch bag.

The wallpaper is damask patterned paper.  Next time I would use a paper with a smaller pattern, but overall I like the effect.