

Showing posts with label embossing. Show all posts
Showing posts with label embossing. Show all posts
09 July 2019
Crafting on the Go
We went camping a few weeks ago and I wanted to take something crafty with me; something portable that wouldn't take up too much space. I found some old card that I had embossed using some Darice embossing folders, which were perfect for colouring in. Along with my watercolour palette and a water brush I had enough to keep me entertained in a nice, compact package. This roses image is so pretty and I love the end result. It would look beautiful on the front of a card, or simply displayed in a frame as a piece of art.


13 March 2018
Black and Gold
Back in September I bought some nesting triangle dies, but I've never used them! I knew I wanted to use the triangles to cover opposite corners of my card and I had recently seen some products from the Crafter's Companion Black and Gold Collection, which inspired the colour scheme.

I decided to use a black card base and cut the triangles from gold mirror card. To add some interest I embossed the gold mirror card using the Crafter's Companion (CC) 3D Lace embossing folder (which I love but have also never used since I bought it!) and the black card with another CC embossing folder - Blooming Vines from the Country Garden collection. I added some black flowers to the triangles, but they were a bit lacklustre so I added a few highlights with gold pen. The sentiment is a Tattered Lace die that came with one of their magazines.
I used the off-cut from the die cut triangles to make a similar card. This time I cut the flowers from gold card and the sentiment from black card.

Which do you like better?

I decided to use a black card base and cut the triangles from gold mirror card. To add some interest I embossed the gold mirror card using the Crafter's Companion (CC) 3D Lace embossing folder (which I love but have also never used since I bought it!) and the black card with another CC embossing folder - Blooming Vines from the Country Garden collection. I added some black flowers to the triangles, but they were a bit lacklustre so I added a few highlights with gold pen. The sentiment is a Tattered Lace die that came with one of their magazines.
I used the off-cut from the die cut triangles to make a similar card. This time I cut the flowers from gold card and the sentiment from black card.

Which do you like better?
25 February 2017
Bold Florals - Just For You Card
I had some flowers left over from my paper flower pot project, which didn't really suit that display, but a single one as a statement embellishment on the front of a card looks pretty good.
The background was made with a scoreboard that came free with a copy of Crafts Beautiful magazine. It is quite similar to the Xcut Quilting embossing folder which is a favourite of mine. I used Sizzix Embosslits heart and leaf dies for the flower petals and leaves. The flower centre was created by colouring a thin rectangular strip of card on both sides, then snipping into it at regular intervals along its length and rolling it up and fanning out the cut fringes. I found a sentiment that matched the colour of the flower and also used a similar colour for the card base. A few gold gems helped to add some interest and also complemented the gold foiling on the sentiment.
 |
| Bold Floral Just For You Card |
The background was made with a scoreboard that came free with a copy of Crafts Beautiful magazine. It is quite similar to the Xcut Quilting embossing folder which is a favourite of mine. I used Sizzix Embosslits heart and leaf dies for the flower petals and leaves. The flower centre was created by colouring a thin rectangular strip of card on both sides, then snipping into it at regular intervals along its length and rolling it up and fanning out the cut fringes. I found a sentiment that matched the colour of the flower and also used a similar colour for the card base. A few gold gems helped to add some interest and also complemented the gold foiling on the sentiment.
15 January 2017
Black and White With a Pop of Colour
Over on both the CAS on Sunday and The Paper Players blogs the challenge is to use black and white with one colour. I've combined that brief with the Freshly Made Sketches sketch challenge.


02 November 2016
6x6 Holly Wreath Card
Wow, was it really May when I last posted on this blog?! Time is racing past at an alarming rate, which means that Christmas will be here in the blink of an eye! So, it seems like a good time to start sharing some Christmas projects.

This is a card that I made last Christmas, but I think that I will make some more this year too. It's pretty straightforward to make.
You will need:
I used my Silhouette Portrait to cut out the holly leaves, but you could use a die, or a punch, or if you have the patience, do it by hand! I also used the Portrait to cut out a ring about 3 inches (7.5cm) in diameter to act as a base for the holly wreath.

This is a card that I made last Christmas, but I think that I will make some more this year too. It's pretty straightforward to make.
You will need:
- 6x6 card blank
- Gold Mirror card in different shades
- Kraft card
- Flat back pearls or Liquid Pearls
- Embossing folder
- Bow or ribbon
- Foam Pads
- Glue
I used my Silhouette Portrait to cut out the holly leaves, but you could use a die, or a punch, or if you have the patience, do it by hand! I also used the Portrait to cut out a ring about 3 inches (7.5cm) in diameter to act as a base for the holly wreath.
- Start with a 6x6 (15x15cm) card blank.
- Cut a piece of mirror card to leave about a 1/2 cm (1/4 inch) border around the outside (so 5.5x5.5 inches or 14x14cm) and affix to the centre of the card blank.
- Cut a piece of Kraft card about 5x5 inches (13x13cm) and emboss using an embossing folder of your choice. I used Sheena Douglass' 7x5 swirls folder (one of my favourites).
- Affix the embossed Kraft card square to the centre of the mirror card mat.
- Cut about 20 holly leaves out of different shades of gold mirror card. If necessary emboss the veins onto each leaf using a ball tool or blunt pencil.
- Cut out a ring about 3 inches (7.5cm) diameter and 5/8 inch (1.5cm) wide from card for the wreath base.
- Attach the holly leaves to the ring, alternating shades and layering some to add dimension.
- Attach a bow at the bottom of the ring.
- Place flat-back pearls in groups of three around the wreath for berries.
- Attach the wreath to the card with foam pads.
- Place a pearl in each corner of the embossed Kraft panel.
09 February 2016
White On White
I'm taking part in the Simply Less Is More challenge, with the theme of 'white on white' this week.
I created my card using a Sheena Douglass embossing folder for the background. I LOVE that swirly pattern. The die cut is the Love Scroll from the new Tattered Lace Melded collection (more on that soon) which I've highlighted with Dovecraft's Crystal glitter glue. It has pink and green highlights which was really hard to capture on film, so to speak, but does a great job of lifting the die cut from the background. I also placed a length of ivory ribbon behind the die cut and a trio of pearls in two corners for added interest.


Do What You Love - Love What You Do

I bought the "Frame & Love Set" embossing folders by Sizzix because I loved this sentiment, but it sat unused for quite a long time because I didn't really know what to do with it. So I started with the basics - I embossed a piece of coloured card with a white core and sanded the embossing back. Then I highlighted some of the decoration around the word 'LOVE', that looked a bit like foliage and flower buds, with Flowersoft. Then I added some butterflies and a punched flower.
The butterflies were from a stamp set by Clearly Besotted, which I coloured with Spectrum Noirs. To help the colours pop I highlighted some of the detail with a white gel pen. The wings were curled a bit and then propped up with small foam pads to help make the piece look more dynamic,
I punched two flowers, which I layered up, shaped a bit and then added black beads to the centre. The leafy vine is a Britannia die, which I really love.
Once done I liked the way it looked, but it needed a mat, so I used bright pink card to echo the colour in the larger butterflies. I then matted the whole thing onto black mirror card which seemed to tie the whole thing together, as it picked up the back from the butterflies as well as the centre of the flower. I intend to mount the whole thing on grey board and then hang it up somewhere around my craft space.
11 October 2015
Two Hearts... One soul
My husband's nephew got married over the weekend. I've never made a wedding card before so this was the perfect opportunity to try it out. Here's what I made:

Quite simple, but quite pretty I think. I embossed white card with a swirl pattern (one by Sheena Douglass), wrapped ivory ribbon across the middle then fixed that to an A5 card blank (the card blank had a lovely linen texture). I cut two hearts from white card that I had painted with silver glitter paint, and one heart from red card. I cut a section from the red heart to match the area where the two white hearts overlapped and stuck that on the top. I printed out the words "Two Hearts... ...one soul" and cut two flag banners. The whole thing was finshed off with some pearls.
Foiling would have looked great but as I don't have a foiling machine I'm going to have to look further into how to hot foil using a laminating machine.

Quite simple, but quite pretty I think. I embossed white card with a swirl pattern (one by Sheena Douglass), wrapped ivory ribbon across the middle then fixed that to an A5 card blank (the card blank had a lovely linen texture). I cut two hearts from white card that I had painted with silver glitter paint, and one heart from red card. I cut a section from the red heart to match the area where the two white hearts overlapped and stuck that on the top. I printed out the words "Two Hearts... ...one soul" and cut two flag banners. The whole thing was finshed off with some pearls.
Foiling would have looked great but as I don't have a foiling machine I'm going to have to look further into how to hot foil using a laminating machine.
12 July 2015
Moroccan Inspired Cards
I bought the Sizzix Peacock* and Moroccan Flowers stamps + die sets recently and I love them. LOVE THEM! I also bought several of the Moroccan label dies. Although I really like them, I found myself struggling to come up with a decent layout, but thankfully I got there in the end.

First off I embossed a piece of red mirror card with my Xcut Moroccan Flower Tiles folder. Then I cut a label with the Sizzix Tangier die and stuck that on top of the mirror card. (I like the way the red shows through the decorative elements of the label.) Then using one of the stamps fron the Peacock set I stamped and embossed the detail in red before cutting out the shape with the corresponding die. The sentiment is attached to the centre of the label using foam pads.

The second card used another stamp from the Peacock collection. I stamped a repeating pattern on the blank card using white ink then heat embossed with clear embossing powder. I then used my inks to create the warm orange/yellow/red background. To bring out the embossed detail I buffed those areas with a dry baby wipe, which removed any ink from the top.
The die cut was done with the Sizzix Arabesque Flower die using red mirror card again. I used the same stamp/die/sentiment combi as before, but this time I embossed in gold. Again I used foam pads to adhere the sentiment.
I love how these cards turned out. Both quite simple but really striking. And so my love affair with the Sizzix Moroccan Collection dies & stamps goes on.
I'm entering the following challenges:
CAS-ual Fridays - Embossing
CAS on Sunday - #62 Embossing
Daring Cardmakers - No Black, No Neutrals
CAsology - Repeat
*I have used some affiliate links in this post.

First off I embossed a piece of red mirror card with my Xcut Moroccan Flower Tiles folder. Then I cut a label with the Sizzix Tangier die and stuck that on top of the mirror card. (I like the way the red shows through the decorative elements of the label.) Then using one of the stamps fron the Peacock set I stamped and embossed the detail in red before cutting out the shape with the corresponding die. The sentiment is attached to the centre of the label using foam pads.

The second card used another stamp from the Peacock collection. I stamped a repeating pattern on the blank card using white ink then heat embossed with clear embossing powder. I then used my inks to create the warm orange/yellow/red background. To bring out the embossed detail I buffed those areas with a dry baby wipe, which removed any ink from the top.
The die cut was done with the Sizzix Arabesque Flower die using red mirror card again. I used the same stamp/die/sentiment combi as before, but this time I embossed in gold. Again I used foam pads to adhere the sentiment.
I love how these cards turned out. Both quite simple but really striking. And so my love affair with the Sizzix Moroccan Collection dies & stamps goes on.
I'm entering the following challenges:
CAS-ual Fridays - Embossing
CAS on Sunday - #62 Embossing
Daring Cardmakers - No Black, No Neutrals
CAsology - Repeat
*I have used some affiliate links in this post.
01 June 2015
Celebrate
I created this card using the sketch from CAS Colours and Sketches and the recipe from CAS on Sunday (choose any three items in a straight line from the grid).


To start with I flicked mica powder paint onto the card blank to get an interesting background. Then I made the bunting by wrapping washi tape around a bit of string and then cutting the shape.
For the sentiment I dry embossed the word "Celebrate", went over it with a Versamark pen and then heat embossed with gold. The edges of the sentiment and two ribbons were also embossed with gold.


I went for the diagonal - top right to bottom left. That meant using heat or dry embossing, twine/ribbon and I decided to interpret Male or Female as a unisex card. This is what I came up with:

For the sentiment I dry embossed the word "Celebrate", went over it with a Versamark pen and then heat embossed with gold. The edges of the sentiment and two ribbons were also embossed with gold.
19 May 2015
Lilac Bouquet ATC
Well, I was thrilled to find that I'd won the last Wicked Wednesday ATC Challenge with my Capture Joy ATC! How fabulous - my first challenge win :-). The latest challenge is entitled "Lilacs or Daffodils". I know I didn't have anything daffodil related, but I didn't know what a lilac looked like. With the help of a Google image search I discovered that they are really sweet, four-petalled flowers usually in pinks and (surprise, surprise) lilac, with the occasional blue and white. And as luck would have it, I had a lilac-esque four-petalled die as part of the Sizzix Flower Vases Thinlits set.

To start with I coloured white card with watercolour pencils in rows of graduating colour and then spritzed and blended the colours a bit with a paintbrush. Then I applied a layer of white gesso over the top to mute the colours a little, but I also like the distressed look that it gives. After than I stamped butterflies randomly over the ATC in light blue ink. I love script in backgrounds, but as I didn't have a stamp I simply wrote over the whole surface with a white gel pen for a really subtle effect. (For those of you interested I have written down part of the poem "Lilacs" by Verna Sheard.)

Then I cut out lots of flowers with my flower die from pink and blue paper, and a vase from gold mirror card, which I then embossed. I also cut some leaves from green mirror card. They are not lilac leaves, but I think that I am allowed some artistic licence. I also added shading and highlights to the flowers and then stuck everything down in a pleasing arrangement.

12 May 2015
Capture Joy ATC
I really enjoy blog challenges. I find them an excellent source of inspiration and I'm always on the lookout for new and interesting ones. So I was pleased to find a blog dedicated to the ATC (that's Artist Trading Card to the uninitiated). The subject of the latest Wicked Wednesday ATC Challenge is "polka dots".
I've heard of ATC's but have never made one before. I thought that having a smaller area to work with would be easier, but it's every bit as challenging as trying to fill a large page! Anyway, this is my attempt:


I've heard of ATC's but have never made one before. I thought that having a smaller area to work with would be easier, but it's every bit as challenging as trying to fill a large page! Anyway, this is my attempt:

I started by covering an ATC-sized piece of Kraft card with polka dot patterned paper. I went over that with a thin layer of gesso to mute the colour a bit. Then I randomly stamped small honeycombs and flourishes all over using silver and black pigment ink. I tried to ink through some stencils that I made, but it didn't really work out. It just kind of looks like I've smudged ink on the background 😀. I used a white gel pen to draw different sized circles on the background. Then I die cut and embossed the umbrella (from the Sizzix "Hello Rainbow" set) three times from patterned paper, silver mirror card and black paper, then pieced them together. The raised parts of the umbrella were highlighted with the white gel pen.

I then stuck on the hearts (waste from another die cut << never throw anything away!) with largest at the bottom and teeny tiny ones at the top, to give the impression that they were floating off into the distance. I went around the umbrella and the hearts with a grey marker, and dotted around the hearts with the white gel pen again to help lift them from the background. Finally, I stamped and embossed the sentiment, which unfortunately didn't stamp very crisply or cleanly. More practice needed!
I really enjoyed making this tiny piece of art and I'm looking forward to the next challenge.
11 May 2015
Best. Dad. Ever!
I think I have just got time to join in with last week's Freshly Made Sketches challenge. This is the sketch:


And this is my interpretation:

I used my new Stripes embossing folder (from the Stripes and Pinwheel set by Sizzix), going around the edge with a Spectrum Noir marker to lift it a little from the background card. I used Washi tape for the banners. Then I cut a rectangle out of patterned wood boards paper and matted it onto silver mirror card, then stamped the sentiment. Using my Garden Tools Sizzlits I cut handles from wood grain patterned paper and cut the heads from silver mirror card.

The mirror card was pressed against the scratched surface of my Big Shot cutting pads so it's been inadvertently embossed with the scratches, but that gives a nice weathered look. I hadn't done it when I took these photos, but I think I'll glaze the handles of the tools. If I had glossy accents that's what I'd use, but as I don't I'll have to make do with Decopatch's glossy glue.
25 April 2015
Make A Wish
I'm playing along with Freshly Made Sketches 183 .


Here's my interpretation:
I embossed the card blank and used strips of paper to reproduce the sketch. I also tried working with vellum for the first time - embossing the dandelion seed heads and sentiment in gold. I thought it would be a good way to add a stamped image without completely obscuring the patterned paper underneath. I discovered that embossing happens really fast on vellum, and gets really hot! The embossing powder started bubbling at one point. Also, as I wasn't sure how glue would show up under the vellum, I only glued the outer edge. In future, I would use a different method. The wet glue caused the vellum to ripple and because it isn't stuck down in the middle, I ended up with a sort of pocket effect. But having said that I think it looks quite nice.
20 April 2015
Hello Notecard
I wanted to make some notecards, but as usual found it difficult to start. I've had the Flower Frame and Tree embossing folder set by Sizzix for a while, but since I got it home I've not really been sure about how to use it. Well, thankfully inspiration finally struck and I came up with these:


I started off using plain Kraft card, but the embossing folder didn't quite fit and it looked a bit odd so I decided to use it as a panel instead. I picked out a few embossed elements to highlight, which was done with watercolour pencils initially, but then I tried painting with mica powders, which gave a much better finish I think (you can see the lower bird looks more crisp than the upper bird). I had a load of 17mm white circles left over from when I cut a tray to hold lip balm tubes, so I stamped individual letters on each one and layered them up on mica paint-washed kraft and white card to mirror the swirl and for an interesting look. Finished off by mounting the panels onto a card blank. I like the mixture of kraft, white and colours, but I prefer the white panel on Kraft more than the other way round. What about you?
I'm entering the following challenges:
Colour Throwdown #338 - Use Green, Teal, Kraft and White
AAA Cards #37 - It's Springtime
21 September 2014
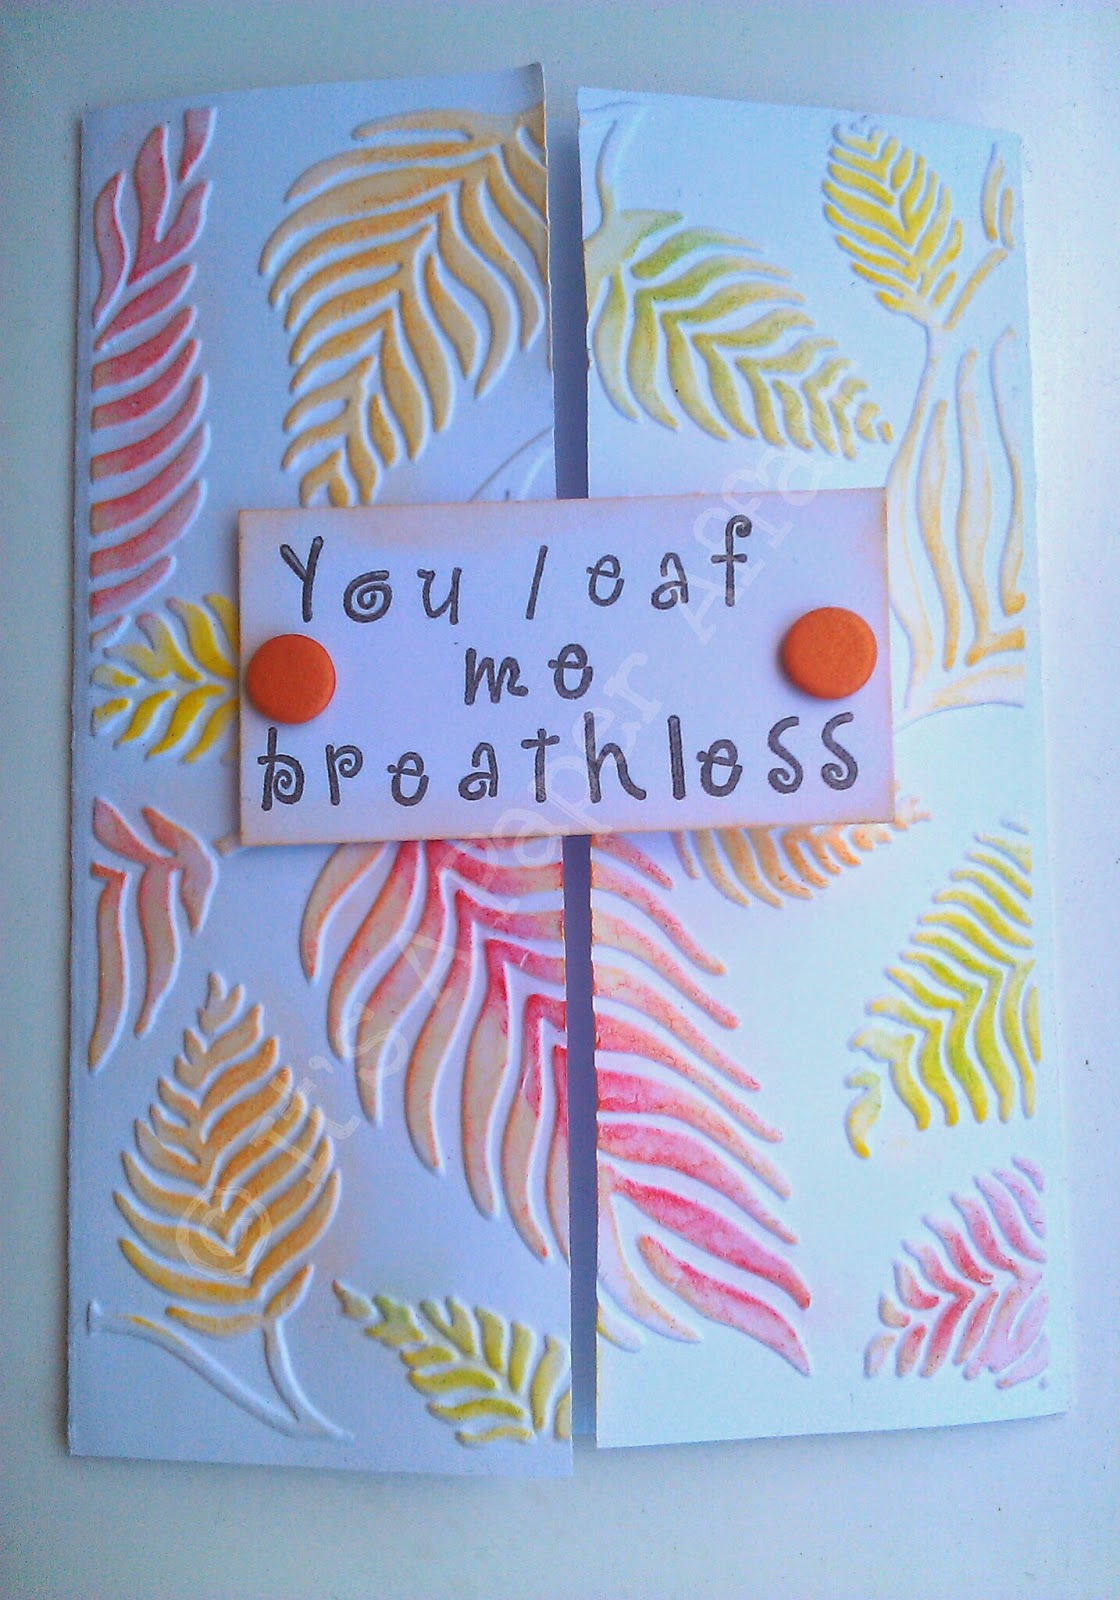
You Leaf Me Breathless

It's the Autumn solstice today so an autumnal-themed card seems appropriate. I've made a gatefold card and used the Sizzix Leaves embossing folder on the two front panels. I then used pigment ink in red, orange, yellow and green over the embossed detail. The sentiment is stamped on plain white card, then I've gone around the edges with orange ink and finished it off with two pieces of Candi.
I'm entering the following challenges:
4 Crafty Chicks #212 - Fall
Cute Card Thursday 339 - Awesome Autumn
4 Crafty Chicks #212 - Fall
Cute Card Thursday 339 - Awesome Autumn
06 June 2014
Fleather / Faux Leather
 |
| Faux Leather from Kraft card |
This is my first attempt at making Fleather or Faux Leather using Kraft card. I first saw the technique demonstrated by Sheena Douglass on Create & Craft TV a few months ago. Since then she's posted a video on You Tube which shows the technique in more detail.
I've been itching to try it for ages, and I finally bought some Kraft card so it was time to give it a go. I'm really pleased with this first attempt.
 |
| Basic Kraft card on the left, Fleather/faux leather on the right |
I used the Far Out Florals embossing folder by Sizzix, and coloured it using metallic copper and orange pigment inks from Hobbycraft. I think I was too vigorous with rubbing in the water/glycerin because the surface was shedding fibres, and in lieu of spray varnish I used some old clear nail varnish, but the effect is amazing. It really does look and feel like old leather! I'll definitely be trying this again.
20 May 2014
Clean and Simple
I've recently discovered that in card-making circles CAS means clean and simple. Generally these cards should have white space (or other plain colour I suppose) with few layers and minimal embellishments.


The second card is quite similar to this one, but I quite like that layout. I made the flowers out of organza ribbon then drew on the stems and leaves. The pink is a tad more neon than I was expecting when I ordered it!
I'm entering the following challenges:
Card 1
Crafty Ribbons - Anything Goes
Little Miss Muffet Challenge - Button Bonanza
CAS-ual Fridays - Three Thirds
Less Is More - Flowers
Cute Card Thursdays - Handmade Embellishments
Card 2
Crafty Ribbons - Anything Goes
CAS-ual Fridays - Three Thirds
Less Is More - Flowers
Cute Card Thursdays - Handmade Embellishments
Crafty Ribbons - Anything Goes
Little Miss Muffet Challenge - Button Bonanza
CAS-ual Fridays - Three Thirds
Less Is More - Flowers
Cute Card Thursdays - Handmade Embellishments
Card 2
Crafty Ribbons - Anything Goes
CAS-ual Fridays - Three Thirds
Less Is More - Flowers
Cute Card Thursdays - Handmade Embellishments
14 May 2014
Spots and Stripes
I made this card for the Paper Crafting Journey Spots and/or Stripes challenge. I've really embraced the theme by using stripes of spots and stripy spots!
I started by laying stripes of spotty washi tape onto A6 card. Then I trimmed about 0.5cm (maybe slightly less) from each side. I then embossed it with an embossing folder (Tim Holtz Texture Fades Retro Circles) and went over the raised surface with a white ink pad, and covered that with clear embossing powder to give a nice glaze. Finally I cut the card into quarters and attached it to the backing card. The whole thing is finished off with a simple, stamped sentiment. I added the organza bow as the sentiment on its own seemed a bit bleak.

Subscribe to:
Posts (Atom)