Search This Blog

Showing posts with label CAS. Show all posts

20 October 2017

Stars 🌟

Over on the Less is More blog the latest challenge is a one layer challenge featuring stars.  Here's my attempt:

The stars come from various stamp sets.  I stamped the sentiment into the centre of the card with copper dye ink and added the little star trio at opposite corners.  Then I stamped the spotted stars into the corners with first with gold dye ink and then overstamped with copper, and finally the stripy star into the gaps with the gold ink.


The pictures don't pick up the metallic sheen of the inks very well, but IRL there is a nice shimmer.

I'm also going to enter the latest AAA Cards challenge - inspired by a film. The movie I've chosen is Stardust (love that movie btw). I think that the sentiment could apply to Evain, who shines brightly when she's happy, but also to Tristan who learns the value of being himself.

14 October 2017

Sparkle ✨

Over on the AAA Cards blog the challenge this week is a sketch:


Here's what I made:

sparkle_cas_card_01

sparkle_cas_card_detail


I used masking tape to create the band where I wanted the colour to go, then I dabbed Distress Stains (Mermaid Lagoon, Wilted Violet, Festive Berries and Worn Lipstick) randomly over the exposed area [I really love that combination of colours].  The colour was a bit intense so I used a tissue to take off the excess.  After drying with a heat tool, I stamped the sparkles and the sentiment with embossing ink and then covered with gold embossing powder.  

That was where I planned to leave it but some of the masking tape damaged the card as I was taking it off and this flower happened to be lying around and it matched the colour scheme pretty well, so it became part of the design.

03 June 2017

Freshly Made Sketches 290


Here's my interpretation of the latest sketch over on the Freshly Made Sketches blog.  I love the combination of lacy detail on that weathered wood bacground.  I used the Tattered Lace Oval Doily die from the Peach Sorbet collection and generic "hello" die.


04 March 2017

Easy Watercolour Backgrounds

Watercolouring in card making is everywhere at the moment, so I dug out my set of Reeves Water Soluble Wax Pastels to have a go at creating some simple watercolour style backgrounds.  I simply scribbled pastels in similar shades onto a white card blank in vertical, horizontal and diagonal stripes, then used a wet paintbrush to go over the colours and blend them a little.

Hello Greetings Card - ombre watercolour background

Have a Beautiful Day greetings card - watercolour background with glitter blutterfly
I used ordinary cardstock for these so the colours did not move as much as if I had used watercolour card, but I quite like that effect.  The first butterfly was cut using Sizzix Thinlits die set Butterfly #3.  The second used an ArtC stencil with BoBunny glitter pastes.  It's much more lovely in real life.

I like the simplicity of these.  The watercolour effect is a great backdrop that doesn't really need much else to make an attractive card.  This would be a great technique for making men's cards; a bold sentiment and a well-chosen stamped image or die cut would be all you'd need.

15 January 2017

Black and White With a Pop of Colour

Over on both the CAS on Sunday and The Paper Players blogs the challenge is to use black and white with one colour.  I've combined that brief with the Freshly Made Sketches sketch challenge.


Hello!

It's been a while since I entered a cardmaking challenge or posted on the blog.  It seems appropriate to start off my comeback with a "Hello".


I got this gorgeous "hello" stamp as a freebie with a Docrafts Creativity magazine and it's been languishing in the bottom of my stamp stash for months.  I can't believe that I waited this long to use it, but now that it's made its debut I can see it being used a lot.

The background was made by flicking gold paint onto the card base.  The sentiment was stamped onto a card panel and heat embossed with gold.  I then made a rough outline of the sentiment panel with a gold pen and popped it up on the card base with foam tape.  Three gold gems, placed randomly finished off the card.

Today I'm entering the following challenges:


Daring Cardmakers (New), and
CAS-Ual Fridays (Gold)

03 May 2016

AAA Cards Game #63 - CAS Shaker

The latest challenge on the AAA Cards blog is to make a CAS shaker card.


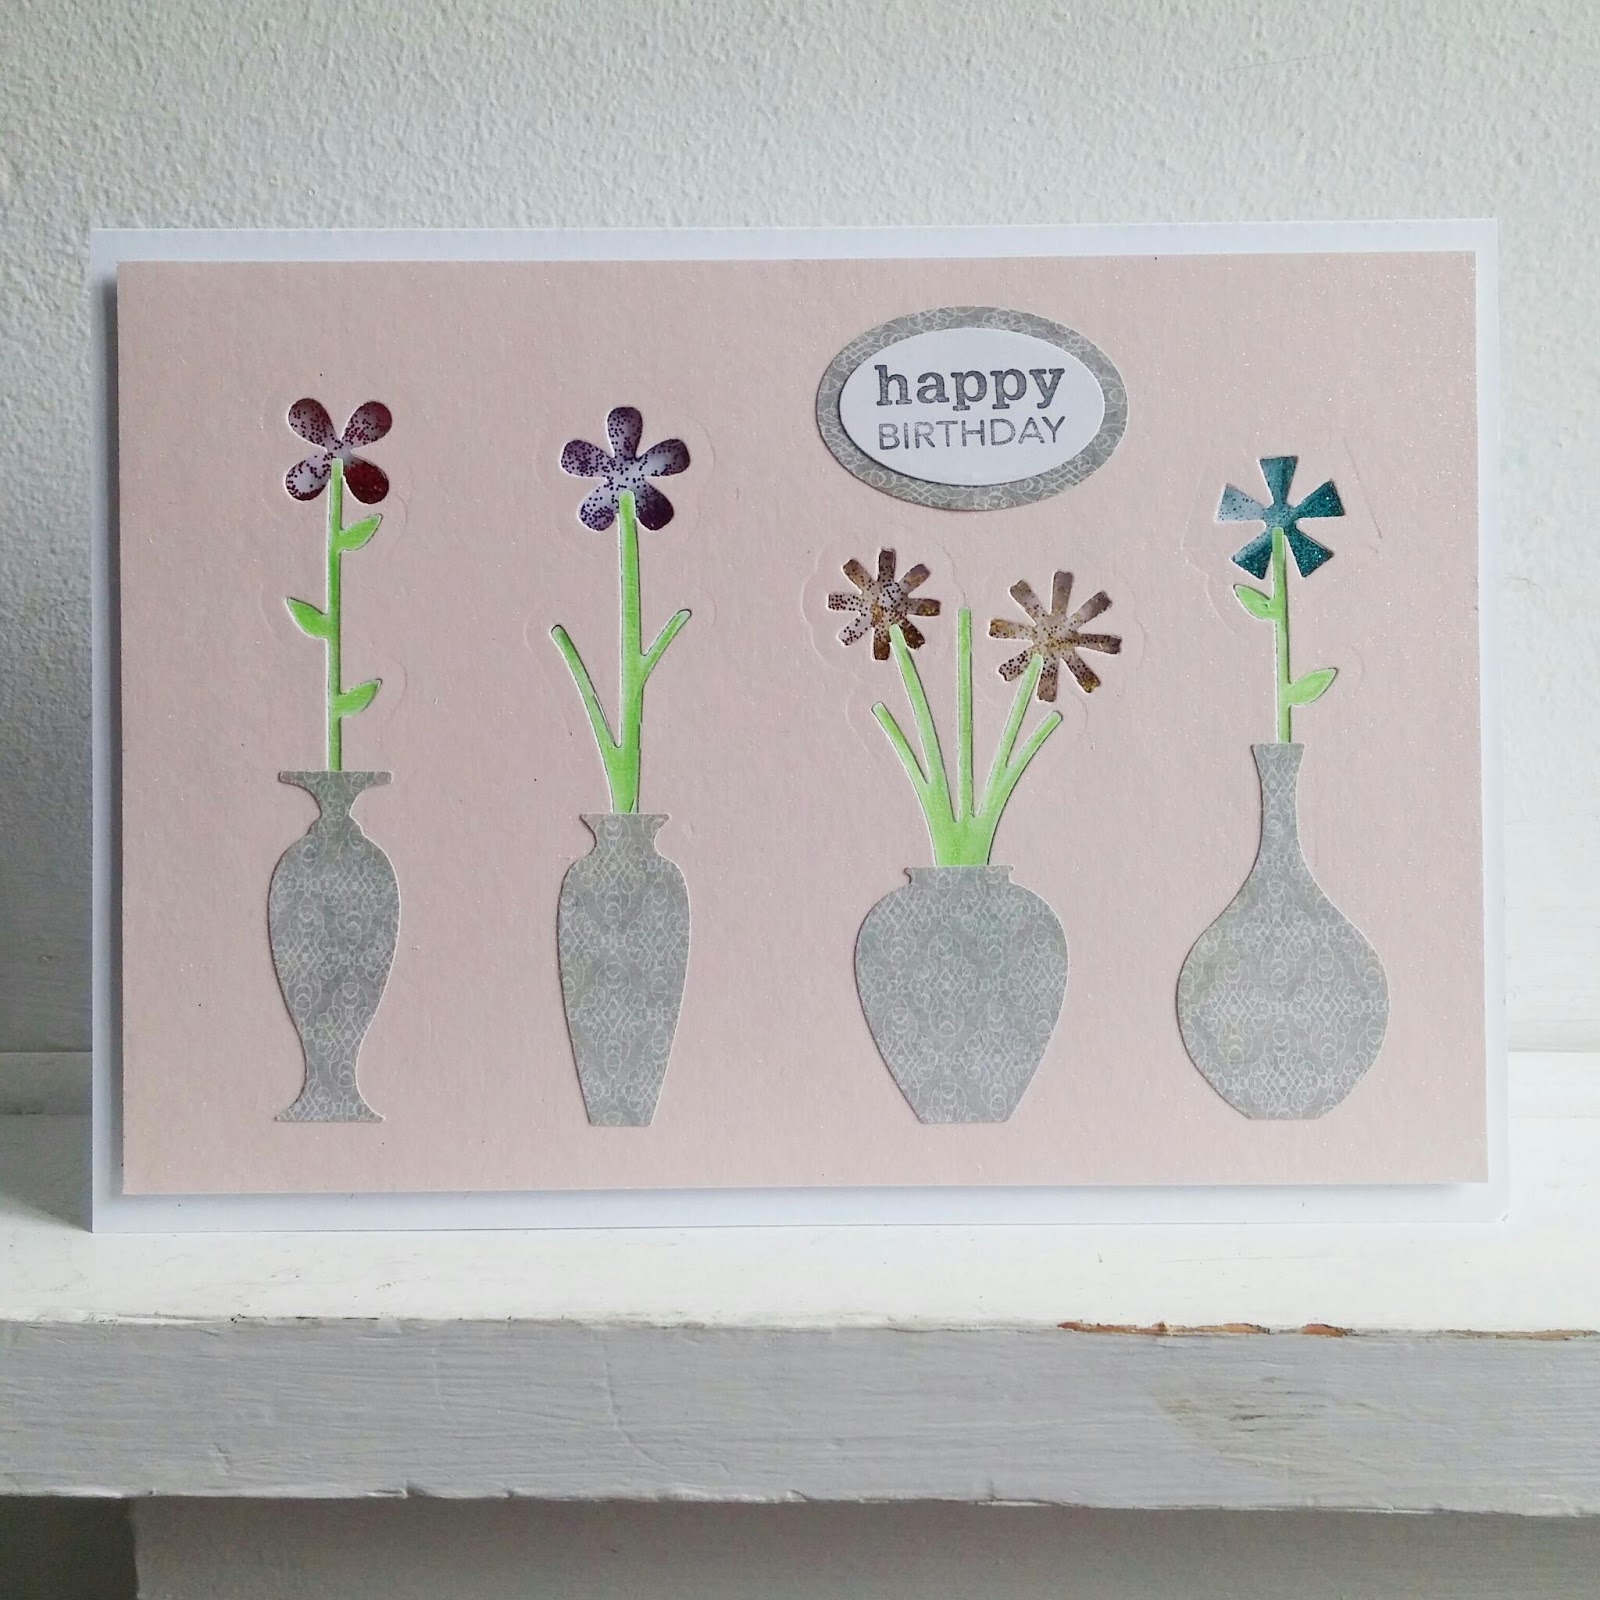
I thought it would be fun to use flowers to make the shaker element and I ended up using the Flowers & Vases Thinlits set by Sizzix.

First I cut the stems into some lovely pale pink glitter paper that I recently acquired, then cut the flowers so that they lined up nicely with the stems. I also cut the stems from green paper and paper pieced those back into the pink card, taping them across the back to hold them in place.  After making the shaker compartment around the flower heads I filled with different coloured glitters, which I did very messily! It's a good thing that you can't see the back of the card panel.  TIP: rather than pouring directly from the glitter pot, use a tool to transfer the glitter. Then I cut the vases from grey patterned paper, stuck them in place and added a simple sentiment framed with the same grey paper to tie it all together.  I decided to use the same colour for all the vases because I think that it's more in keeping with the CAS style.  And here it is:

It's a shame the photos don't really show the glitter paper.  It really is delicious.  


12 April 2016

CAS Sympathy Card

Sadly, I've had to make a couple of sympathy cards recently.  I've never made one before but I wanted them to be simple and tasteful.  After poring over my stamps for ages, I finally decided to use a die cut and chose the English Rose die by Tattered Lace.


I used linen-textured card for the card blank to add a little bit of interest without domineering the card and then used the die to cut the rose design from plain white card, which I went over a couple times with a clear Spectrum Sparkle pen. This gave a nice, subtle sheen that added some interest to the die cut.  I also had some My Craft Studio sentiment strips that I bought a long time ago and promptly forgot, so I chose the "With Sympathy" sentiment and cut a strip the same width as the card blank.  The die cut was glued in the centre of the card, with the sentiment strip below.  The card was finished off with three aurora borealis-style sequins, which are clear but have a pink or slightly green tinge depending on how they catch the light.

11 October 2015

Two Hearts... One soul

My husband's nephew got married over the weekend.  I've never made a wedding card before so this was the perfect opportunity to try it out.  Here's what I made:


Quite simple, but quite pretty I think.  I embossed white card with a swirl pattern (one by Sheena Douglass), wrapped ivory ribbon across the middle then fixed that to an A5 card blank (the card blank had a lovely linen texture).  I cut two hearts from white card that I had painted with silver glitter paint, and one heart from red card.  I cut a section from the red heart to match the area where the two white hearts overlapped and stuck that on the top.  I printed out the words "Two Hearts... ...one soul" and cut two flag banners. The whole thing was finshed off with some pearls.

Foiling would have looked great but as I don't have a foiling machine I'm going to have to look further into how to hot foil using a laminating machine.

12 July 2015

Moroccan Inspired Cards

I bought the Sizzix Peacock* and Moroccan Flowers stamps + die sets recently and I love them. LOVE THEM! I also bought several of the Moroccan label dies. Although I really like them, I found myself struggling to come up with a decent layout, but thankfully I got there in the end.


First off I embossed a piece of red mirror card with my Xcut Moroccan Flower Tiles folder.  Then I cut a label with the Sizzix Tangier die and stuck that on top of the mirror card.  (I like the way the red shows through the decorative elements of the label.)  Then using one of the stamps fron the Peacock set I stamped and embossed the detail in red before cutting out the shape with the corresponding die.  The sentiment is attached to the centre of the label using foam pads.


The second card used another stamp from the Peacock collection.  I stamped a repeating pattern on the blank card using white ink then heat embossed with clear embossing powder.  I then used my inks to create the warm orange/yellow/red background.  To bring out the embossed detail I buffed those areas with a dry baby wipe, which removed any ink from the top.

The die cut was done with the Sizzix Arabesque Flower die using red mirror card again.  I used the same stamp/die/sentiment combi as before, but this time I embossed in gold. Again I used foam pads to adhere the sentiment.

I love how these cards turned out.  Both quite simple but really striking.  And so my love affair with the Sizzix Moroccan Collection dies & stamps goes on.

I'm entering the following challenges:
CAS-ual Fridays - Embossing
CAS on Sunday - #62 Embossing
Daring Cardmakers - No Black, No Neutrals
CAsology - Repeat

*I have used some affiliate links in this post.

02 June 2015

My First Shaker Card

This is a straight-up CASE of a card by Vicky Papaioannu..  I've never really felt compelled to make a shaker card, but I loved the softness and the diffused effect that using vellum gives, so I decided to give my own a go.


To start with I cut three rectangles 12.85cm x 8.5 cm from patterned paper, plain white card and vellum.  To make a frame I measured 1.5cm in from all sides on the back of the white rectangle and then cut the middle section out using a craft knife.  (I may use my Silhouette to make up a load of these rectangles and frames for future use, as I'm pretty rubbish with a craft knife and even this simple task was a bit of a pain!)


I stamped the image and sentiment onto the vellum using silver pigment ink and then covered that with silver embossing powder. Heat embossing happens quickly on vellum so keep the heat tool moving to avoid bubbling.  Then placing the embossed vellum face down, I attached double-sided foam tape around the four edges of the vellum, sprinkled in some sequins then placed the patterned paper rectangle on top (also face down).  And that's the shaker compartment done.

I had intended to use the same patterned paper as a mat for the shaker compartment, but forgot!  Instead I used a lovely bright blue paper, which matched the colour tones of the sequins.  So there you go - my first shaker card!  I don't think it'll be the last...

I'm entering this card into the Simon Says Stamp Wednesday Challenge and The Paper Players Tic Tac Toe challenge (any shade of blue / Embossing / Patterned paper).

01 June 2015

Celebrate

I created this card using the sketch from CAS Colours and Sketches and the recipe from CAS on Sunday (choose any three items in a straight line from the grid).


I went for the diagonal - top right to bottom left. That meant using heat or dry embossing, twine/ribbon and I decided to interpret Male or Female as a unisex card.  This is what I came up with:


 To start with I flicked mica powder paint onto the card blank to get an interesting background.  Then I made the bunting by wrapping washi tape around a bit of string and then cutting the shape.

For the sentiment I dry embossed the word "Celebrate", went over it with a Versamark pen and then heat embossed with gold.  The edges of the sentiment and two ribbons were also embossed with gold.

20 April 2015

Hello Notecard

I wanted to make some notecards, but as usual found it difficult to start.  I've had the Flower Frame and Tree embossing folder set by Sizzix for a while, but since I got it home I've not really been sure about how to use it.  Well, thankfully inspiration finally struck and I came up with these:


I started off using plain Kraft card,  but the embossing folder didn't quite fit and it looked a bit odd so I decided to use it as a panel instead.  I picked out a few embossed elements to highlight, which was done with watercolour pencils initially, but then I tried painting with mica powders, which gave a much better finish I think (you can see the lower bird looks more crisp than the upper bird).  I had a load of 17mm white circles left over from when I cut a tray to hold lip balm tubes, so I stamped individual letters on each one and layered them up on mica paint-washed kraft and white card to mirror the swirl and for an interesting look. Finished off by mounting the panels onto a card blank.  I like the mixture of kraft, white and colours, but I prefer the white panel on Kraft more than the other way round.  What about you?

I'm entering the following challenges:
Colour Throwdown #338 - Use Green, Teal, Kraft and White
AAA Cards #37 - It's Springtime

21 March 2015

Bare Naked CAS


Inspired by the challenge over on AAA Cards I have made three "bare naked" CAS cards. The first uses a stamp from the Hobby Art Owl collection - so sweet!  He looked kind of pensive to me so I thought the "Thinking of You" sentiment was perfect.


The second is along the same lines but I changed the stamped image and also the orientation of the card.  And of course roses and love are another perfect pairing. I'm also going to add this to the CAS-ology challenge.


And finally, I embossed 2 pieces of plain white card, stuck one on the front of the card, then cut out and inked a single butterfly from the other, stuck it over the top of a plain butterfly and folded the wings back. Finished of with a teeny sentiment from the Hot Off The Press dragonfly mini stamp set.

01 March 2015

Simple Mother's Day Card


I was inspired by the sketch in Freshly Made Sketches 175 and the colour palette in Colour Throwdown 331 to create a simple but sweet card for Mother's Day (which is coming up on 15th March here in the UK).


The cue colours were hot pink, light pink, green and Kraft.  I used hot pink organza ribbon, MUM was die cut from Kraft card with the Xcut alphabet die, the flowers were die cut with a Tim Holtz Tattered Florals Sizzix Bigz die, then edged with fuchsia ink and curled for body and dimension, and the leaves were die cut and embossed with a Sizzix Leaf Embosslits die.

02 February 2015

Say It With Flowers

It's always nice to get flowers so I made this bouquet card for my sister's birthday.   I bought the gingham flowers but made the pinwheels. I was going to put the flowers in a vase, but ended up creating stems from green mirror card and tying it all together with a red organza bow.

I am going to enter this into the CAS on Sunday Challenge #51: Flowers.  I'm not sure if it counts as CAS as there are quite a few embellishments, but I suppose I'll find out...

20 September 2014

Hummingbird

I made this card for the CAS on Sunday challenge #42 - Sequins Celebration and Crafty Little Fairies - Sparkle and Bling challenges.  I got a set of adorable mini stamps by Hero Arts, including a lovely hummingbird set, which I've used here.  I then painted the hummingbird with mica powders - I love the shimmery effect, although it doesn't really show up very well in the photos. The flower was coloured with watercolour pencils.  


Now, when it comes to stamping and colouring, I'm as fresh as a daisy.  One of the things that I noticed was how the mica powder "paint" partially obscures the black, stamped outline.  If I was going to repeat this card, I think that I would try using an embossing powder, which would then act as a resist and keep the outline crisp and sharp.


I didn't read the challenge properly - I missed the part about "celebration", so I went back sand stamped "Happy Birthday" at the top.  I actually prefer the original version. What about you?


20 May 2014

Clean and Simple

I've recently discovered that in card-making circles CAS means clean and simple.  Generally these cards should have white space (or other plain colour I suppose) with few layers and minimal embellishments.


I think that these two cards meet the requirements.  In the first card the topper has beern embossed and inked, with organza ribbon placed behind it across the card.  The sentiment has been stamped.

The second card is quite similar to this one, but I quite like that layout. I made the flowers out of organza ribbon then drew on the stems and leaves.  The pink is a tad more neon than I was expecting when I ordered it!

I'm entering the following challenges:
Card 1
Crafty Ribbons - Anything Goes
Little Miss Muffet Challenge - Button Bonanza
CAS-ual Fridays - Three Thirds
Less Is More - Flowers 
Cute Card Thursdays - Handmade Embellishments 

Card 2
Crafty Ribbons - Anything Goes
CAS-ual Fridays - Three Thirds
Less Is More - Flowers 
Cute Card Thursdays - Handmade Embellishments 

09 May 2014

Less Is More Challenge - 3 colours


This was supposed to be my entry into the Simply Less is More Week 170 Colour Challenge, but I missed adding my link by a matter of seconds! 

The challenge was to use 3 colours, or 3 shades of the same colour.  I used pink, purple and turquoise circles and simply drew on stalks and leaves.

For such as simple card, it took me ages to come up with it!  But I think that it's quite sweet in its simplicity.