Search This Blog

Showing posts with label Tattered Lace. Show all posts

09 March 2021

Friends Are The Flowers in The Garden of Life - With Free Download


I made this for a friend a while ago.  It's been a while since I've seen it, but the adhesive failed so she asked me to fix it and now that I've seen it again I really love it!

The base is an MDF shape that I picked up at a craft show.  I covered it with a couple of coats of silver acrylic paint.

The flowers were made using Tattered Lace's Floral Layers Rose die, which makes really lovely layered flowers, but sadly has been discontinued.  However any floral dies would work.  Same for the foliage.

I designed the sentiment in Canvas Workspace, positioning all the letters so that there was some overlap, then welding them together so that the sentiment was a single piece.  I cut 4 layers from 300gsm card and glued them together to get a solid, dimensional appearance.  Download the SVG cut file for the sentiment here (personal use only please).

To arrange the flowers I used hot glue to affix a piece of acetate to the back of the watering can that extended from the top to the handle and then used hot glue to stick down the flowers. Then I cut cut some foliage, doubling up the layers again to give them some rigidity, and just slotted them in around the flowers.

Fonts:

03 November 2020

Magnolia Fridge Magnet

Remember all of those decoupage flowers taht I made a few weeks back (mentioned in this post)?  I'm still not sure what to do with them all and then I had the idea of making fridge magnets.  

I decided to use one of teh die sets rather than the cut files becouase it was much quicker for me.  I gave the assembled flower a couple of coats of spray varnish to seal the paper and make it more resistant to moisture and staining but the gloss finish ended up giving it a glazed ceramic look, which is really pretty.  Then I simply cut out the base layer from a mganetic sheet and then glued the two layers together.  


It's a really simple idea, but very effective and it opens up a whole new way of using my die cuts.

19 October 2020

Quick and Easy Hanging Heart

If you've read my last couple of posts you'll know that I now have a LOT of die cut flowers in my stash.  I don't really have any plans for them, but it would be a shame to leave them bagged up and in a box somewhere.  So I made up a quick and easy hanging heart to display a few of them.


  • I cut out the heart from old cereal boxes (I used a Sizzix Framelits heart die).  [Incidentally, 4 or 5 layers of cereal box weight card glued together makes a good, rigid base comparable to chipboard or lightweight MDF.]  
  • I painted the background using cerulean blue and titanium white acrylic paint (I used a stencil brush for the clouds).
  • I chose a selection of flowers and arranged them at the bottom of the heart. (I used a selection from my many Tattered Lace 3D decoupage flowers - Bell Flower, Hydrangea, Blossom and Bloemen Primula).
  • I added a butterfly in the top left corner (downloaded from thehungryjpeg.com).
  • To finish I attached some twine to the back with hot glue as a hanger.
Simple, but very sweet.


12 October 2020

More Decoupage Flowers

So, I might be a little obsessed.  After my first marathon flower making session I was inspired to dig out some of my old die sets to create even more.  I was shocked to discover that some of said die sets had not been used since they were bought in 2018! I'm not even sure that they're still available to buy.  I did buy the Tattered Lace Floral Decoupage Delights Vol. 1 and Vol. 2 USBs though, because as I said I might be a little obsessed!  Vol. 1 sold out in record time, but at the date of writing this Vol. 2 is still available from Create and Craft TV.


The flowers shown here are a mixture of old dies and a handful from Floral Decoupage Delights Vol. 1.  I haven't even made it to Vol. 2 yet, so I see a lot more flowers in my future 🔮.


EDIT 13/02/2022

The Floral Decoupage Delights USBs are no longer available, but individual SVG cut files and corresponding Charisma artwork can be downloaded from the Create and Craft website.

01 October 2020

Tattered Lace Decoupage Flowers - Favourite Florist Collection

*This post contains affiliate links.  Read the Disclaimer for more information. 

 I am weak for any Tattered Lace 3D decoupage floral dies.  I love them, but unfortunately my wallet doesn't always allow me to indulge myself.  But a few weeks ago there was a 50% off sale at Create and Craft so I took the opportunity to bag a few from the Favourite Florist collection ðŸ™Œ.  

The collection consists of 6 "In the Garden" flowers, which as the name suggests are flowers that you would find in your garden, and 6 "In the Field" wildflowers, and they come with free downloadable coloured images (a.k.a. Charisma).  I purchased the Peony, Hyacinth, Lily and Pelargonium dies from the "In the Garden" collection and the Lavatera and Wild Rose from the "In the Field" collection.  


I spent a good while playing around with the colours in a graphics program (because the Charisma images only came in one colour) and then printing, cutting and putting them together.  My favourites are the Hyacinth and Lavatera dies.  Lily and Peony are also very pretty with lots of decoupage elements.  The wild rose is very pretty as well, but it would have been nice to have a few more decoupage elements.  The Pelargonium is OK but I have another geranium/pelargonium die set from a different collection that I much prefer.  

You can use foam tape to put these together, but I used Pinflair glue gel.  It's crystal clear and odourless and gives great dimension.  Now I just have to figure out what to do with all these flowers...

09 July 2020

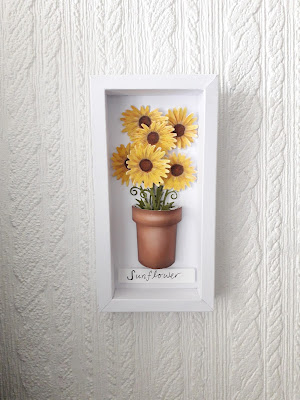
Tattered Lace Sensational Flower and 3D Flower Pot Dies

*This post contains affiliate links.  If you click on the link and subsequently make a purchase you will not be charged extra, but I will receive a commission.

A few weeks ago I managed to snag a great deal from Create and Craft.  The offer was to get the Sensational Flower and Flower Pot die sets at effectively half price (BOGOF).  It looked so cute and I like the 3D element and I like miniature stuff so.....

Tattered Lace Sensational Flower and Flower Pot in Yellow and displayed in a shadow boxTattered Lace Sensational Flower and Flower Pot in Purple and displayed in a shadow box


The flowers and pot come with Charisma (which for the uninitiated is a pre-coloured image that fits the die perfectly that can be downloaded from the Create and Craft website).  The flowers come in yellow and purple, with a couple of additional stems and flower heads so that you can decoupage or fill out the bouquet.  If you have access to a graphics program the colour could be changed to anything you like!  So you could have sunflowers, gerberas, daisies or other similar flowers. I actually recoloured both colour options using alcohol markers because they came out a little more pastel on my printer and I wanted a bold colour. 

The pot comes in terracotta only but again could be recoloured and the die set comes with some additional lacy details that could change the look completely.  I'm going to see if I can get a glazed ceramic look by using Glossy Accents.  You could even stick two halves together to get a free-standing pot and flower display.

The BOGOF deal is no longer available but at the time of publishing you can still get the Sensational Flower die set and the Flower Pot die set for £14.99 each from createandcraft.com.

30 March 2020

Tattered Lace 3D Miniatures - Hot Air Balloon

This post contains some affiliate links (denoted by *).  If you click on a link and make a purchase there will be no extra cost to you, but I will receive a commission.  

Tattered Lace recently released a new collection - the Butterfly Garden Collection.  Part of the collection consists of seven die sets that create miniature items.  There's a hot air balloon, a violin, a jukebox, a teacup, a perfume bottle, a dresser and an alarm clock. 

Now, I love die cutting and I love all things miniature so there was really never going to be any other outcome than making the set mine, plus all seven sets were available at a ridiculously good price (just over half price) from Create and Craft*.  At the time of writing said multi-buy deal is still available at Crafting.co.uk, but only a couple of the individual die sets are available on either site.


I decided to try out the Hot Air Balloon first.  The set creates half of a hot air balloon.  Charisma (Tattered Lace's pre-coloured graphics that work with the die set) artwork is available to download for each of the die sets for free.  If you wanted you could cut the pieces out twice to make a fully 3D miniature, but I love how it looks in a box frame.


I made an A6 box frame and painted the inside blue using watercolour paint.  I die cut three clouds and then used a fineliner to draw in some bird silhouettes.  The end result is really cute.  I'd also like to try cutting the balloon from plain card and making up my own designs and also having multiple designs in a larger box frame.  It would look really sweet in a nursery or kid's bedroom.

Note - this is not the die set for you if you have poor eyesight or any sort of issues with manual dexterity. 

19 November 2019

Floral Friends Box Frames

I bought a few of the girls from the Tattered Lace Floral Friends die collection - Lily, Jasmine and Poppy.  I've been calling them flower fairies, but I think that they are actually just girls wearing floral costumes.  I do like the idea of them being fairies though so maybe I'll just stick with that.

The dies are 3D decoupage dies, which means that they have multiple layers that can be stacked together to give the finished die cut added dimension.  I bought them with the intention of using them in box frames to make cute wall art and I finally got around to putting a few together.

Jasmine Floral Friends Box Frame          


It was difficult to capture in the photos, but I've added some glitter accents to some of the dresses and flowers. These would look really sweet in a kid's bedroom.  I'm going to make a couple to my nieces-in-law for Christmas.  They are dancers and  I think they would love these.  All four are now available in my Folksy shop.

18 July 2018

L'amour est la cle

When it comes to craft supplies I'm a hoarder.  I can't bear to part with the smallest scraps of paper or a bit of ribbon that came with a gift or some old cardboard that could be used for some project or other.  So in an attempt to destash I decided to make a heart wall hanging out of old cereal boxes that I've been putting aside for a while.  


I made a large heart template on a piece of A5 card and then traced around that on the large panels of the cereal box.   After cutting them out (4 of them) and punching holes so that the finished piece could be hung, I stuck the 4 hearts together to get a thick, chipboard type of effect.  I also used the heart template to cut a heart from a piece of woodgrain effect paper.  NOTE - I suggest placing the heart stack underneath something heavy to prevent it from warping as the glue dries.

I cut the flowers with my ScanNCut using a pattern that I designed myself and coloured them using Spectrum Noir alcohol markers, before layering them together.  The leaves came from another die set.  I also used some Katy Sue Flower Soft for the flower centres. 

I gave the padlock die cut the same treatment as the hanging heart in that I layered up several die cuts - 5 from plain white card and one from gold mirror card - to get some dimension.  I then went over the front and sides with copper gilding wax to take away the white edges. 

The lettering was die cut using Sizzix Brush Alphabet dies and then I added a few freehand hearts to finish it all off.  I decided to go with French as it was a present for my (French) friend's mother.  To finish it off I used some thick string, which gave it a bit of a rustic feel.

In case you're interested in any of the supplies that I used:

*affiliate link

13 March 2018

Black and Gold

Back in September I bought some nesting triangle dies, but I've never used them! I knew I wanted to use the triangles to cover opposite corners of my card and I had recently seen some products from the Crafter's Companion Black and Gold Collection, which inspired the colour scheme.


I decided to use a black card base and cut the triangles from gold mirror card.  To add some interest I embossed the gold mirror card using the Crafter's Companion (CC) 3D Lace embossing folder (which I love but have also never used since I bought it!) and the black card with another CC embossing folder - Blooming Vines from the Country Garden collection.  I added some black flowers to the triangles, but they were a bit lacklustre so I added a few highlights with gold pen.  The sentiment is a Tattered Lace die that came with one of their magazines.

I used the off-cut from the die cut triangles to make a similar card.  This time I cut the flowers from gold card and the sentiment from black card.

Which do you like better?


16 February 2018

Cocktails by Moonlight

When the Tattered Lace Art Deco Classics range came out I fell in love with the ladies in the Art Deco Cocktail Hour set.  I really like the seated lady and I had recently downloaded a set of space watercolour backgrounds from Creative Market (free download of the week at the time, currently 50% off) which made me think of having her sitting in the moon sipping her cocktail. A few gems and some small fabric stars completed the overall effect.  


This post does not contain affiliate links. 

09 February 2018

Patchwork Butterfly Birthday Card

My friend asked me to make her mum a 60th birthday card. I make a lot of cards.  I even send some of them to friends and family for various occasions, but I have never made a card for someone to give to someone else.  It was different, trying to make for someone whose tastes I didn't know that much about.  It didn't help that the only direction that I received from my friend was to "make it nice"! 😒
I ended up making a variation on a card that I'd made before that I thought was really pretty,


I made a patchwork base using 4 blocks consisting of 4 strips of patterned paper.  Each block was rotated through 90°.  I cut the Tattered Lace Red Admiral Butterfly from gold mirror card and then cut another from which I separated the butterfly and flowers.  I placed those elements on top of the first die cut, lifting the wings of the butterfly and using foam tape behind the flowers to add dimension.  I also used the mirror card to cut the sentiment.  The card was finished with gold flatback gems in each corner and a couple of pearls for the flower centres. 

I really love how it turned out, and it went down very well with my friend's mum too 😊

29 November 2017

Christmas Decorations - Indoor Wreath

I love Christmas decorations and in an ideal world every room in the house would be festooned to bursting point. In reality though, every year the living room looks beautifully festive but the decoration of the rest of the house is sporadic at best. So I vow to craft up a storm for next Christmas, but it always seems to creep up on me! You know, it's ages away, it's ages away. it's ages away, oh shit it's here! It's like that scene out of Monty Python's The Holy Grail (but without the carnage 😂!) You'd think by now I'd be better prepared...

So in my attempt to boost the decorations stash I have made a few things, including this indoor wreath. I will be attaching one to every internal door in the house.

I cut a ring from Kraft card with a 15cm outer diameter. I then lined it with pine sprigs that I die cut (I don't know the brand) from green paper. I then die cut holly leaves from two shades of green mirror card using the holly dies in the Tattered Lace Holly & Robin set. Finally I cut several poinsettias using two sizes from the Tattered Lace Poinsettia 2016 set to place over the leaves around the frame. The wreath is finished off with a red bow at the top and a loop of red ribbon for hanging glued to the back. As I cut the holly from green mirror card, I went back over all of the berries with red glitter glue.

In our house the decorations go up on the 1st December. That's only a couple of days away so I won't have a full complement of decorations in time for that, BUT technically I've got until Christmas Day so I'll keep making them and adding them up until then.

21 November 2017

Woodland Christmas

I've seen a few cards on Pinterest featuring a silver birch style background which I really liked.  So I bought myself a birch tree background cutting die and made my own version. I really like how it turned out.


I started with an A6 plain white card blank.

For the background I used Distress Stains in blocks of colour (from top to bottom: Chipped Sapphire, Wilted Violet+Broken China and Broken China).  I simply swiped the stain across the card in stripes, overlapping the colours in each block for a smoother transition.  Wilted Violet on its own was too purple, so went over the top of it with Broken China to get more of a blue hue.  I also dotted Chipped Sapphire across all three colour blocks in several places, which also helps to blend the colours.

I die cut the birch tree trunks from white card and lined the die cut up with the top and sides of the card over the coloured background.  The die cut did not reach all the way to the bottom so I cut a couple of snow mounds from white card and placed them at the bottom of the card, then went over them with a Spectrum Noir clear sparkle pen for a glistening snow effect.

The deer are from the Tattered Lace Family Outing die set.  I cut them from white card and coloured them using Spectrum Noir markers, going over the spots on their backs with a white gel pen.  I stuck the doe straight on to the card and used foam pads for the fawn.

At this point I decided to add some snowfall to the scene by dotting snowflakes onto the background using a white gel pen.

Finally, I stamped the sentiment into the corner.  The stamp I used is from a set that came with issue 35 of Creative Stamping magazine.

03 June 2017

Freshly Made Sketches 290


Here's my interpretation of the latest sketch over on the Freshly Made Sketches blog.  I love the combination of lacy detail on that weathered wood bacground.  I used the Tattered Lace Oval Doily die from the Peach Sorbet collection and generic "hello" die.


22 April 2017

Three Looks, One Die

I love background dies and the Tattered Lace Grandma's Garden panel die is really pretty.  There are loads of techniques that are great with background dies, but here are three simple ways to use it.


1.  Cut it out of Kraft (or other coloured) card and affix to a white card blank.  Stick a die cut sentiment also cut from Kraft (or other coloured) card on to a white oval and then affix both on to the background with foam pads.  It's really simple but it looks great.


2.  Die cut a panel out of plain white cardstock and place it over a coloured background.  In this case I created a vibrant background using alcohol markers, but you can use inks, watercolours, pan pastels or whatever medium you like.  I placed a white die cut sentiment onto a piece of coordinating card stock.  The white against the vibrant background helps to tone it down.  This is a great technique to use with busy background papers too.


3.  Die cut a panel from plain white cardstock and colour in the different elements, then affix to a card blank.  In this case I used pastel shades and a Kraft card base.  The pastels and Kraft work really well together.


GHVHVDN131519882 

21 April 2017

Glamour Puss

I've been coveting the Tattered Lace Glamour Puss die that came with one of their magazines ever since I first saw it.  I finally caved in and picked up a back issue from eBay a couple of months ago.  Inspired by one of the sample cards on the Tattered Lace website I made this:


Isn't she fabulous?! The stairway die is also by Tattered Lace, from the Essentials collection.  I used plain white card and coloured the vertical faces of the steps using a Spectrum Noir light grey marker.

The Glamour Puss die itself cuts out all the detail in the dress, but I wanted to keep it in so I taped across the back of the die cut before removing it from the die.  I used a black Spectrum Noir marker to colour the dress then went over it with Dovecraft Crystal glitter glue.  The black highlighted all the green elements in the glitter glue, giving the dress a beautiful emerald shimmer.

I used a gold pen to highlight her jewellery and gave her some hot red lipstick, black hair and a matching clutch bag.

The wallpaper is damask patterned paper.  Next time I would use a paper with a smaller pattern, but overall I like the effect.

11 February 2017

Paper Flower Pot

Inspired by the pop-up box card, I thought it would be fun to use the same principle to create a different shape.  A plant pot came to mind and I do like to make paper flowers, so I put the two together and voila!


Unlike the pop-up box, the plant pot is only connected along the top edge.  The sides have been cut away to create the pot shape.  I used two strips of card on each side to connect the front and back of the pot to give it some stability.

The flowers have all been made with either punched hearts, or using hand-drawn heart templates.  I stuck 5 heart petals together at their tips to create each flower.  I also scored along the petals before colouring them to give some texture, then shaped the petals by curling gently.  Most of the petals were cut from plain white card, which I then coloured with Spectrum Noir alcohol markers.  A couple were cut from pink paper and then coloured blue.

Some of the stamens were made by snipping at regular intervals into a thin rectangular strip of card and then rolling that up and fanning out the cut fringes.  The rest were made using Flower Soft by Katy Sue.  I actually much prefer those.  I added a few die cut and freeform leaves, and some decorative flourishes by Tattered Lace to finish off the display.  Because the pot is made using the same principle as the pop-up box, it does flatten, so in theory you could make one of these and send it in the post.


12 April 2016

CAS Sympathy Card

Sadly, I've had to make a couple of sympathy cards recently.  I've never made one before but I wanted them to be simple and tasteful.  After poring over my stamps for ages, I finally decided to use a die cut and chose the English Rose die by Tattered Lace.


I used linen-textured card for the card blank to add a little bit of interest without domineering the card and then used the die to cut the rose design from plain white card, which I went over a couple times with a clear Spectrum Sparkle pen. This gave a nice, subtle sheen that added some interest to the die cut.  I also had some My Craft Studio sentiment strips that I bought a long time ago and promptly forgot, so I chose the "With Sympathy" sentiment and cut a strip the same width as the card blank.  The die cut was glued in the centre of the card, with the sentiment strip below.  The card was finished off with three aurora borealis-style sequins, which are clear but have a pink or slightly green tinge depending on how they catch the light.

30 March 2016

Washi Tape Banner Card

I've amassed so many supplies, but hardly use any of them, including my collection of Washi Tape, so I decided to make a Washi tape card.


I placed strips of Washi tape vertically from the top right corner of the card blank and cut the ends to look like banners. After that I stalled! I couldn't think of how to finish the card. I tried a horizontal layered banner across the bottom, but the layout was really lacking something.  Then I remembered my new Tattered Lace Melded Backgrounds dies and that made all the difference. 

Tattered Lace Melded Backgrounds die set

 I cut the diamond pattern into the bottom left corner and added a pink insert into the card, which really made the pattern pop. I then placed the layered banner back over the top and finished it off with a die cut "Wonderful" (the waste from another die) and a small flower.

It's great how a small feature can really take a card from drab to fab!