Make a pretty junk journal / mini album using the Marie's Garden printable kit. In the video below I show you how I put the kit together - no sewing required!
Thanks for watching and please like and subscribe!
DOWNLOAD THE KIT:
https://www.creativefabrica.com/product/maries-garden-junk-journal-printable/ref/98543/
PRINTER PAPER:
https://tinyurl.com/u695h2ec
CIRCLE PUNCH:
https://tinyurl.com/jjhcrp2r
I plan to do a series of tiger-themed crafts throughout the year to celebrate the Year of the Tiger. I finally sat down a couple of weeks ago to make this hanging heart idea that I had.
I have used the paper set exclusively. The only extras I used were the gem for the flower centres and the letter dies that I used to make the words. You could also use a digital cutting machine to cut the letters. Apart from the slightly wonky lady, I really like how it turned out ☺.
PROCESS
Prepare the heart base. I used 4 layers cut from old cereal boxes and glued together.
Choose one of the papers for the background. Print it out and trace around the heart base, then cut it out and glue onto the heart.
Go around the edge of the heart with a sanding block (optional).
Print out a couple of the leafy papers and fussy cut a variety of leaves. I cut nine leaves.
Print out the art deco style black and gold paper and cut 5 of the fan shapes.
Print the lady and the sitting tiger clip art making sure to resize them to match the size of the heart base and cut them out.
Use the uppercase die set to cut the letters S, T, A, Y from the copper textured paper.
Use the lowercase die set to cut the letters w, i, l, d, from one of the tiger skin paper.
Position the lady and the tiger towards the centre of the heart. It doesn't matter if the tiger overhangs the edge a little bit.
Position the lettering in the top right of the heart.
Add one of the smaller leaves underneath the words as a flourish.
In the top left corner use the art deco style elements to create a flower. Glue them down around a central point leaving the edges free.
Add a gem in a coordinating colour to the centre of the flower you created.
Arrange a few of the leaves around the flower, slotting them in behind the petals.
Add some string or other fixing method to the back of the heart.
I like to keep a regular check on new products added to the Design Bundles Plus products pages. Under the "Crafters" - "Laser Cutting Designs" filter there are literally thousands of cut files designed for laser cutting with new files being added daily. I don't have a laser cutter (yet!) but I still like to stalk the pages for items that would work with card or greyboard on my ScanNCut.
There are a load of layered house plant cut files that I really love. They would look wonderful in their own right as wall art, but would also make great toppers for cards, scrapbook embellishments, fridge magnets and so on.
Head over to Design Bundles to take a look. The files are part of the Design Bundles Plus membership, so you would have to become a member to download them. However the first month is just $1 and you get 10 free Plus credits as soon as you sign up. And you get to keep any Plus purchases even if you cancel the membership. Each of the files above are just one plus credit each, so you could buy them all and have credits to spare!
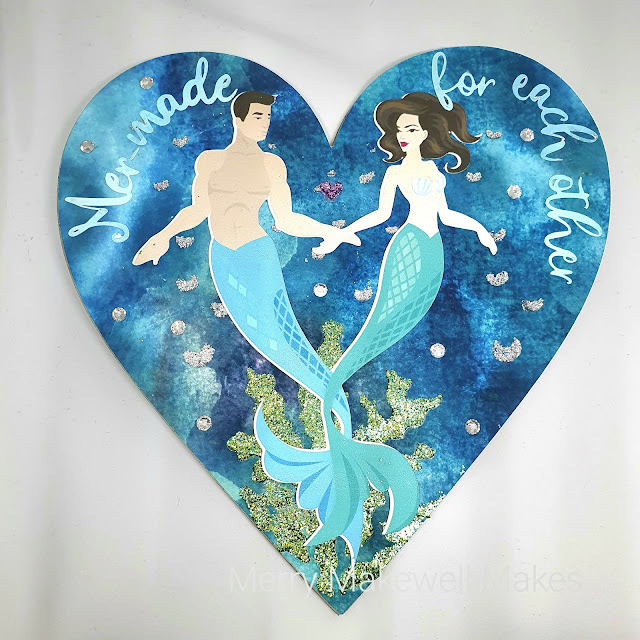
I thought it would be fun to do 14 days of love by making 14 hearts, starting today with this punny heart.
PREPARATION
Download items from the supplies list below.
Import the mercouple clip art (the artwork comes both coloured and black and white) into graphics program and resize to fit a 150mm x 150mm heart (my couple were 125mm tall). Then printed that out.
The download includes jpg, png and svg formats. Import the svg into Canvas Workspace and isolate the outer line only and export that to cut out the clip art.
Scan the print layout of the mercouple into the ScanNCut (I really love that feature!), then line up the outline and cut out the couple.
Using the pre-installed shapes on the ScanNCut cut four (4) 150mm hearts from 0.6mm greyboard, and one (1) heart from patterned paper printed from the Serene Digital Waters collection.
I created the text (Mer-made for each other) in Canvas Workspace and used the "Fit to Path" function to get the text to curve around the top of the heart.
Cut the text from patterned card printed from the Serene Waters Digital Textures pack.
Cut out the Seaweed Stencil, resized to 200mm x 200mm from thick (Kraft) card.
ASSEMBLY
Glue the 4 greyboard hearts together. This will give a nice, rigid base.
Glue the patterned paper heart to the top of the greyboard stack. (Leave to dry under something heavy so it doesn't warp.)
Mix three green shades of Aladine Izink Diamond Paint (turquoise, dark green and light green) and then pass that through the stencil at the bottom of the heart. (I chose to mix the colours but that is optional.)
Use silver Diamond Paint through the stencil to create bubbles.
Leave to dry, then glue the mercouple to the centre of the heart.
Glue the text around the curve top of the heart.
Add some clear acrylic gems randomly across the heart.
Add a small heart between the couple. (I used Diamond Paint in pink. If making this again I would make the heart bigger).
Go over the mercouple's tails with a clear glitter pen so that they are glistening. (I didn't do that until after I'd taken the photo, but I like how it looks.)
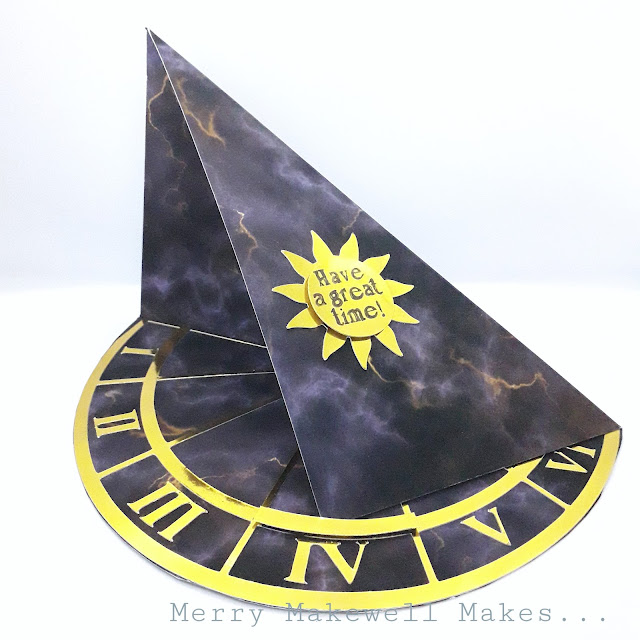
I recently updated my Skillshare class - "Create Dimensional Greetings Cards that Wow! - 1. Easel Card" with a couple of additional lessons. In the lessons I show how to make a twisted easel card and I create a sundial card as an example of how to use the shape for maximum effect.
I am so happy with how it turned out! I can't say that I've seen a card like this before so I'm claiming it as my invention!
Head over to Skillshare to watch the class. If you're not already a member clicking the link will give you a 14-day free trial, and 1 free month if you then sign-up.
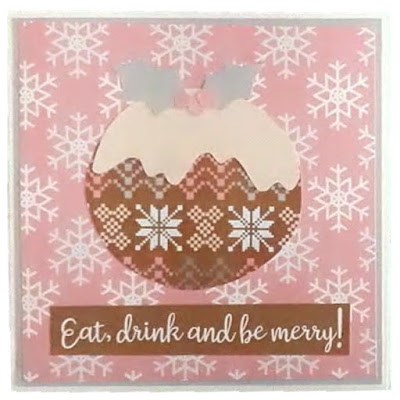
On the back of one of the brown patterned papers draw around a circular-ish shape and then cut it out. This will be the Christmas Pudding.
On a piece of contrasting card (I chose plain beige) use the pudding shape to draw and cut out a half circle.
Cut along the bottom edge of the half circle to create the effect of dripping frosting and then glue that to the pudding shape.
On another piece of coloured cardstock (I used grey picked from one of the patterned papers) draw two holly leaf shapes and cut them out.
Cut or punch three small circles from the plain pink cardstock for berries.
Cut a square from the pink snowflake patterned paper to 13 x 13cm
Glue the pudding, holly leaves and berries to the patterned paper, leaving enough room below for a sentiment.
Glue the sentiment in place.
Cut a square from the grey cardstock to 13.5 x 13.5cm and glue the pudding and pink patterned paper on top of it leaving an even, narrow border all around.
I recently downloaded the Nordic Winter Christmas Backgrounds digital paper set. I wanted to do a 10 cards 1 paper pack for this set, but I don't think that I'll have time to get that all done. So I'm going to post about each card as I go rather than waiting for all the cards to be completed.
Nordic Christmas Digital Paper Set by Green Light Ideas (via CreativeFabrica.com)
To flesh out the paper pack I used the colour picker tool in my graphics program on the patterned paper to create some solid-colour coordinating cardstock in pink, brown, grey, beige and blue. I also made some generic Christmas sentiments using the brown background. Take a look at this post to find out create your own sentiment strips.
To make the card:
Draw (or print) a template for a Christmas jumper (sweater) onto plain white card, trace around it on the reverse of the patterned papers and then cut it out.
Trace around just the neck, cuffs and bottom of the jumper on plain white card, cut them out and glue them into place.
The card blank is 10.5 x 14.5cm.
Cut a piece of 10 x 14cm printed brown cardstock and glue to the card blank.
Cut a piece of 9.5 x 13.5cm blue and grey argyle patterned paper and layer on top of the brown card.
Glue the jumper (sweater) to the front of the card. Use foam tape for added dimension (optional).
Place a sentiment of your choosing below the jumper (sweater).
Back in March I released a Skillshare class about crafting with digital supplies. The class is about making use of digital supplies to create physical items - in this case hanging hearts for home décor.
I made a few samples, but I just realised that I haven't shared them on the blog! I used old cereal boxes for the heart base, and the background and embellishments are items that I downloaded, printed and cut out.
This was the prototype that I made when I was feeling out the idea for the class:
I wanted to show how the same basic ingredients could be used to produce different results, so this was an alternative arrangement that I designed:
I also had the idea to make the butterfly a real statement, so in this example I put it front and centre surrounded by the flowers and foliage to give a wreath-like effect.
For the final example I wanted to use a different papers from the sets that I used to make the hearts. I also wanted to show a slightly different way to use the elements and still achieve a nice result.
The only supplies used were old cereal boxes, printer paper, scissors and glue. All of the digital resources that I used in the class are available to download for free!
If you want to find out more, head over to Skillshare and check out the class here. If you aren't a member you can get a free 14-day Premium membership trial which will allow you to watch this class and hundreds of others. While you're there, take a look at my Easel Card class as well.
In case you've never heard of it, Izink Diamond Paint is a glitter paste and paint in one. Although you can apply it with a paintbrush it wouldn't really work for painting fine details. It would work really well with stencils though. I love that it is super sparkly and that the paint is not too wet like a lot of other glitter paints/glues. I've purposely left the stripes and spots a little bit rough but it's up to you how neat and tidy they are.
The Vanilla Blossom Watercolor set has a number of elements including florals, foliage, butterflies and birds. One of the florals had three complementary images that would work as decoupage.
I filled an A4 sheet with the various images that I wanted to use and printed that out. If you're going to try to decoupage remember to group all of the relevant images and resize them together.
I'm using sentiment strips that I created myself. Check out this blog post to see how I made them.
Card 1
- Paint horizontal stripes across the card front and allow to dry.
- Cut out the three different floral images (flower with stem, flower with no stem and flower on its own).
- Layer the floral images using foam pads to create a 3D decoupage effect.
- Glue the decoupaged flower to the front of the card and add a sentiment.
Card 2
- Paint horizontal stripes across the card front and allow to dry.
- Cut out one each of the flower with stem, and the flower on its own and stick them together with foam pads.
- Rotate the card to landscape orientation so that the fold is at the top.
- Glue the floral to the left-hand side of the card front and add a sentiment.
Card 3
- Use a saucer, bowl or similar to paint curved stripes across the card front and allow to dry.
- Cut one each of the flower with stem, flower and leaves with no stem, flower on its own and a butterfly.
- Layer the flowers with foam pads and glue it in the bottom right corner of the card front.
- Glue the butterfly in the top left corner (ish) and add a sentiment.
Card 4
- Paint rough circles about 1.5cm / ⅝ inch onto the card front and leave to dry.
- Cut out two of the flower with leaves, one flower on its own and a butterfly.
- Decoupage one of the flowers with leaves and the flower on its own with foam pads.
- Arrange the flowers toward the centre of the card and glue them down.
- Add a butterfly (I chose the top left corner) and add a sentiment.
Use a black card blank for an alternative look.
I really like the gold, but the diamond paint comes in a few different colours so it could be fun to try out different card and paint combinations as well as different florals, or even multicoloured glitter paint backgrounds.
So, you've accumulated a load of patterned papers (either physical or digital), but you have no idea what to do with them. At least, that's a problem that I have. I'm not a prolific card maker, nor do I scrapbook, but I can't resist a pretty patterned paper or an interesting background texture. So what to do? Collage, that's what!
I tend to overthink things and spent ages trying to decide what to collage. In my mind I felt like it needed to be some grand, artistic piece. But it really didn't have to be so complicated. In the end I went with a simple floral layout inspired by an embroidery design.
I used papers from my digital stash, but any papers would work. This would actually be a great project for using up paper scraps. I chose a newsprint, a pink paper with a a slight texture for the flowers, two different green papers for the stems and leaves, yellow paper for the flower centres and a lovely bluey-purple paper for some berries. I've listed links to all the papers used at the end of the post.
Step-by-step
1. I printed out three sheets using one of the designs in the Old Newspaper Textures set. The original file is a 12 x 12 sheet and the text was quite large. So I resized it a couple of times to make the print smaller. I tore pieces from all three sheets and stuck them down on the canvas board trying to get a nice mix between the different text sizes.
2. Using the pink sheet I cut a strip about one inch wide and then cut about 30 petals shapes.
3. I arranged the petals on to the canvas board to create 3 flower heads.
4. I cut thin stems from one of the green papers and various sized leaves from the other green paper, then arranged them onto the board.
5. I cut a few small circles for berries from the blue-purple paper and three yellow circles for the flower centres and added them to the piece as well.
At this point the collage was finished, but I felt like it didn't stand out from the background enough. So I went around the edges of the petals, leaves and berries with my Derwent Inktense pencils to help lift the composition off the page. I think that I might have overworked it a bit, but it does seem to have done the job and I still like the end result. (Original on the left, "enhanced" on the right.)
Sentiment strips can be a really elegant addition to your card fronts, home décor projects, mixed media artwork or scrapbook pages. They generally come pre-printed or as a stamp (and die) set. Both of those options are just fine, but they can be costly and you are limited to the words and phrases that are offered, the font used, the size of the strip etc. Making your own sentiment strips is both cost-effective and non-limiting because you choose the words and phrases, the font, the size, the colour scheme and so on.
In the following example I used Photoshop to create my sentiment strips, but you could also do this in a word processing program if you don't have a graphics program.
1. Create a new project. I used A5 size because I couldn't think of enough sentiments to fill an A4 page! But in hindsight I could have just doubled-up on some of them 🙃.
2. Draw a rectangle to cover the sheet and fill it in black (or whatever colour scheme you fancy).
3. Using the text tool, select the desired font and create a page full of short sentiments to cover a variety of occasions and lay them out onto the (black) background. If using a dark background colour remember to select white or a light colour for the text and vice versa.
4. When the page has been filled and you are happy with your sentiment sheet print it out, then cut out the strips as you need them or cut them all out and keep them in a container so that they're ready to go.
Remember to set your print settings to best quality and consider using photo paper rather than copy paper to get a good depth of colour in the background.
I may have mentioned before that I absolutely love buying craft supplies! It's bordering on an addiction. The problem with that is that it is costly and the supplies take up a lot of space (that I don't have). So I've been trying my hardest not to succumb to all the juicy deals that seem to keep popping up in my inbox lately 😩. To help keep my cravings at bay, I've been scouring the "Freebies" section at Creative Fabrica. It's the perfect foil to my buying habit - the products don't cost anything, they only take up space on my hard drive and I get to feel the same joy and satisfaction that I get from buying and receiving physical items 🙌.
Anyway, on to the project! These floral greetings cards are really pretty and quick and easy to make.
Aside from your computer and printer, you will need:
Download the clipart and import the images into a graphics program, e.g. Photoshop. Adjust the size so that they are about 10 x 13cm (to fit an A6 card) or whatever dimensions you need for the card that you want to make.
Step 2:
Position the graphics so that they are one side of the page (rotate if required and use guides to help you position them), then print out.
Step 3:
Cut the A4 sheet in half, then score and fold to create two greetings cards and put them aside.
Step 4:
Create another page in your graphics program using the graphics from step 2, but this time fill the page, then print.
Step 5:
Cut out one central flower from each design on the printed sheet.
Step 6:
Use foam pads or dimensional glue to stick the cut flower onto the greetings card base to add dimension.
Step 7:
Download the font and install on your computer.
Step 8:
In your graphics program create a new project with an A5 sheet. Draw a rectangle to cover the sheet and fill it in black.
Step 9:
Using the text tool, select the Underwood Champion font and create a page full of short sentiments to cover a variety of occasions and lay them out onto the black background. Select white for the font fill colour. When you are happy with your sentiment sheet print it out.
Step 10:
Cut out one of the sentiment strips and attach it to the front of the greetings card.
Your card is complete! I chose to do some decoupage on the front because I think it adds something extra, but that is optional (steps 4-6).
The sentiment sheet does take a little time to put together, but once you have done it choosing a sentiment is very quick.
You could easily make a stack of these to have on hand for any occasion or to sell or gift as a set.
Head over to Creative Fabrica to grab these assets and make your own cards, or check out the vast selection of fonts and graphics (both free and paid for) and be inspired to bring your own creations to life.
I've been interested in digital crafting for a couple of years. I first came across the concept via Create and Craft TV, which introduced me to digikits - a digital graphics set consisting of clipart embellishments and digital backing papers. The digikits were used in a graphics program to create greetings cards and scrapbook pages, which were then printed out.
After that I started collecting graphics files - particularly backing papers and, more recently, cut files. That is how I first came across Creative Fabrica.
What is Creative Fabrica?
Creative Fabrica is a marketplace website where you can buy graphics resources for a variety of applications. There are literally millions of resources including:
fonts
digital paper
textures
clipart
templates
mock-ups
cut files
and even sewing, embroidery and crochet patterns.
Why use digital resources?
I love patterned paper and die cutting and as a result I have a significant collection of the two. However, buying paper pads and cutting dies can be expensive. A 6x6 paper pad with around 8 different designs would cost £5-£10. A 12x12 paper pad would be in the £15-£20 range. Plus once the paper has been used up you have to buy more and the particular set that you like may have sold out or been discontinued.
With digital paper the files are yours to keep, so you can print as many sheets as you want and never run out. If you are tech-savvy you can also adjust colours or resize the pattern without having to buy a new set as you would with a physical paper pad. With digital paper sets of around 10 different designs generally costing less than £5, the savings and value for money are clear.
Where a cutting die could cost in the region of £10-20+, a digital cut file of the same design would generally be less than £5. And because the files can be resized, you are essentially buying the equivalent of a die set rather than a single die.
Most digital files will come with a Commercial Licence, which means that you can sell whatever you make - both digitally and physically - with fewer restrictions compared to branded craft supplies.
In summary:
Resources never run out
Graphics can be resized and recoloured at no extra cost
Cost-effective (much cheaper in comparison to physical items)
Create your own designs using the resources
Commercial licences available (so you can sell your makes)
What is the All Access Subscription?
The Creative Fabrica All Access Subscription gives you access to every single file on the Creative Fabrica website for one monthly, recurring price. From fonts to graphics to templates to bundles, you can download whatever takes your fancy. All downloads come with a full Commercial Licence, which you can read about here.
I signed up to the Creative Fabrica All Access Subscription back in September 2020. When I looked at how much I spent on cutting dies, paper and CDs/USBs from well-known craft companies I was shocked to find that it was in the several hundreds of pounds over just a few months! There was a special offer at the time that was too good to pass up. So the subscription just made sense. I still do buy the occasional physical product like paints or mediums, but for patterned paper, paper cutting and embellishments I can usually find what I'm looking for at Creative Fabrica.
How much does it cost?
The All Access Subscription normally costs $29 per month. With this special offer you can get it for just $1 for the first month and $19 per month thereafter. That's just $209 per year for as many files as you can fit on to your hard drive!
So if you spend a lot on craft supplies like dies, backing papers or embellishments, or you are a budding pattern or graphic designer head over to Creative Fabrica and have a look around. You might find that the subscription is just what you have been looking for.
If you're at all familiar with this blog, you'll know that I have a bit of a hoarding problem when it comes to art and craft supplies! This also applies to digital products. I have literally hundreds of digital papers, textures, clipart, fonts and cut files.
I was looking for a way to use some of my extensive collection of digital assets in real life and not just leave them languishing in cyberspace. But then it occurred to me that there might be people like me who might be looking for ideas about how to use their digital products and thus this class was born! It's also a perfect introduction to crafting for those who might want to give crafting a try, but don't have any supplies.
In this class you will learn:
where to find digital resources that you can download (for free)
how to combine the printed digital elements to create a beautiful piece of home décor.
PLUS
a bonus mini class on how to create your own floral embellishments
There's no need for stamps or dies or inks or patterned papers. The only supplies needed are:
a computer
a printer
copy paper
heavier weight printer (photo) paper
scissors
glue
and a pencil.
This class is suitable for all levels. Whether you're a complete beginner, a seasoned crafter looking for something new, or someone looking for ideas about how to use your own collection of digital artwork, I'm sure you will take something from this class.
Head over to Skillshare to watch the class. You'll need a Premium Membership to watch the whole class, but if you're not a member yet you can sign up for a 14-day free trial.
If you want to craft along with me, these are the resources that I use during the class:
A few months ago Design Bundles released a new freebie digital paper pack - the Summer Digital Papers Set: sixteen 12x12" papers with a (loose) summer theme. As soon as I saw the set I thought of Christmas even though it's labelled as "Summer" and one of the papers features watermelons! So I thought it would be fun to try a 10 cards 1 kit with the set, but with a Christmas theme. I also thought that it would make a great debut video for my YouTube channel. Alas, I didn't get around to editing it in time 😞.
OK, so I know that Christmas is long gone, but I'm posting this anyway because I went to all the trouble to make the cards and film the process and it seems like a bit of a waste not to. Besides, if you ignore the Christmas theme this could be great inspiration for how to use patterned papers for cards in general.
I did use some die cuts, stamps and card from my stash, but I tried to keep the "extras" to a minimum so that the cards could be recreated easily with whatever you have in your stash.
Card 1
I was struggling to get started so used Freshly Made Sketches 457 for inspiration. I used a Kraft card blank and four of the patterned papers and cut a stag head silhouette from Kraft card to match the base. The sentiment is stamped and heat embossed with white embossing powder.
The stag head could easily be replaced and the sentiment changed for a card for a different occasion.
Card 2
For this card I cut one of the green papers into a triangle for a tree and used the red paper to create presents. I also used pink glitter card as a mat to match the pink of the patterned backing paper and then cut 'tinsel' from the glitter card to decorate the tree. Acrylic gems for baubles and a simple sentiment stamped in green to match the colour scheme finish off the card. (If I were going to make this again, I'd make the presents slightly smaller.)
Card 3
For this card I embossed a piece of plain white card, slightly smaller than the card front. I cut strips of the triangular patterned paper and used them to create a frame around the embossed card. Then I cut three triangles for trees and a scalloped circle to frame the sentiment from different papers in the set. I added a few gems for an extra festive touch.
Card 4
Here I made rosettes of varying sizes from three of the patterned papers and used silver glitter glue to make them look like hanging ornaments. I stamped and heat embossed a sentiment onto a piece of one of the green papers. This design would also suit a birthday card or any celebration card.
Card 5
The striped patterned paper screamed "candy cane!" to me so I cut out two mirror images of candy cane shapes. (I didn't have a candy cane die so I drew a template and used that as my guide.) I die cut a bow from the the red paper and some pine sprigs from one of the green papers. The elements were arranged on a Kraft tag to match the card blank, and then I used the red gingham style paper as the background. I also added some silver string to the tag.
Card 6
For this card I die cut the pine sprigs from one of the green papers and die cut three circles from three of the patterned papers. I fussy cut various triangles from the patterned paper and arranged all the elements to make it look like baubles hanging from a tree. I cut a sentiment from pink glitter card to finish off the card.
Card 7
I kept things fairly simple for this card, cutting a stitched edge rectangle frame from Kraft card and a rectangle from the red patterned paper. I die cut a bird and a sentiment from plain white card and finished off the card with a few gems.
This could also be adapted for any other occasion by changing the sentiment and using a similar die or florals in place of the bird.
Card 8
This is one of my favourites. Pink isn't readily associated with Christmas, so to make the card more festive I stamped a snowflake-like motif in the centres of all the polka dots and heat embossed them with gold embossing powder. Then I layered rectangles of gold mirror card and the pink patterned paper as shown and die cut a sentiment and the stag head from gold mirror card as well. Again, this could easily be adapted for a different occasion.
Card 9
I had a lot of small paper pieces and offcuts left over so I decided to try some paper weaving. I embossed a piece of white card with the swirly pattern then die cut a bauble aperture from it and placed the woven paper behind the aperture. Then I die cut the bauble hanger from gold mirror card and pieced it back into the aperture. I also stamped two sentiments on circles which I covered with Glossy Accents. I was hoping to get a somewhat domed effect, but they turned out pretty flat. I added a few gems to finish.
Card 10
I left the red and black polka dot paper until last. I really struggled with how to use it because it didn't feel Christmassy to me. In the end I decided to use a layout that I've used a lot in the past and like. I cut a strip of black card to go across the card and a slightly smaller strip of the patterned paper to sit on top of it, then cut a stag silhouette and the sentiment from black card. The stag silhouette didn't pop out enough when directly on the patterned strip so I also cut a decorative oval from white card for it to sit on. I added a few gems on the white spaces for a bit of added interest. I'm still not sold on this colour scheme, but it was interesting to try.
EDIT - I did it! I finished the corresponding video and posted it to YouTube 🙌🙌
--------------------
This was a lot of fun and a great creative exercise! I was really pleased with the variety of different cards that I ended up with despite using limited resources. Why not challenge yourself to create 10 cards from 1 paper pack? Design Bundles have thousands of background papers as well as other graphic resources at very reasonable prices. It's a really cost-effective way of adding to your stash (provided that you have a decent printer), plus you'll never run out of your favourite design again!
If you're new to digital crafting or don't have much of a budget for craft supplies it's definitely worth checking out their freebies page, but remember to read the licence terms to make sure you don't violate any terms of use.