Search This Blog

16 December 2021

Nordic Winter Digital Paper Set - Card 2

Here is the second card made with with the Nordic Winter digital paper pack (see the first here).  


To make the card:

  • I used a card blank measuring 14 x 14cm.
  • On the back of one of the brown patterned papers draw around a circular-ish shape and then cut it out.  This will be the Christmas Pudding.
  • On a piece of contrasting card (I chose plain beige) use the pudding shape to draw and cut out a half circle.
  • Cut along the bottom edge of the half circle to create the effect of dripping frosting and then glue that to the pudding shape.
  • On another piece of coloured cardstock (I used grey picked from one of the patterned papers) draw two holly leaf shapes and cut them out.
  • Cut or punch three small circles from the plain pink cardstock for berries.
  • Cut a square from the pink snowflake patterned paper to 13 x 13cm
  • Glue the pudding, holly leaves and berries to the patterned paper, leaving enough room below for a sentiment.
  • Glue the sentiment in place.
  • Cut a square from the grey cardstock to 13.5 x 13.5cm and glue the pudding and pink patterned paper on top of it leaving an even, narrow border all around.
  • Glue the stack to the front of the card blank.

Watch the process video:


Supplies:

*I get my photo paper from StinkyInk.

15 December 2021

Snowflake Wood Slice Ornaments

Here's a quick and easy project using wood slices, glitter paint and a dimensional medium to create sparkly, festive ornaments.

To make the ornament:
  • Spread an even layer of diamond paint on to the wood slice with a paintbrush.
  • Leave to dry (it only takes a few minutes).
  • Repeat on the other side.
  • Draw a snowflake pattern onto the painted surface using the Crystal Drops.
  • Add some small dots around the snowflake using the Crystal Drops.
  • Leave to dry thoroughly (a few hours or overnight).
  • If desired do the same on the other side.
  • Thread some ribbon or sparkly twine through the hole at the top of the wood slice.
The glitter paint comes in lots of different shades - from gold to hot pink! Check out the range here.


Supplies:
Aladine Izink Diamond Paint https://tidd.ly/3DRvFL9
Tonic Nuvo Crystal Drops - White https://tidd.ly/322QAxC

14 December 2021

Nordic Winter Digital Paper Set - Card 1

I recently downloaded the Nordic Winter Christmas Backgrounds digital paper set.  I wanted to do a 10 cards 1 paper pack for this set, but I don't think that I'll have time to get that all done.  So I'm going to post about each card as I go rather than waiting for all the cards to be completed.

Nordic Christmas Digital Paper Set by Green Light Ideas (via CreativeFabrica.com)

To flesh out the paper pack I used the colour picker tool in my graphics program on the patterned paper to create some solid-colour coordinating cardstock  in pink, brown, grey, beige and blue.  I also made some generic Christmas sentiments using the brown background.  Take a look at this post to find out create your own sentiment strips. 

To make the card:

  • Draw (or print) a template for a Christmas jumper (sweater) onto plain white card, trace around it on the reverse of the patterned papers and then cut it out.
  • Trace around just the neck, cuffs and bottom of the jumper on plain white card, cut them out and glue them into place.
  • The card blank is 10.5 x 14.5cm.
  • Cut a piece of 10 x 14cm printed brown cardstock and glue to the card blank.
  • Cut a piece of 9.5 x 13.5cm blue and grey argyle patterned paper and layer on top of the brown card.
  • Glue the jumper (sweater) to the front of the card.  Use foam tape for added dimension (optional).
  • Place a sentiment of your choosing below the jumper (sweater). 

Here's the finished card:


Watch the process video:


Supplies:

280gsm+ White Card

190gsm matte printer paper* to print:

  1. Nordic Winter Christmas Backgrounds digital paper set 
  2. Brown cardstock (use the colour picker tool in a graphics program to get the same brown as on the patterned paper)
  3. Christmas sentiment strips on brown background (handmade)

*I get my photo paper from StinkyInk.

11 December 2021

Stained Glass Papercut Collection - Peacock

Here's another design from the Stained Glass Papercut Collection from CraftWorld.  I love peacocks, so it was a given that this would be one of the first designs that I chose from the collection.


To make this card:

  • I wanted to back the peacock with a colourful patterned paper, so I imported the SVG to Canvas Workspace and created a mat to fit the peacock by drawing around it with the Path Tool.  So now when I resize the peacock design I can resize the mat at the same time!
  • The SVG was 8.5 x 14cm.  So I cut a piece of gold glitter card to 9 x 14.5cm and the card blank was 9.5 x 15cm.  
  • I glued the papercut and mat to the gold (champagne) glitter card, and then onto the card blank.
  • I added some gems to the peacock's tail in a coordinating peacock green.
It's a relatively simple design, but it has a lot of impact.  I can't remember where I got the glitter card from, but it is absolutely gorgeous 😍.

The papercut includes the sentiment "Best Wishes" , but it would be easy enough to make some additional sentiments.  The Breamcatcher font would fit the Art Deco aesthetic very well and is available to download for free.

The patterned paper that I used for the peacock is from this set.

Get the Stained Glass Peacock cut files and others from the collection here.

10 December 2021

DIY Hanging Hearts - No Craft Supplies Required!

Back in March I released a Skillshare class about crafting with digital supplies.  The class is about making use of digital supplies to create physical items - in this case hanging hearts for home décor.  

I made a few samples, but I just realised that I haven't shared them on the blog!  I used old cereal boxes for the heart base, and the background and embellishments are items that I downloaded, printed and cut out.  

This was the prototype that I made when I was feeling out the idea for the class:


I wanted to show how the same basic ingredients could be used to produce different results, so this was an alternative arrangement that I designed:

I also had the idea to make the butterfly a real statement, so in this example I put it front and centre surrounded by the flowers and foliage to give a wreath-like effect.


For the final example I wanted to use a different papers from the sets that I used to make the hearts.  I also wanted to show a slightly different way to use the elements and still achieve a nice result.


The only supplies used were old cereal boxes, printer paper, scissors and glue.  All of the digital resources that I used in the class are available to download for free!


Free Mixed Media Painted Butterflies

Free Rose Gold Floral Sprays

Free Fantasy Watercolor Digital Paper Set

If you want to find out more, head over to Skillshare and check out the class here.  If you aren't a member you can get a free 14-day Premium membership trial which will allow you to watch this class and hundreds of others.  While you're there, take a look at my Easel Card class as well.

09 December 2021

Stained Glass Papercut Collection - Rose Buds

I was browsing the CraftWorld website a couple of weeks ago and came across a call for digital cut file testers.  On a whim I applied and imagine my delight when they sent me a bunch of files to try out!

There are 9 files in the Stained Glass Collection consisting of a mix of traditional stained glass imagery as well as some landscapes and florals.  For the first card that I made, I used the Rose Buds set.


  • First of all I imported the SVG into a graphics program and adjusted the line colour so that it was very faint.  
  • Then I printed that out to use as a painting guide.  I used Derwent Inktense pencils and a water brush to colour in most of the elements. 
  • I cut the file (being sure to keep the same dimensions* as the printed version) from black card and then glued that on top of the coloured image and put it onto a card blank.
  • To finish the card I added some gold gems and a sentiment strip, which I popped up with foam tape.

*For this card the SVG had width of 9cm.  The card blank was 10 x 16cm.

Originally a set of metal dies, which are no longer available to buy, the designs have been resurrected as SVG cut files.  Get the full set from CraftWorld.

29 October 2021

Friday Favourites - Watercolour Christmas Digital Paper Pack

Some affiliate links used. If you follow a link and then make a purchase I will receive a commission at no additional cost to you. 
All of the products mentioned in this post are products that I have bought and paid for myself.

Last year I did a 10 Cards 1 Kit post where I used a paper pack as my "kit".  I like the idea of doing something similar and this Christmas-themed paper pack that I found at Creative Fabrica seemed like a good fit.  I like the mix of colours and imagery and the potential to make a complete card kit from it.  


To make up the card kit you could:

  • use a graphics program to separate the gingerbread, holly sprigs, candy and poinsettias into individual files to give a set of embellishments.  
  • print the backing papers as is (in 12x12 format) or manipulate them in a graphics program to create a smaller scale repeat as the patterns are (more-or-less) seamless.
  • use the colour picker tool to create your own coordinating plain card for matting and layering.
  • create a sheet of generic sentiments (like in this blog post) for your card fronts or interiors.
  • bring in some other elements from your stash (like glitter, glitter card, mirror card, gems etc.) to add some pizzazz...

…and you've made your own card kit!  I'll make a separate post (and maybe a video) with more details and the results, so stay tuned.

22 October 2021

Friday Favourites - Layered Floral Letters

Some affiliate links used. If you follow a link and then make a purchase I will receive a commission at no additional cost to you. 
All of the products mentioned in this post are products that I have bought and paid for myself.

Welcome to a new feature - Friday Favourites.  Every Friday I'll be posting my favourite finds of the week.  


This week I'm loving these layered floral letters from Design Bundles.  As soon as I saw them, I was in love 😍.  Although designed for laser cutting, I wanted to see how they would work using cardstock (of course!).  And I am so happy with how they turned out.


I used 250-270gsm cardstock and set the height of the letters to 145mm.  That combination worked really well, but I haven't tried making larger letters yet .  Depending on whether they would be framed or stand-alone I would consider heavier weight cardstock for larger letters or perhaps doubling-up on each layer, or maybe using greyboard instead of cardstock.  


The letters are only available to Design Bundles Plus Members but you can get Plus Membership for $1 for the first month, which includes 10 Plus credits to spend on any Plus products.  (At the time of publishing this post there were over 125,000 plus products listed!)  You can also buy additional Plus credits for $1 (+VAT) each.

There are three membership tiers - Bronze, Silver and Gold - with prices starting at $7.99 per month.  Find out more about what you can get as a Plus member here.

11 October 2021

Rest In Pieces Coffin Box

Some affiliate links used. If you follow a link and then make a purchase I will receive a commission at no additional cost to you. 
All of the products mentioned in this post are products that I have bought and paid for myself.

So yesterday while I was organising my latest batch of cut files I was hit with a sudden compulsion to make a coffin box 🤷.  I really don't know where that came from, because none of the files that I was organising were even remotely Halloween related! I could have purchased or downloaded one but I felt like I wanted to make my own, so I did.

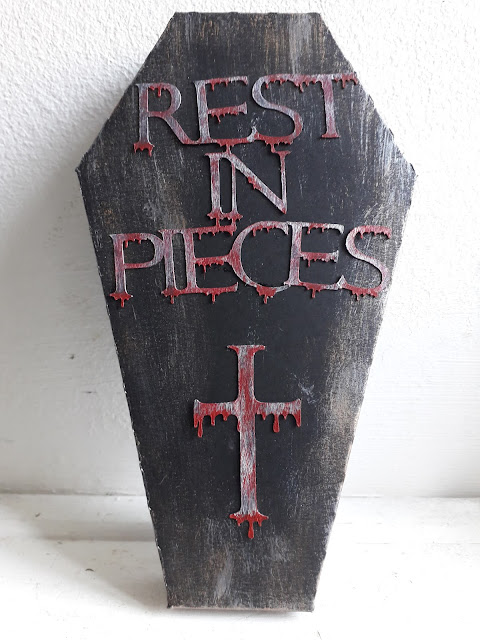
Coffin treat box with Rest In Pieces written on it and a cross both dripping with blood.
Coffin treat box for halloween

  • For the text and cross I used the Kiss My Lips font.  It's actually not a "spooky" font, but I thought that it would give a great dripping blood effect.  In Canvas Workspace I welded the words "REST IN PIECES" together and the letters T and I to make the cross. 
  • Then I cut all the elements from black card.
  • After assembling the box lid and base I used a synthetic bristle brush to paint a very light coating of silver acrylic paint and bronze gouache on to the coffin lid to distress the black.
  • I also used the synthetic bristle brush to roughly paint over the text with silver acrylic paint. (I didn't want neat, even coverage.)
  • With a very small amount of scarlet red acrylic paint I roughly painted over the silver, being sure to leave some of the silver showing.
  • With a fine detail brush I used the red acrylic paint to saturate the drips.
  • Finally I glued the text and cross onto the front of the coffin lid.
  • Fill with treats (or tricks!).

Supplies

Coffin cut file for ScanNCut (free download): https://www.dropbox.com/s/220ywu7exj30ig9/coffin%20box%202.fcm?dl=0

Rest In Pieces text for ScanNCut (free download): https://www.dropbox.com/s/x2eyxfje0h8rcpc/rest%20in%20pieces%20text.fcm?dl=0

Kiss My Lips Font: https://www.creativefabrica.com/product/kiss-my-lips-3/ref/98543/

Arteza Acrylic Paint: https://arteza.co.uk/collections/acrylic-paint/products/acrylic-paints-set-12-colours

Arteza Metallic Acrylic Paint: https://arteza.co.uk/collections/acrylic-paint/products/metallic-acrylic-paint-set-12

Arteza Metallic Gouache Paint: https://arteza.co.uk/collections/gouache-paint/products/metallic-gouache-artist-paint-12ml-tubes-set-of-36

Arteza Detail paint brush set: https://arteza.co.uk/collections/artist-brushes/products/detail-paint-brush-set-of-15

Black card: https://tidd.ly/3GPZosv


09 August 2021

Glitter Background Floral Greetings Cards

Affiliate links used. If you follow a link and then make a purchase I will receive a commission at no additional cost to you. 
All of the products mentioned in this post are products that I have bought and paid for myself.

Hello!  Today I'm sharing a few cards that I have made by creating simple backgrounds with Aladine's Izink Gold Diamond Paint and some graphics from the Vanilla Blossom Watercolor Set from The Hungry Jpeg. 

In case you've never heard of it, Izink Diamond Paint is a glitter paste and paint in one.  Although you can apply it with a paintbrush it wouldn't really work for painting fine details.  It would work really well with stencils though.  I love that it is super sparkly and that the paint is not too wet like a lot of other glitter paints/glues.  I've purposely left the stripes and spots a little bit rough but it's up to you how neat and tidy they are.

The Vanilla Blossom Watercolor set has a number of elements including florals, foliage, butterflies and birds.  One of the florals had three complementary images that would work as decoupage.  


I filled an A4 sheet with the various images that I wanted to use and printed that out.  If you're going to try to decoupage remember to group all of the relevant images and resize them together.

I'm using sentiment strips that I created myself.  Check out this blog post to see how I made them.

Card 1

- Paint horizontal stripes across the card front and allow to dry.
- Cut out the three different floral images (flower with stem, flower with no stem and flower on its own).
- Layer the floral images using foam pads to create a 3D decoupage effect.
- Glue the decoupaged flower to the front of the card and add a sentiment.
Floral card with horizontal gold glitter stripe background


Card 2

- Paint horizontal stripes across the card front and allow to dry.
- Cut out one each of the flower with stem, and the flower on its own and stick them together with foam pads.
- Rotate the card to landscape orientation so that the fold is at the top.
- Glue the floral to the left-hand side of the card front and add a sentiment.


Card 3

- Use a saucer, bowl or similar to paint curved stripes across the card front and allow to dry.
- Cut one each of the flower with stem, flower and leaves with no stem, flower on its own and a butterfly.
- Layer the flowers with foam pads and glue it in the bottom right corner of the card front.
- Glue the butterfly in the top left corner (ish) and add a sentiment.
Floral card with gold glitter curved stripe background


Card 4

- Paint rough circles about 1.5cm / ⅝ inch onto the card front and leave to dry.
- Cut out two of the flower with leaves, one flower on its own and a butterfly.
- Decoupage one of the flowers with leaves and the flower on its own with foam pads.
- Arrange the flowers toward the centre of the card and glue them down.
- Add a butterfly (I chose the top left corner) and add a sentiment.


Use a black card blank for an alternative look.

I really like the gold, but the diamond paint comes in a few different colours so it could be fun to try out different card and paint combinations as well as different florals, or even multicoloured glitter paint backgrounds.

Watch the process video:


SUPPLIES


21 July 2021

Floral Collage Canvas

So, you've accumulated a load of patterned papers (either physical or digital), but you have no idea what to do with them.  At least, that's a problem that I have. I'm not a prolific card maker, nor do I scrapbook, but I can't resist a pretty patterned paper or an interesting background texture.  So what to do?  Collage, that's what!

I tend to overthink things and spent ages trying to decide what to collage.  In my mind I felt like it needed to be some grand, artistic piece.  But it really didn't have to be so complicated.   In the end I went with a simple floral layout inspired by an embroidery design.

I used papers from my digital stash, but any papers would work.  This would actually be a great project for using up paper scraps.  I chose a newsprint, a pink paper with a a slight texture for the flowers, two different green papers for the stems and leaves, yellow paper for the flower centres and a lovely bluey-purple paper for some berries.  I've listed links to all the papers used at the end of the post.


Step-by-step

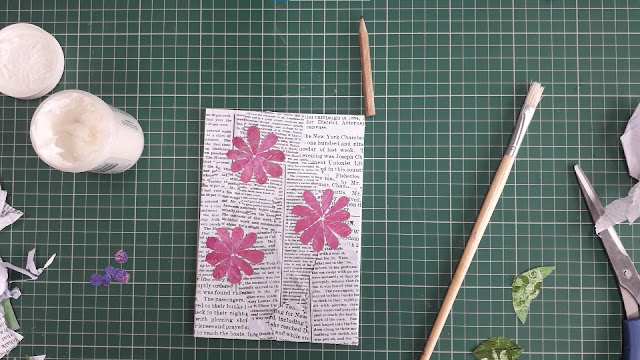
1.  I printed out three sheets using one of the designs in the Old Newspaper Textures set.  The original file is a 12 x 12 sheet and the text was quite large.  So I resized it a couple of times to make the print smaller.  I tore pieces from all three sheets and stuck them down on the canvas board trying to get a nice mix between the different text sizes.


2.  Using the pink sheet I cut a strip about one inch wide and then cut about 30 petals shapes.


3.  I arranged the petals on to the canvas board to create 3 flower heads.


4.  I cut thin stems from one of the green papers and various sized leaves from the other green paper, then arranged them onto the board.


5.  I cut a few small circles for berries from the blue-purple paper and three yellow circles for the flower centres and added them to the piece as well.


At this point the collage was finished, but I felt like it didn't stand out from the background enough. So I went around the edges of the petals, leaves and berries with my Derwent Inktense pencils to help lift the composition off the page.  I think that I might have overworked it a bit, but it does seem to have done the job and I still like the end result.  (Original on the left, "enhanced" on the right.)


Tutorial

Watch the process video on my YouTube channel.


SUPPLIES

5 x 7" Canvas Boards  (you could also use scrap cardboard)
Derwent Inktense Pencils

Backgrounds and digital papers:
Glop Wallpaper 08 (sample freebie available with fewer backgrounds) [apple green paper]
Glop Wallpaper 16 (sample freebie available with fewer backgrounds) [pink paper]
Pattys Desert Strips 3 Bundle (sample freebie available with fewer backgrounds) [blue-purple paper]


09 July 2021

DIY Sentiment Strips

Sentiment strips can be a really elegant addition to your card fronts, home décor projects, mixed media artwork or scrapbook pages.  They generally come pre-printed or as a stamp (and die) set.  Both of those options are just fine, but they can be costly and you are limited to the words and phrases that are offered, the font used, the size of the strip etc.  Making your own sentiment strips is both cost-effective and non-limiting because you choose the words and phrases, the font, the size, the colour scheme and so on.

Pile of sentiment strips with white text on a black background

In the following example I used Photoshop to create my sentiment strips, but you could also do this in a word processing program if you don't have a graphics program.


1. Create a new project.  I used A5 size because I couldn't think of enough sentiments to fill an A4 page!  But in hindsight I could have just doubled-up on some of them 🙃.  

2.  Draw a rectangle to cover the sheet and fill it in black (or whatever colour scheme you fancy).

3.  Using the text tool, select the desired font and create a page full of short sentiments to cover a variety of occasions and lay them out onto the (black) background.  If using a dark background colour remember to select white or a light colour for the text and vice versa.


4.  When the page has been filled and you are happy with your sentiment sheet print it out, then cut out the strips as you need them or cut them all out and keep them in a container so that they're ready to go.


Remember to set your print settings to best quality and consider using photo paper rather than copy paper to get a good depth of colour in the background.

06 July 2021

Converting Fonts to Cut Files for Electronic Cutting Machines


I really like the papercut effect of the font Monogram Daishy In order to create an actual papercut monogram with my ScanNCut I would need to convert the font from OTF/TTF formats to a compatible format. The FCM format is specifically for the ScanNCut. The SVG format will work with most electronic cutting machines including the ScanNCut.  


Converting fonts for the ScanNCut

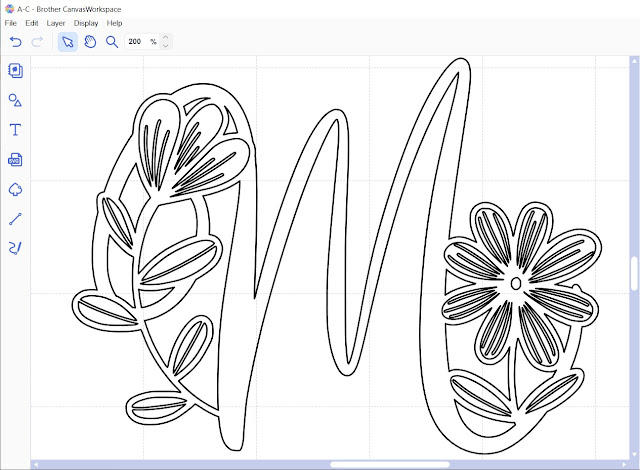
Simply using the text tool in Canvas Workspace doesn't always work.  With more complicated or intricate designs the cut lines can end up crooked and jumbled and would absolutely not work as a cut file.


Monogram Daishy Font in Canvas Workspace using text tool


The easiest solution is to use the ScanNCut Type Converter - a free program that you can download from the Brother website for converting OpenType and TrueType fonts to FCM cut files.  

Brother ScanNCut Type Converter overview


You can only type a single line of text into the converter and it all has to fit within the 30cm (12") width of the mat, so you may have to either save the letters individually or in small groups depending on the size of the font.  My preference is to save as many letters as possible in one go and then resize them in Canvas Workspace afterwards. 

You can clearly see the difference between using the text tool directly in Canvas and using the Type Converter before importing the file into Canvas.


Monogram Daishy Font in Canvas Workspace using Type Converter


Bear in mind that some font designs are best suited for larger scales due to the intricacy of the design or areas with narrow lines and small apertures.  Also some font designs might not translate well to a cut file, for example if the style is sketchy.

I am not familiar with Cricut Design Space or Silhouette Studio, but you can also create cut files from fonts by using a graphics program to convert the font to SVG format.  


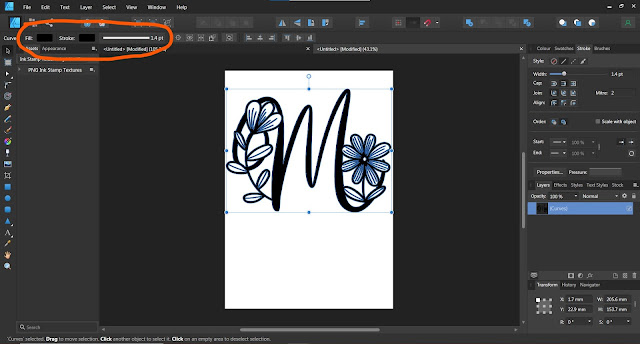
How to convert a font to an SVG in Affinity Designer 


- open a new document.  
- select the Type Tool (1) and type out your letter(s).  
- select "Layers - Convert to Curves" (2 and 3).  


- select a colour for the stroke and set the stroke width to >0pt. 


- with the letter(s) selected, go to "File - Export..."
- select "SVG" for the file format and "selection only" for the Area (to export only the areas of interest and not the whole page)


How to convert a font to an SVG in Photoshop


- open a new document.  
- select the Type Tool (1) and type out your letter(s).  
- select "Type - Convert to Shape" (2 and 3).  


- select "Layer - Export As..."

- then select SVG for the format and click export.


The font is now ready to use with your cutting machine! 

Get the Monogram Daishy Font:

Explore more great monogram fonts here, here and here.

23 June 2021

Quick and Easy Floral Greetings Cards

I may have mentioned before that I absolutely love buying craft supplies!  It's bordering on an addiction.  The problem with that is that it is costly and the supplies take up a lot of space (that I don't have).  So I've been trying my hardest not to succumb to all the juicy deals that seem to keep popping up in my inbox lately 😩.  To help keep my cravings at bay, I've been scouring the "Freebies" section at Creative Fabrica.  It's the perfect foil to my buying habit - the products don't cost anything, they only take up space on my hard drive and I get to feel the same joy and satisfaction that I get from buying and receiving physical items 🙌.

Anyway, on to the project!  These floral greetings cards are really pretty and quick and easy to make.


 Aside from your computer and printer, you will need:
Step 1:
Download the clipart and import the images into a graphics program, e.g. Photoshop.  Adjust the size so that they are about 10 x 13cm (to fit an A6 card) or whatever dimensions you need for the card that you want to make.

Step 2:
Position the graphics so that they are one side of the page (rotate if required and use guides to help you position them), then print out.


Step 3:
Cut the A4 sheet in half, then score and fold to create two greetings cards and put them aside.


Step 4:
Create another page in your graphics program using the graphics from step 2, but this time fill the page, then print.


Step 5:
Cut out one central flower from each design on the printed sheet.


Step 6:
Use foam pads or dimensional glue to stick the cut flower onto the greetings card base to add dimension.

Step 7:
Download the font and install on your computer.

Step 8: 
In your graphics program create a new project with an A5 sheet.  Draw a rectangle to cover the sheet and fill it in black.

Step 9:
Using the text tool, select the Underwood Champion font and create a page full of short sentiments to cover a variety of occasions and lay them out onto the black background.  Select white for the font fill colour.  When you are happy with your sentiment sheet print it out.


Step 10:
Cut out one of the sentiment strips and attach it to the front of the greetings card.  


Your card is complete!  I chose to do some decoupage on the front because I think it adds something extra, but that is optional (steps 4-6). 

The sentiment sheet does take a little time to put together, but once you have done it choosing a sentiment is very quick.

You could easily make a stack of these to have on hand for any occasion or to sell or gift as a set.  

Head over to Creative Fabrica to grab these assets and make your own cards, or check out the vast selection of fonts and graphics (both free and paid for) and be inspired to bring your own creations to life.