Search This Blog

29 October 2021

Friday Favourites - Watercolour Christmas Digital Paper Pack

Some affiliate links used. If you follow a link and then make a purchase I will receive a commission at no additional cost to you. 
All of the products mentioned in this post are products that I have bought and paid for myself.

Last year I did a 10 Cards 1 Kit post where I used a paper pack as my "kit".  I like the idea of doing something similar and this Christmas-themed paper pack that I found at Creative Fabrica seemed like a good fit.  I like the mix of colours and imagery and the potential to make a complete card kit from it.  


To make up the card kit you could:

  • use a graphics program to separate the gingerbread, holly sprigs, candy and poinsettias into individual files to give a set of embellishments.  
  • print the backing papers as is (in 12x12 format) or manipulate them in a graphics program to create a smaller scale repeat as the patterns are (more-or-less) seamless.
  • use the colour picker tool to create your own coordinating plain card for matting and layering.
  • create a sheet of generic sentiments (like in this blog post) for your card fronts or interiors.
  • bring in some other elements from your stash (like glitter, glitter card, mirror card, gems etc.) to add some pizzazz...

…and you've made your own card kit!  I'll make a separate post (and maybe a video) with more details and the results, so stay tuned.

22 October 2021

Friday Favourites - Layered Floral Letters

Some affiliate links used. If you follow a link and then make a purchase I will receive a commission at no additional cost to you. 
All of the products mentioned in this post are products that I have bought and paid for myself.

Welcome to a new feature - Friday Favourites.  Every Friday I'll be posting my favourite finds of the week.  


This week I'm loving these layered floral letters from Design Bundles.  As soon as I saw them, I was in love 😍.  Although designed for laser cutting, I wanted to see how they would work using cardstock (of course!).  And I am so happy with how they turned out.


I used 250-270gsm cardstock and set the height of the letters to 145mm.  That combination worked really well, but I haven't tried making larger letters yet .  Depending on whether they would be framed or stand-alone I would consider heavier weight cardstock for larger letters or perhaps doubling-up on each layer, or maybe using greyboard instead of cardstock.  


The letters are only available to Design Bundles Plus Members but you can get Plus Membership for $1 for the first month, which includes 10 Plus credits to spend on any Plus products.  (At the time of publishing this post there were over 125,000 plus products listed!)  You can also buy additional Plus credits for $1 (+VAT) each.

There are three membership tiers - Bronze, Silver and Gold - with prices starting at $7.99 per month.  Find out more about what you can get as a Plus member here.

11 October 2021

Rest In Pieces Coffin Box

Some affiliate links used. If you follow a link and then make a purchase I will receive a commission at no additional cost to you. 
All of the products mentioned in this post are products that I have bought and paid for myself.

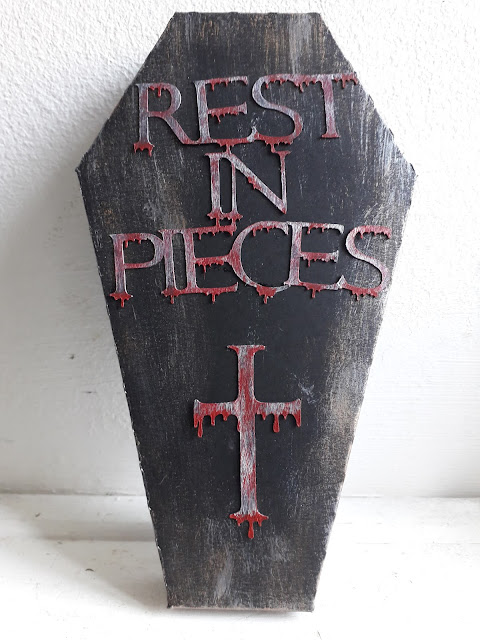
So yesterday while I was organising my latest batch of cut files I was hit with a sudden compulsion to make a coffin box 🤷.  I really don't know where that came from, because none of the files that I was organising were even remotely Halloween related! I could have purchased or downloaded one but I felt like I wanted to make my own, so I did.

Coffin treat box with Rest In Pieces written on it and a cross both dripping with blood.
Coffin treat box for halloween

  • For the text and cross I used the Kiss My Lips font.  It's actually not a "spooky" font, but I thought that it would give a great dripping blood effect.  In Canvas Workspace I welded the words "REST IN PIECES" together and the letters T and I to make the cross. 
  • Then I cut all the elements from black card.
  • After assembling the box lid and base I used a synthetic bristle brush to paint a very light coating of silver acrylic paint and bronze gouache on to the coffin lid to distress the black.
  • I also used the synthetic bristle brush to roughly paint over the text with silver acrylic paint. (I didn't want neat, even coverage.)
  • With a very small amount of scarlet red acrylic paint I roughly painted over the silver, being sure to leave some of the silver showing.
  • With a fine detail brush I used the red acrylic paint to saturate the drips.
  • Finally I glued the text and cross onto the front of the coffin lid.
  • Fill with treats (or tricks!).

Supplies

Coffin cut file for ScanNCut (free download): https://www.dropbox.com/s/220ywu7exj30ig9/coffin%20box%202.fcm?dl=0

Rest In Pieces text for ScanNCut (free download): https://www.dropbox.com/s/x2eyxfje0h8rcpc/rest%20in%20pieces%20text.fcm?dl=0

Kiss My Lips Font: https://www.creativefabrica.com/product/kiss-my-lips-3/ref/98543/

Arteza Acrylic Paint: https://arteza.co.uk/collections/acrylic-paint/products/acrylic-paints-set-12-colours

Arteza Metallic Acrylic Paint: https://arteza.co.uk/collections/acrylic-paint/products/metallic-acrylic-paint-set-12

Arteza Metallic Gouache Paint: https://arteza.co.uk/collections/gouache-paint/products/metallic-gouache-artist-paint-12ml-tubes-set-of-36

Arteza Detail paint brush set: https://arteza.co.uk/collections/artist-brushes/products/detail-paint-brush-set-of-15

Black card: https://tidd.ly/3GPZosv